
Status: CRA Classification Wizard and CRA DoC Wizard, November 2026. The version is shown in the footer.
This manual explains how to use the two wizards. It does not cover which questions come up or how to answer them. Each question has its own help for that (chapter 5). How your product is to be classified is your decision as the manufacturer; if in doubt, consult your legal adviser. For questions on using the wizards, DDAS helps you at [email protected]; errors and suggestions on the manual are welcome there too (chapter 14).
1. Overview
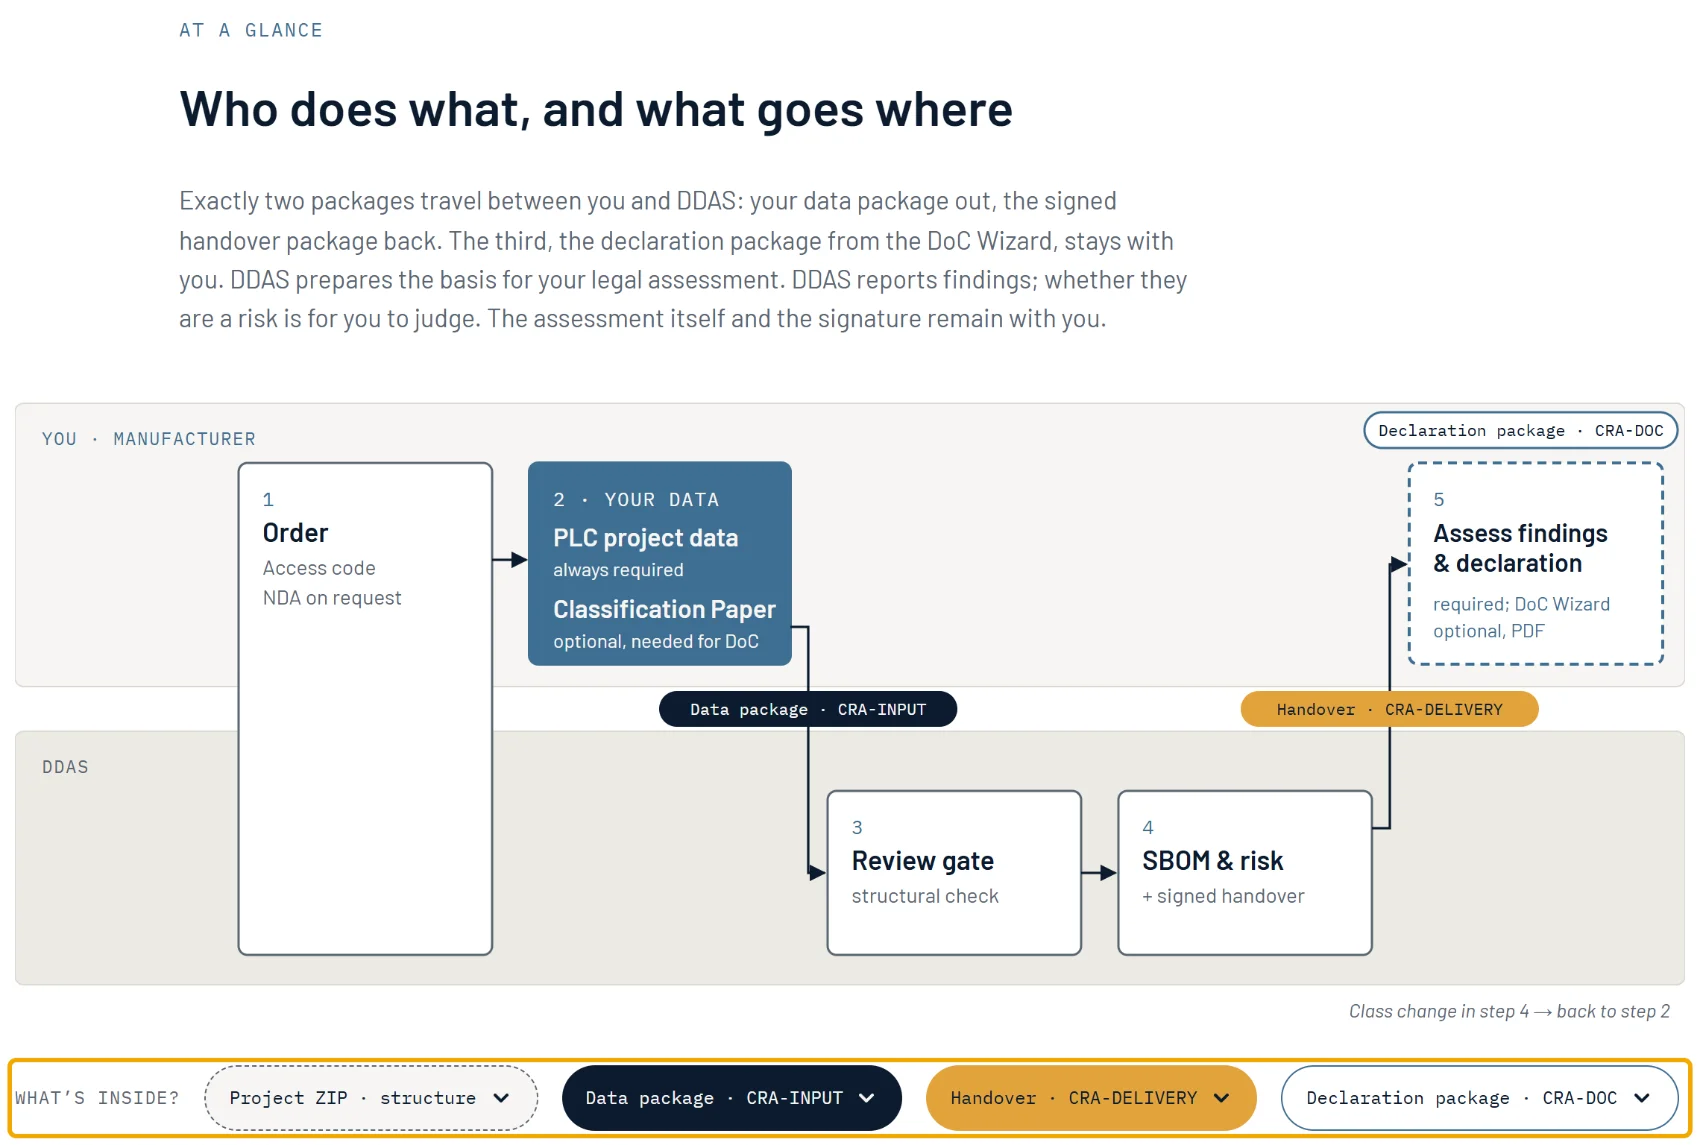
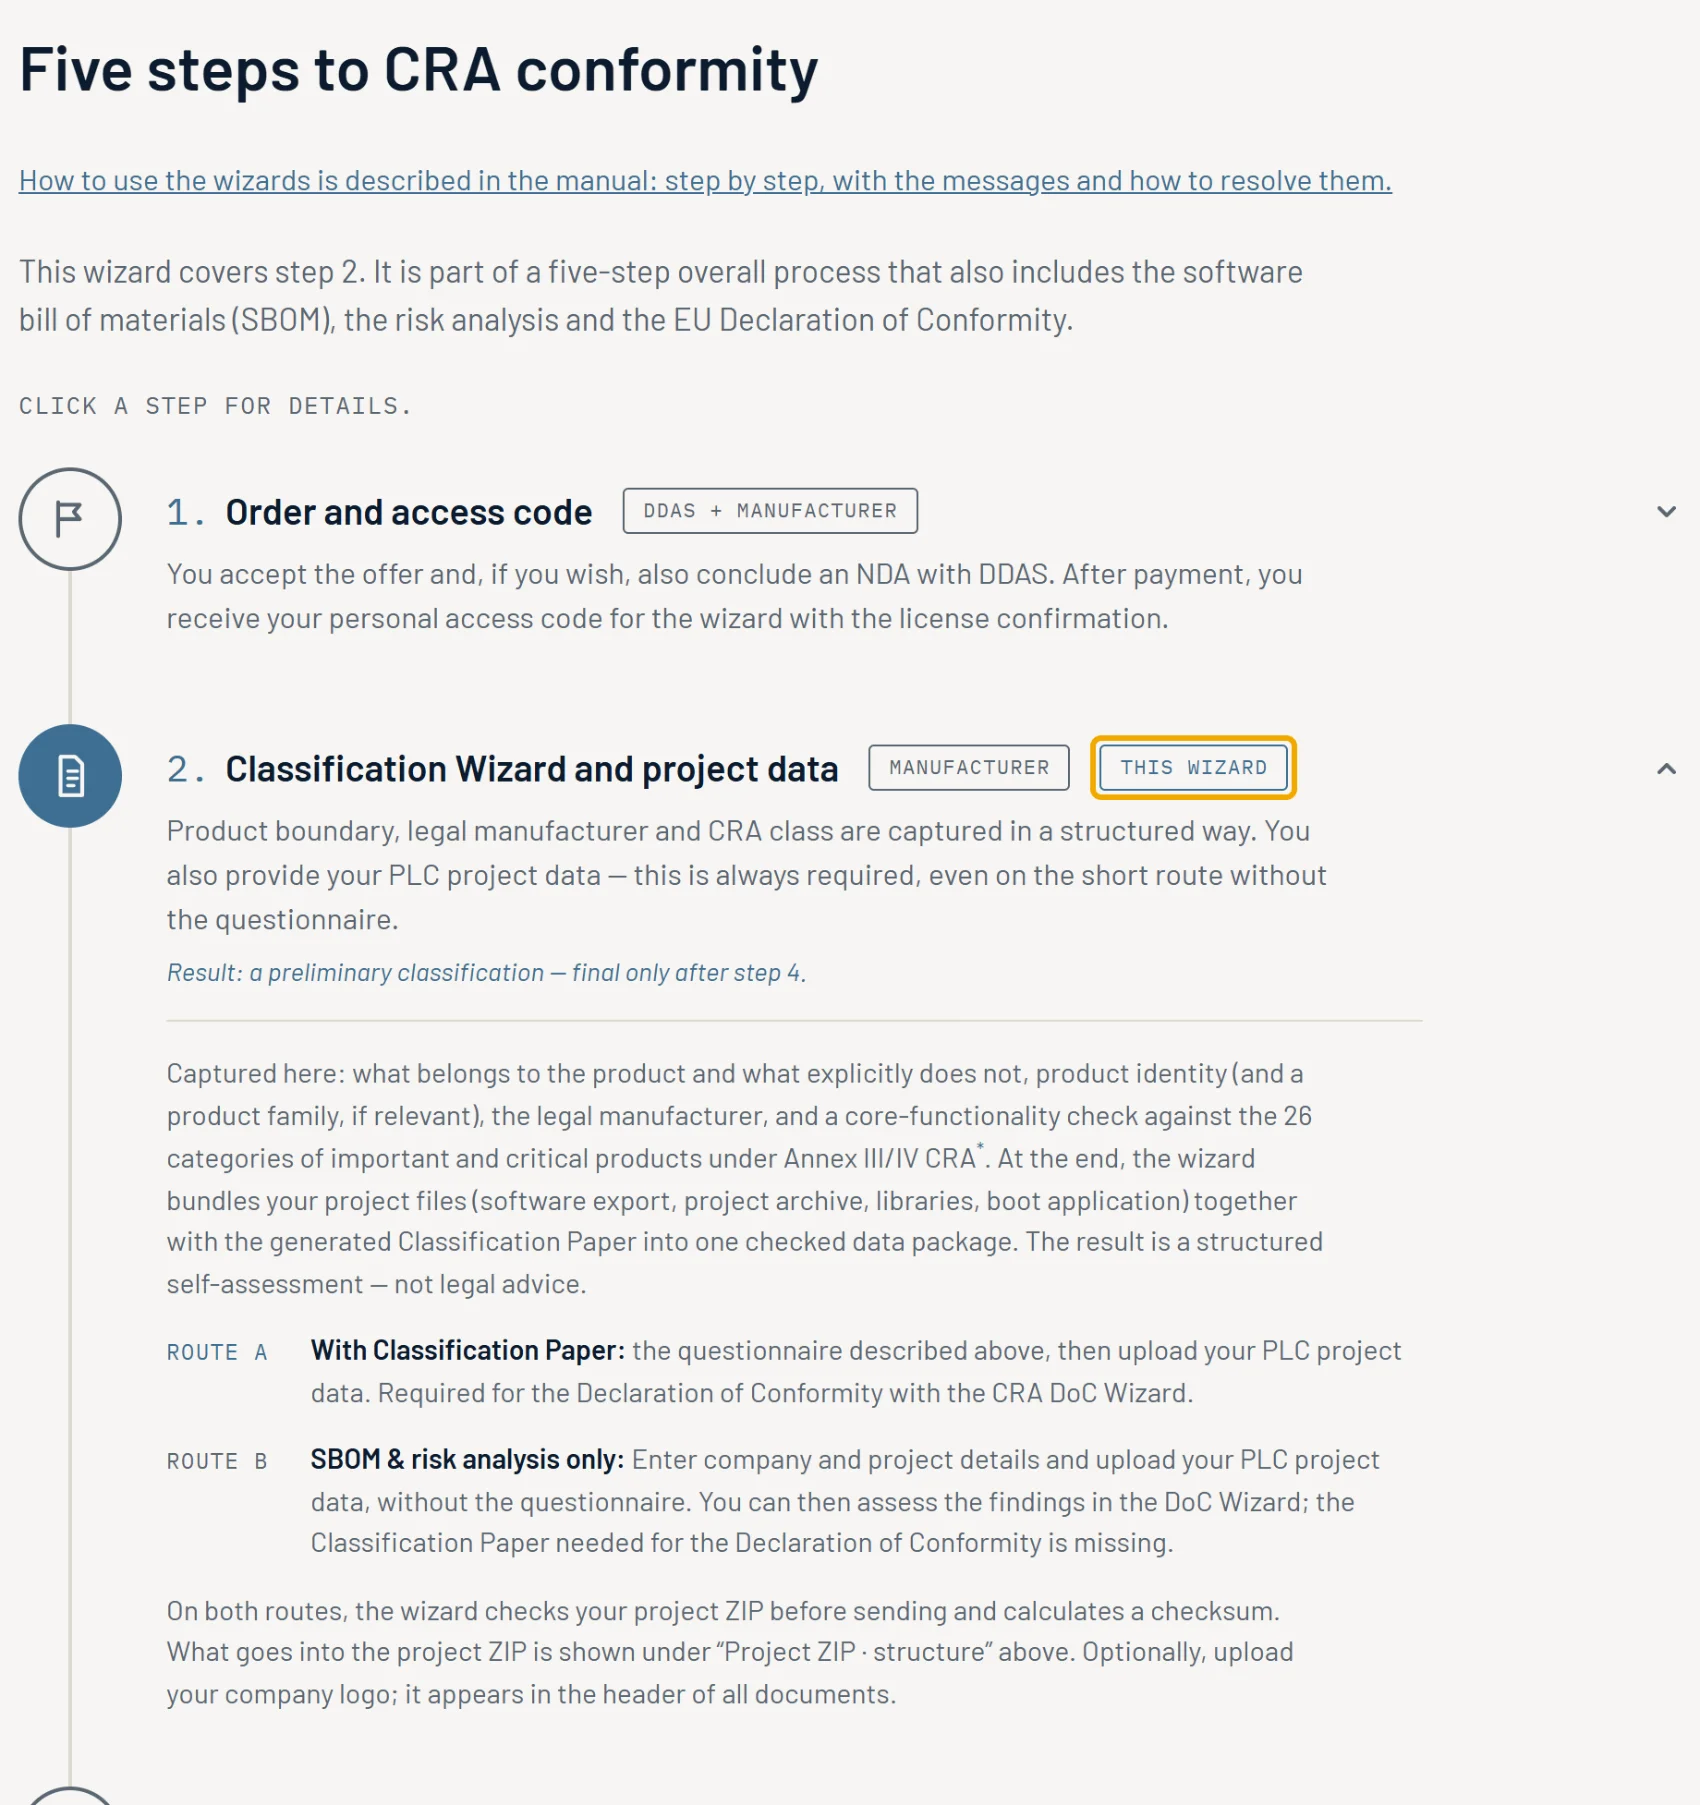
The DDAS CRA compliance package leads in five steps to the EU declaration of conformity under the Cyber Resilience Act. You complete two of the steps yourself in a wizard in your browser.
| Step | Title on the Wizards page | Who | Tool |
|---|---|---|---|
| 1 | “Order and access code” | You and DDAS | none: offer, order naming the contact person for the project data, NDA if you wish, license confirmation with access code |
| 2 | “Classification Wizard and project data” | You | CRA Classification Wizard |
| 3 | “DDAS review gate” | DDAS | no substantive or legal review, only structure and completeness; the check report calls it “Pre-check” |
| 4 | “SBOM, risk analysis & handover” | DDAS | the result is your handover package |
| 5 | “Assess findings and Declaration of Conformity” | You | CRA DoC Wizard |
Which wizard covers what
- CRA Classification Wizard (step 2): You enter company and project details, answer the questionnaire for the Classification Paper if you wish, and upload your PLC project. The result is the data package for DDAS.
- CRA DoC Wizard (step 5): You load the handover package from DDAS, assess the findings of the risk analysis (part 1) and issue the EU declaration of conformity (part 2). The result is the declaration package.
With the basic package, the Classification Paper and the declaration are not included: in the Classification Wizard you take the short route “SBOM & risk analysis only”, and in the DoC Wizard you only assess the findings. The Classification Paper and the declaration belong to the option you can book in addition.
The packages
Exactly two packages pass between you and DDAS: your data package (…_CRA-INPUT_EN.zip) goes to DDAS, and the signed handover package (…_CRA-DELIVERY_EN.zip) comes back. The declaration package (…_CRA-DOC_EN.zip) is created in the DoC Wizard and stays with you. In the end you hold two packages that you keep: the handover package and the declaration package. What the packages contain is shown on the Wizards page on ddas.digital under “What’s inside?” (buttons “Data package · CRA-INPUT”, “Handover · CRA-DELIVERY”, “Declaration package · CRA-DOC”).
What to have ready
- the access code from your license confirmation,
- the contact person for the project data whom you named in your order: only this person receives the links from DDAS for uploading the data package and for downloading the handover package,
- your decision on the language you need the documents in (chapter 2),
- manufacturer, project, version and the name of the person working through the wizard,
- your company logo as PNG or JPEG, if you wish (chapter 3),
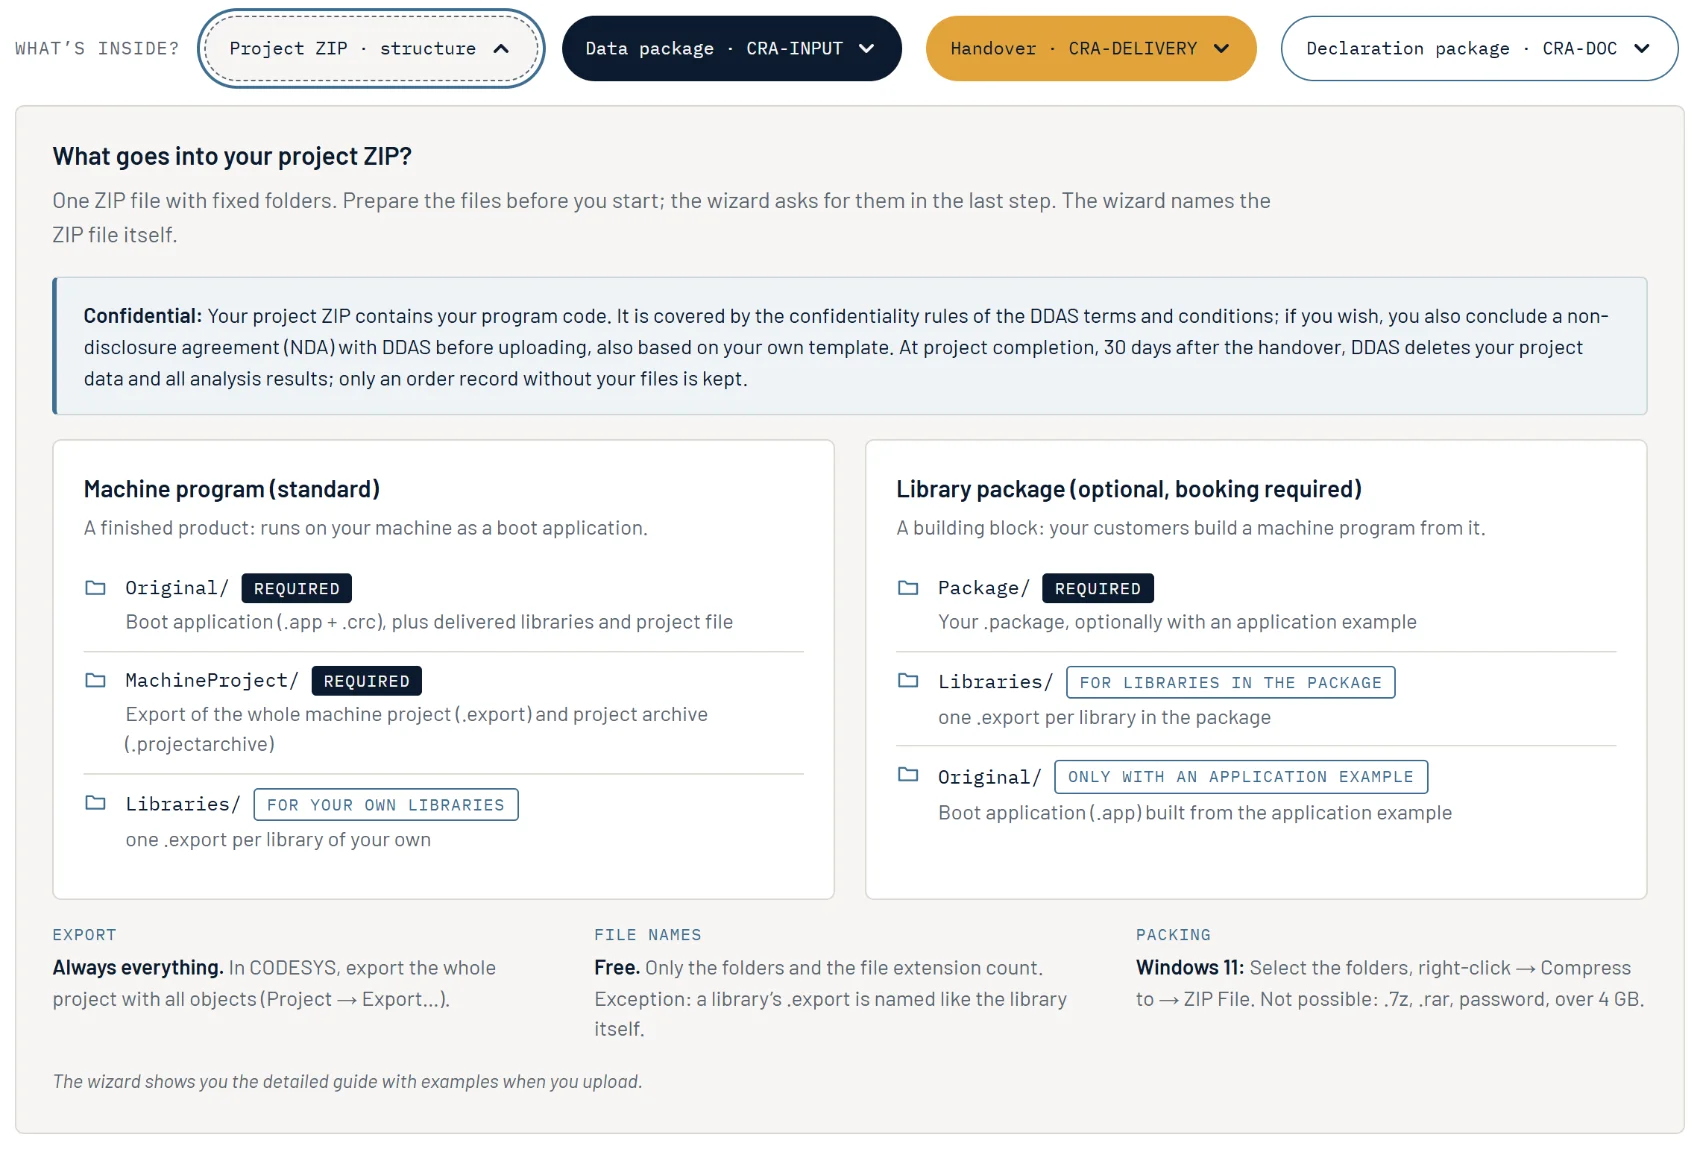
- your PLC project as a ZIP file with fixed folders (chapter 8); the Wizards page shows the structure under “Project ZIP · structure”,
- for a new version: your earlier handover package, your statement on the findings and your progress file (chapter 10).
2. Getting started: access code, language and wizard
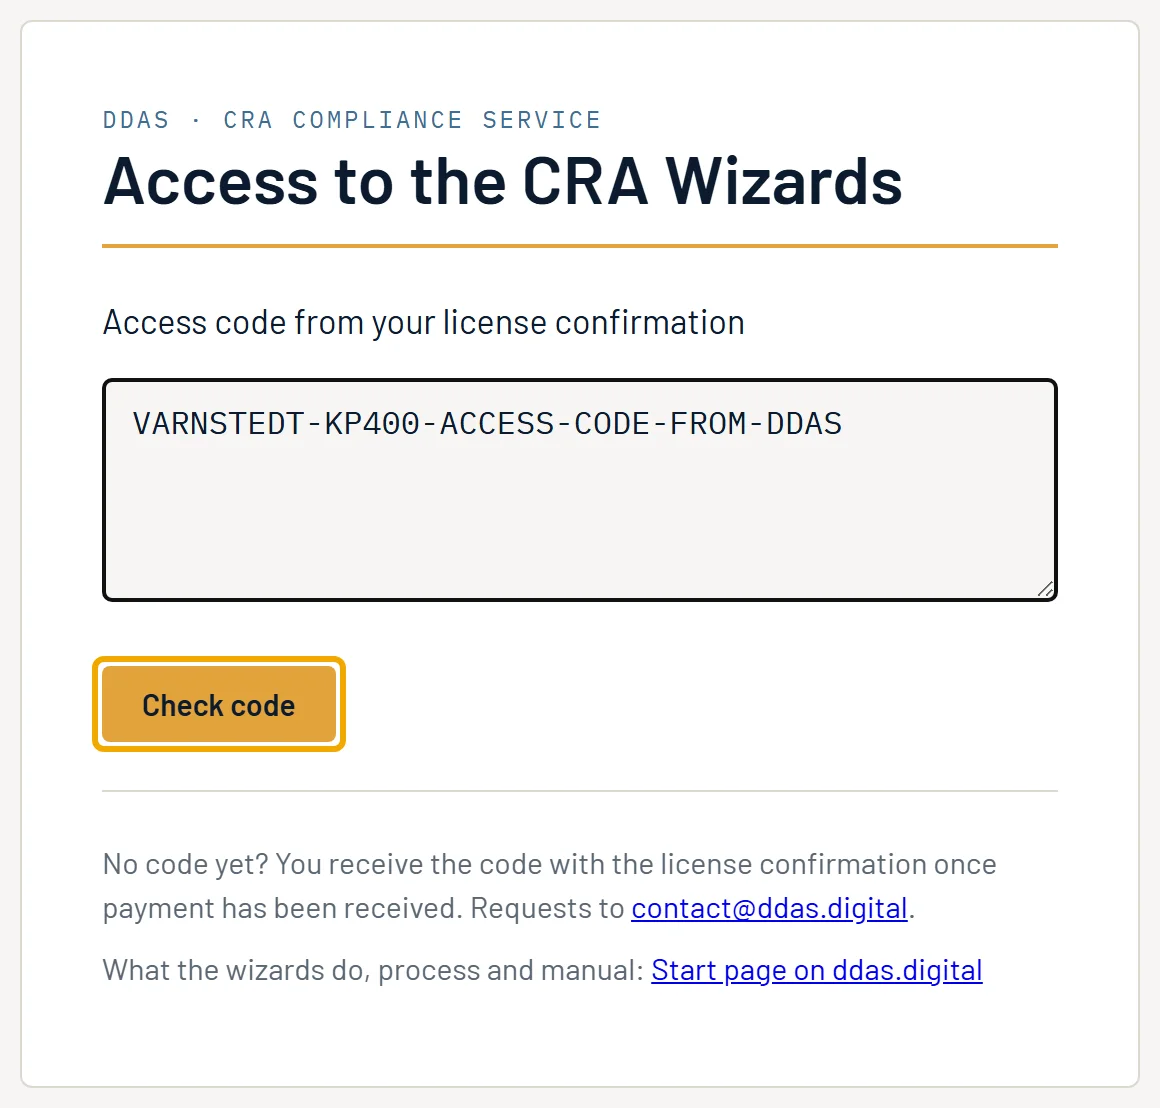
You open the wizards from the Wizards page on ddas.digital with “Start wizard” or directly at wizard.ddas.digital. The wizard opens in a tab of its own. First you enter the access code; the wizard then shows which order it applies to, and you choose the language and the wizard.
Entering the access code
- Paste the code into the field “Access code from your license confirmation”. The code is long; copy it from the license confirmation instead of typing it. The field shows it in full so that you can compare it with the original.
- Click “Check code” or press Enter. While the check runs, the button reads “Checking …”.
The buttons “DE” and “EN” at the top right set the language of this screen. Messages about the code are in chapter 12.
You receive the access code from DDAS once payment has been received, with the license confirmation. No code yet? Write to [email protected].
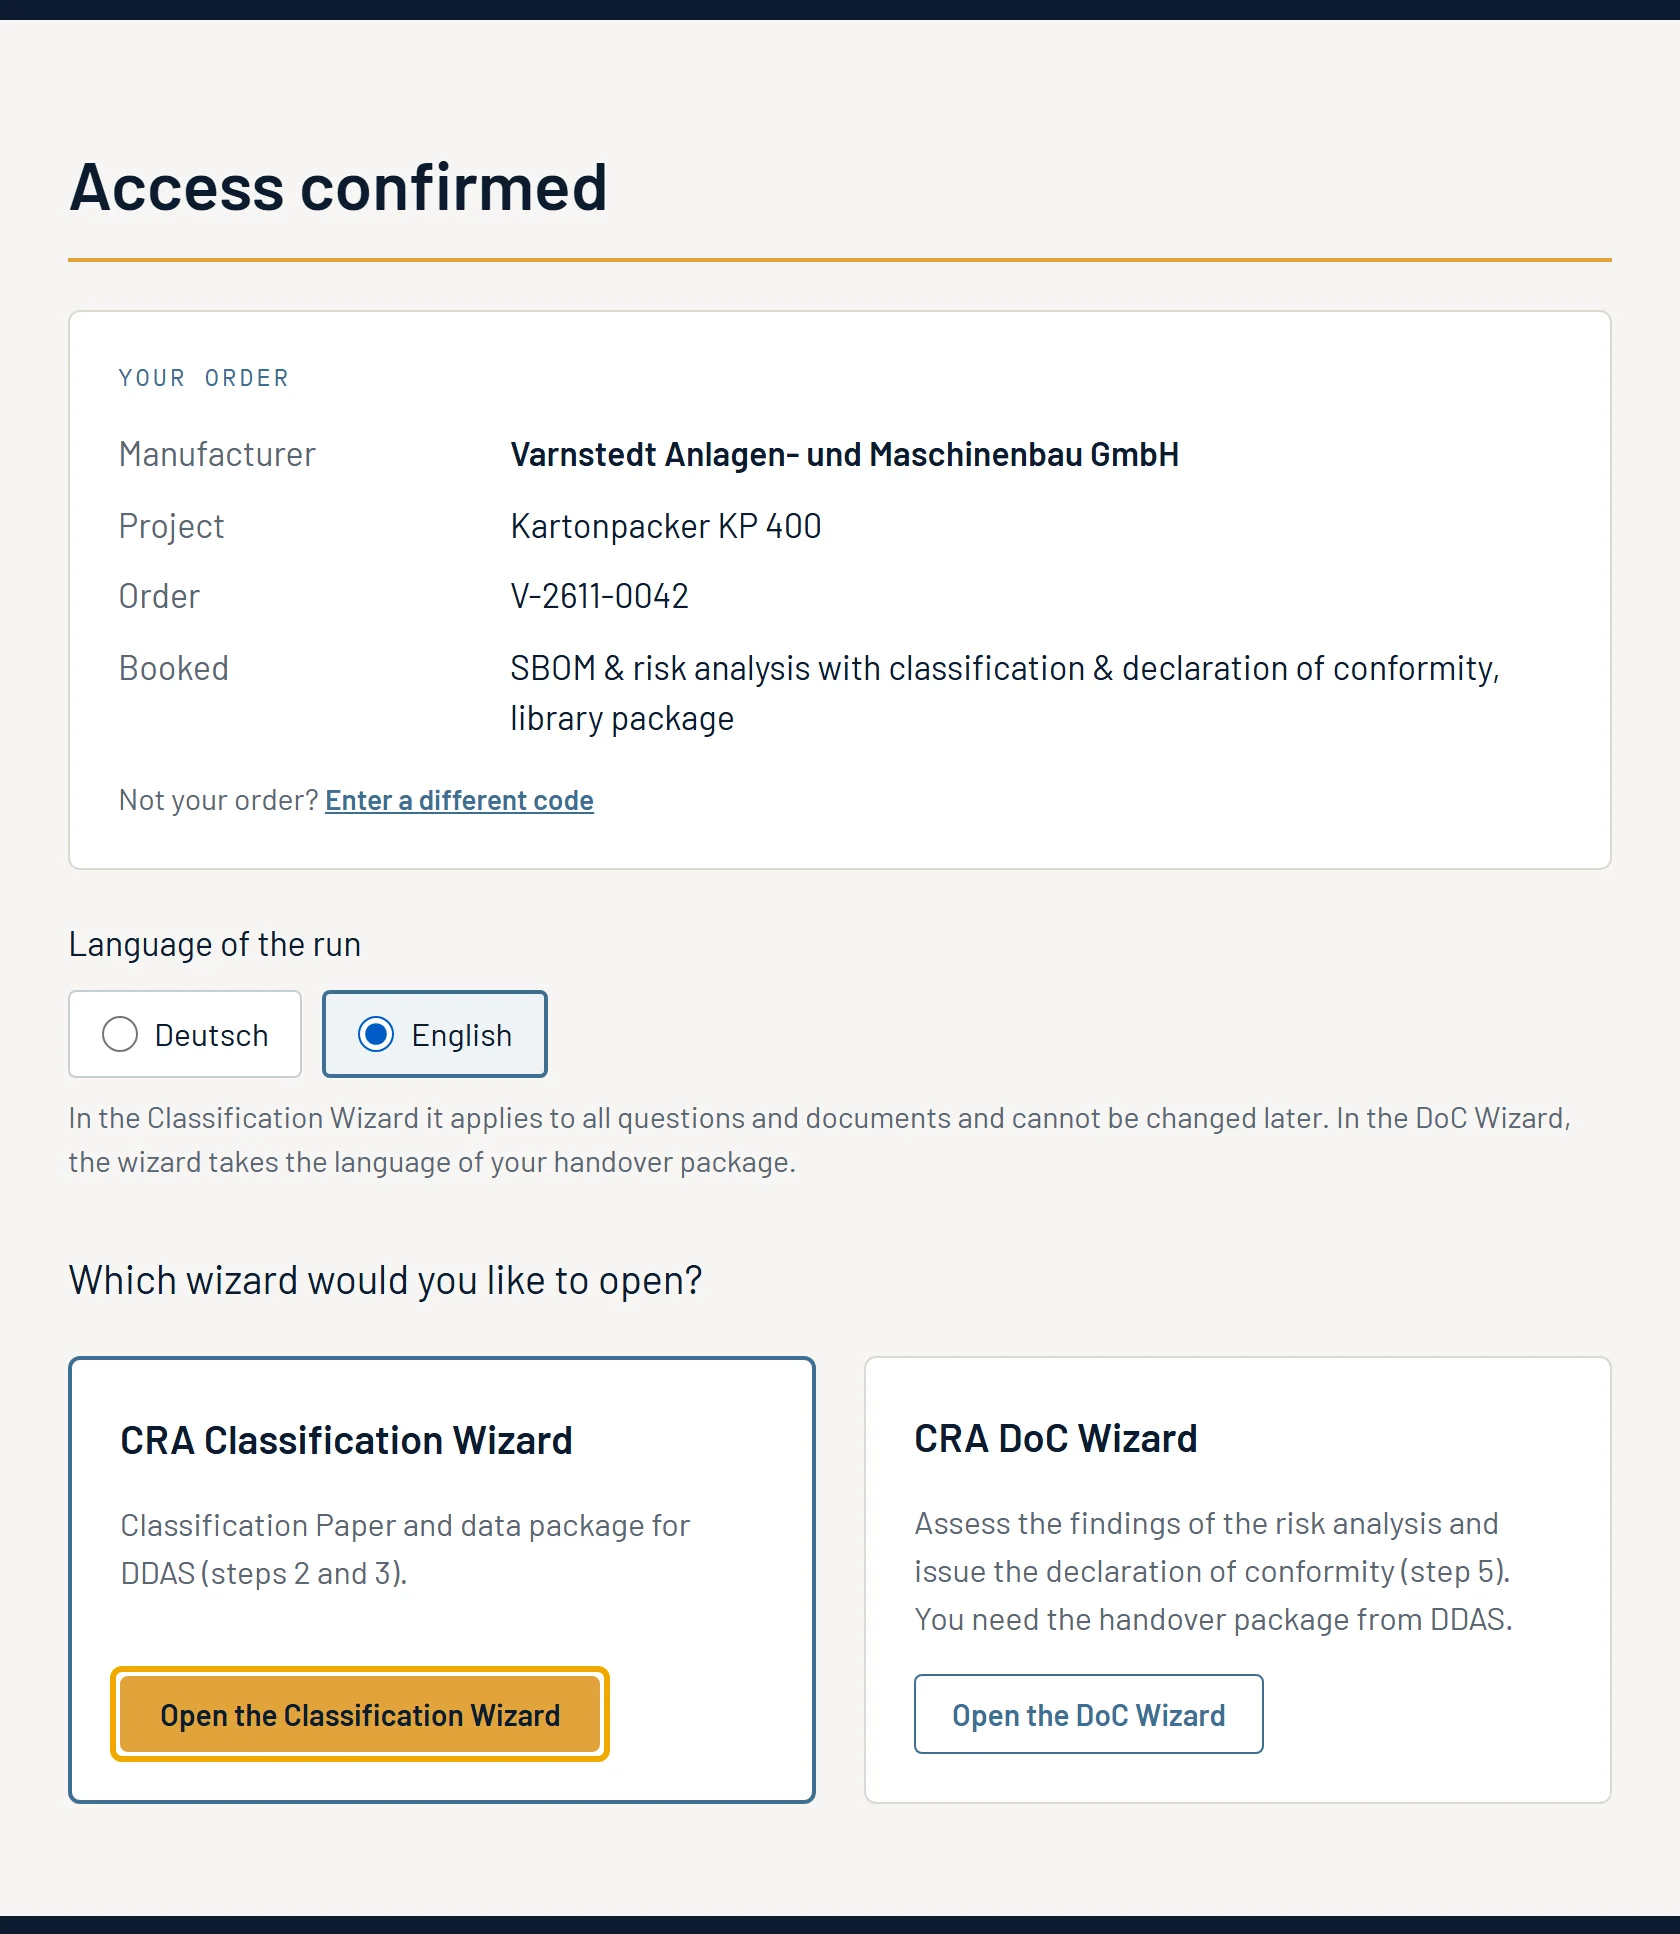
Access confirmed: your order
If the code is valid, “Access confirmed” appears. Under “Your order” you see who the code applies to: manufacturer, project, the order number if any, the type of run (first run or follow-up run) and what you have booked. These details are then already filled in. What your code unlocks (route “With Classification Paper”, profile selection, library package) was set by DDAS when issuing it. If the order does not match, choose “Enter a different code”.
Language of the run
Under “Language of the run” you choose “Deutsch” or “English”. Preselected is the language in which you entered the code.
- In the Classification Wizard you receive the questions, all documents and their file names in this language; the packages carry the suffix
_DEor_EN. Switching later is not possible; the other language needs a new run. If you load saved progress, the language in which it was created applies. - In the DoC Wizard the wizard takes the language of your handover package as soon as you load it. The declaration and the statement are written in the same language as your Classification Paper. For a version in the other language, request a handover package in that language from DDAS.
Choosing the wizard
Below are two tiles: “CRA Classification Wizard” for step 2 and “CRA DoC Wizard” for step 5. “Open the Classification Wizard” or “Open the DoC Wizard” starts the wizard. If you come from the Wizards page, the wizard you chose there is highlighted.
“Leave wizard” takes you from a wizard back to this screen without entering the code again. Unsaved entries are lost (chapter 6).
3. CRA Classification Wizard: route, details, logo, profile
Choosing the route
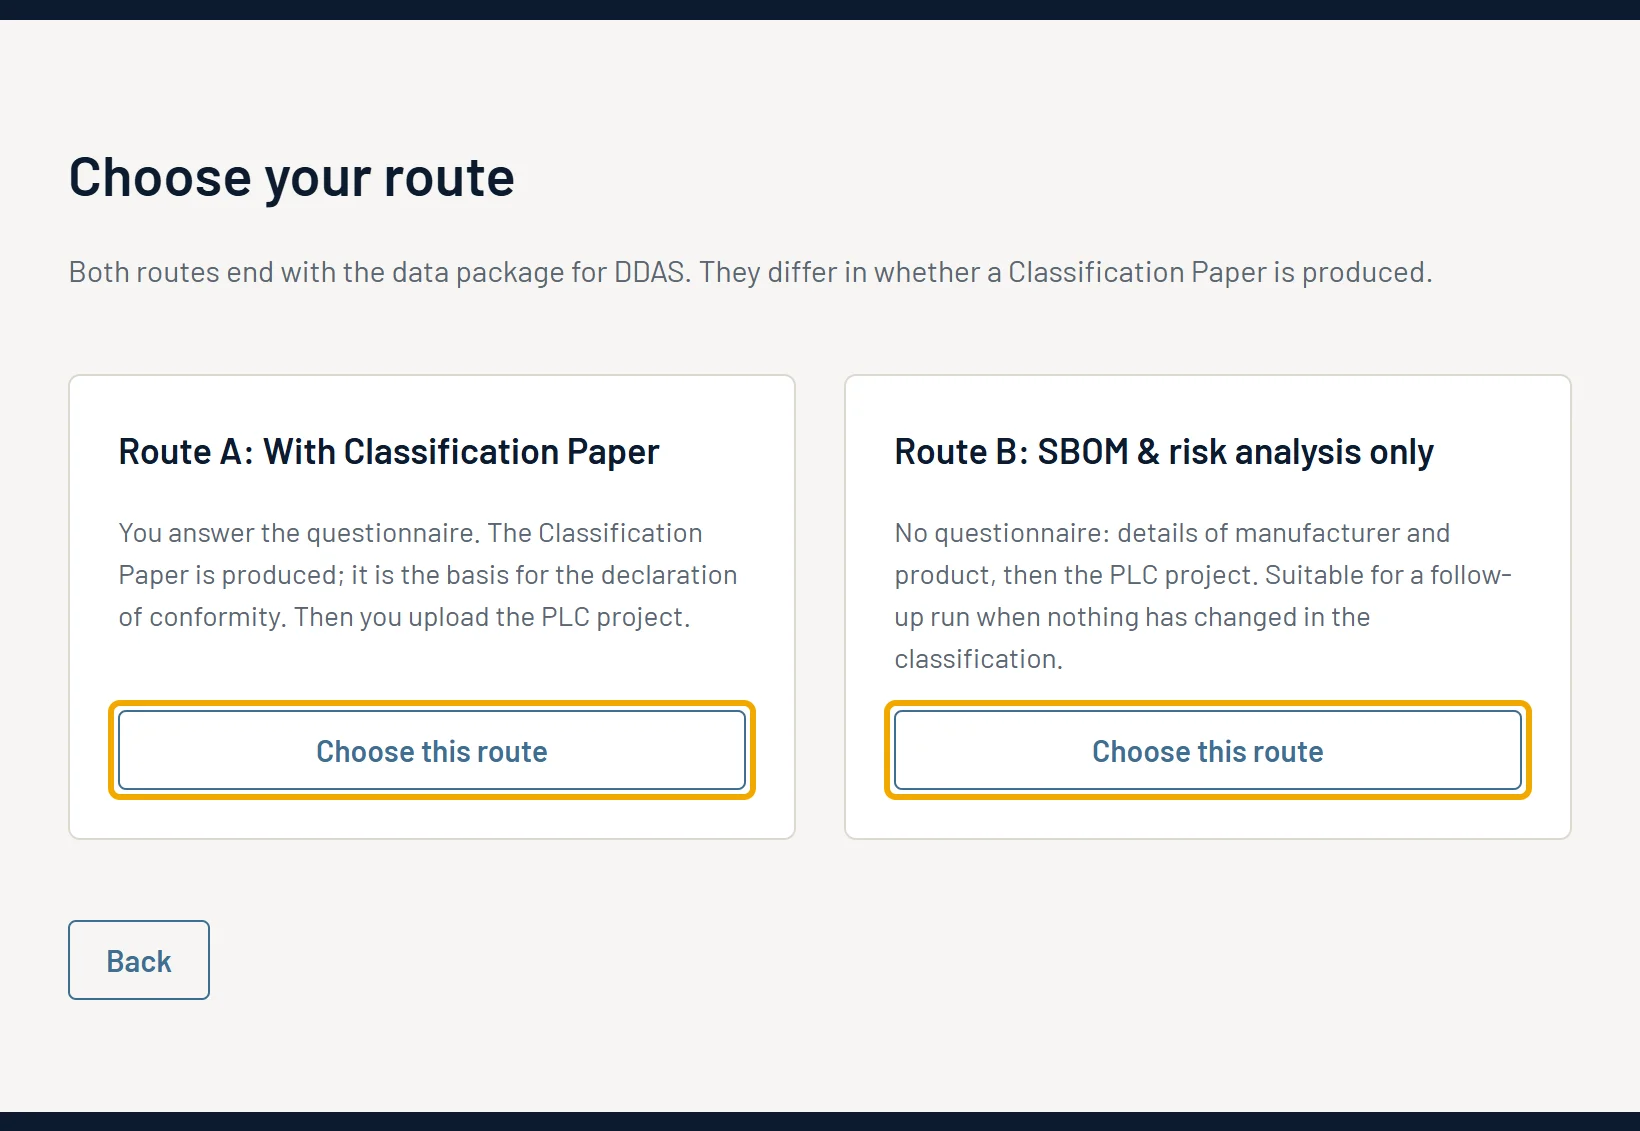
If your code includes the option “Classification & declaration of conformity”, the screen “Choose your route” appears. Both routes end with the data package for DDAS:
- “Route A: With Classification Paper”: You answer the questionnaire, the Classification Paper is produced, and then you upload the PLC project. You need the paper for the declaration of conformity in the DoC Wizard.
- “Route B: SBOM & risk analysis only”: no questionnaire; details of manufacturer and product, then the PLC project. In the DoC Wizard you can then assess the findings; the paper needed for the declaration is missing.
In the box you want, click “Choose this route”. Without the option there is only route B; the wizard opens it directly.
Company and project details
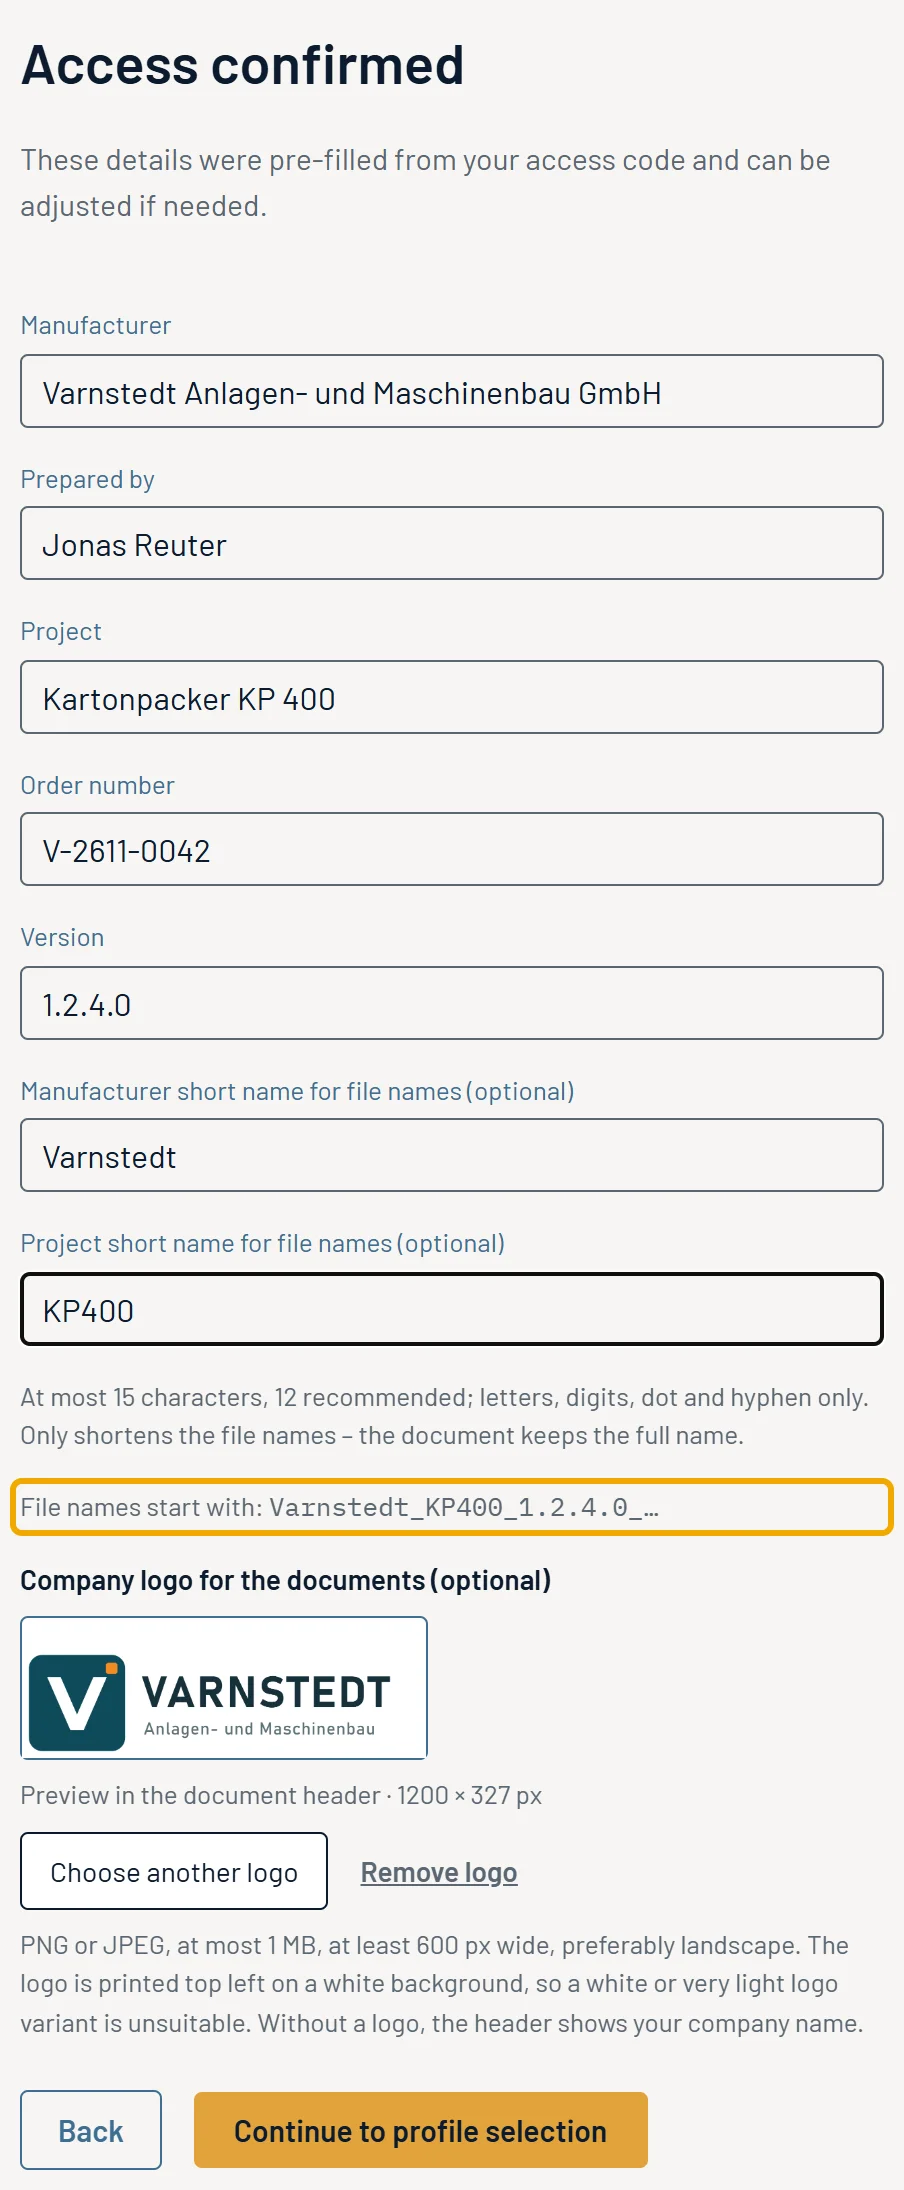
On route A the screen is called “Access confirmed”, on route B “SBOM & risk analysis only”. The fields are the same:
- “Manufacturer”, “Prepared by”, “Project” and “Version” are required. “Prepared by” is the person filling in the wizard; “Version” is always empty and must be entered. Enter the version that your software also carries, e.g. the version of the boot application. If it differs, DDAS points this out in the handover package, and the DoC Wizard warns you before the declaration.
- “Order number” is optional.
- “Manufacturer short name for file names (optional)” and “Project short name for file names (optional)” only shorten the file names: at most 15 characters, letters, digits, dot and hyphen only. The document keeps the full name. Under “File names start with” you can see how your file names begin.
On route A you continue with “Continue to profile selection” or, depending on your code, “Continue to the questionnaire”. On route B, if the library package is booked, the wizard also asks “What is being analysed?”; you continue with “Continue to the PLC project” (chapter 8).
Logo
Under “Company logo for the documents (optional)” you upload your logo with “Choose logo”. Requirements: PNG or JPEG, at most 1 MB, at least 600 px wide, ideally in landscape format. The logo is printed at the top left on a white background; a white or very light version is unsuitable. The preview shows how it appears in the header of the documents. “Choose another logo” replaces it, “Remove logo” removes it. Without a logo, your company name appears in the header.
Profile
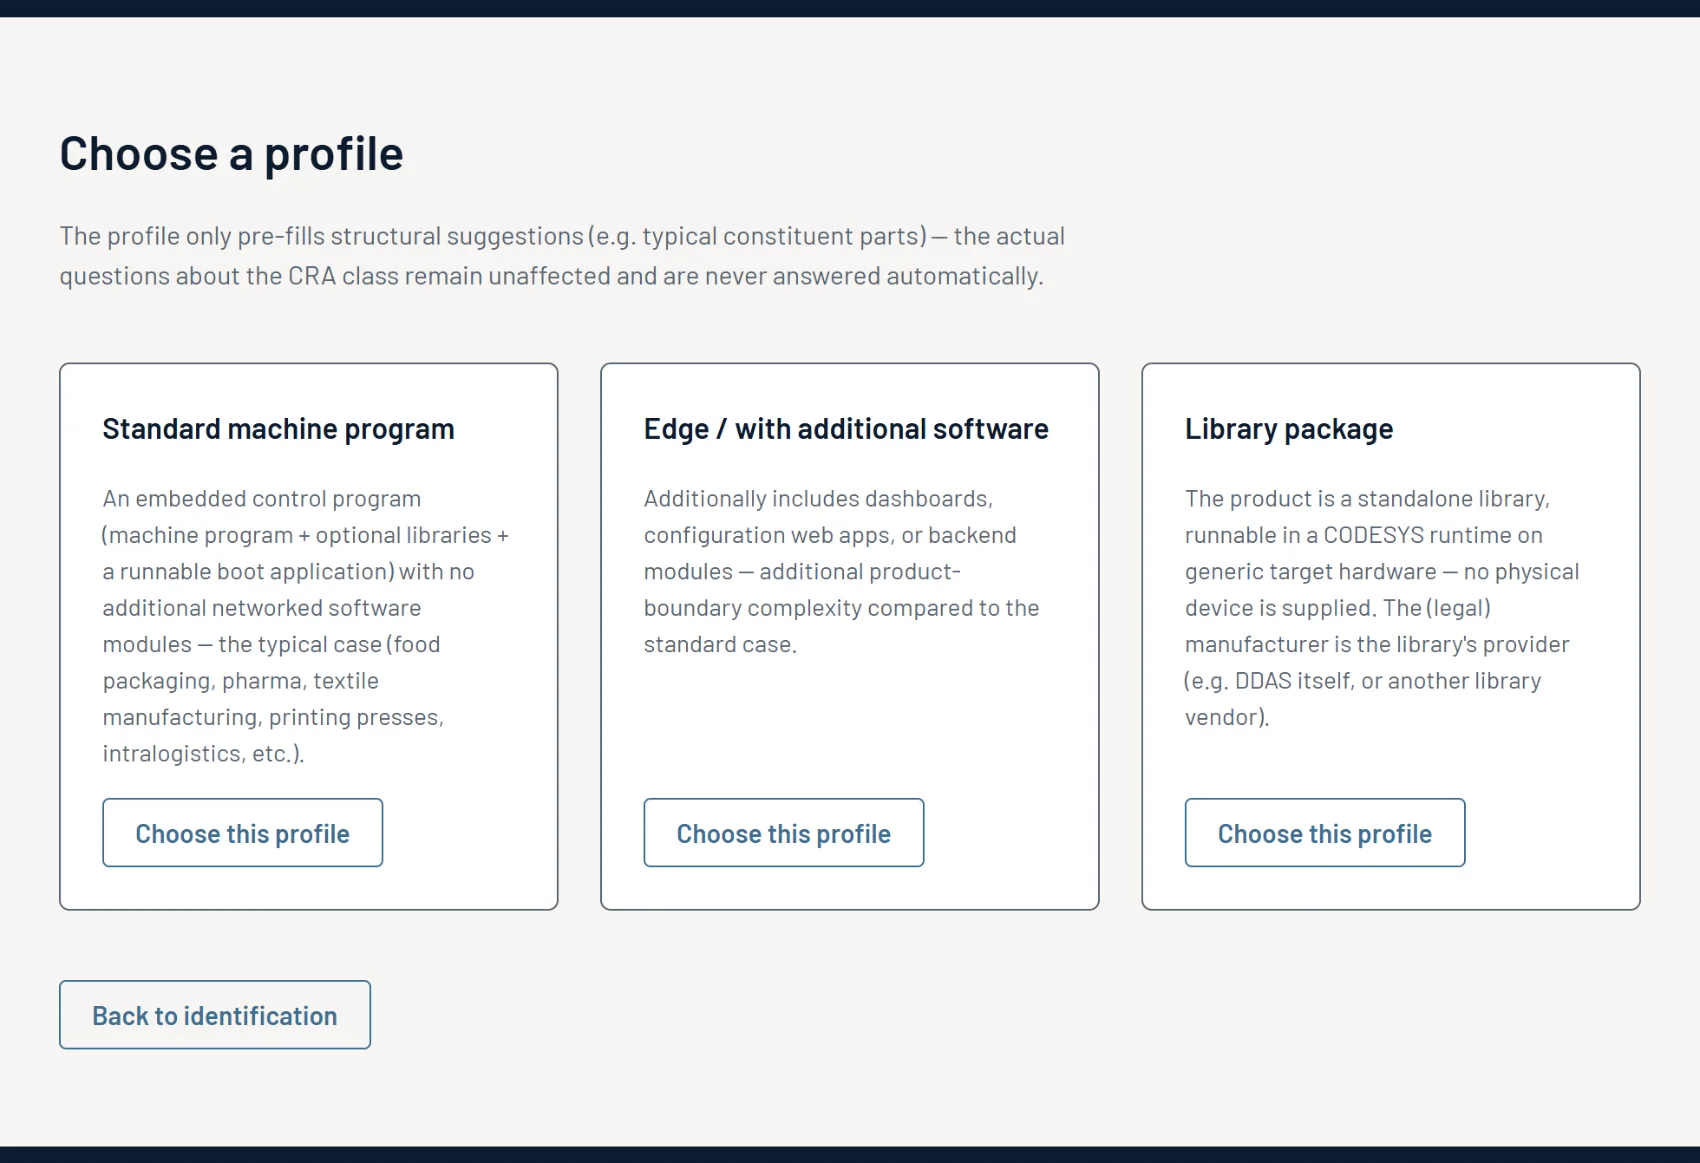
If DDAS has unlocked profile selection, “Choose a profile” appears. The profile only fills in structural suggestions, such as typical constituent parts; it never answers questions about the CRA class. The choices are “Standard machine program”, “Edge / with additional software” and, only if booked, “Library package”. Click “Choose this profile”. Without profile selection, the questionnaire starts with the profile “Standard machine program”.
Editing details
While you work through the questionnaire, “Edit details” is shown at the top right. The dialog “Edit details” contains the same fields and the logo. Your answers are kept. “Apply” saves the change, “Cancel” discards it.
4. Working with the questions
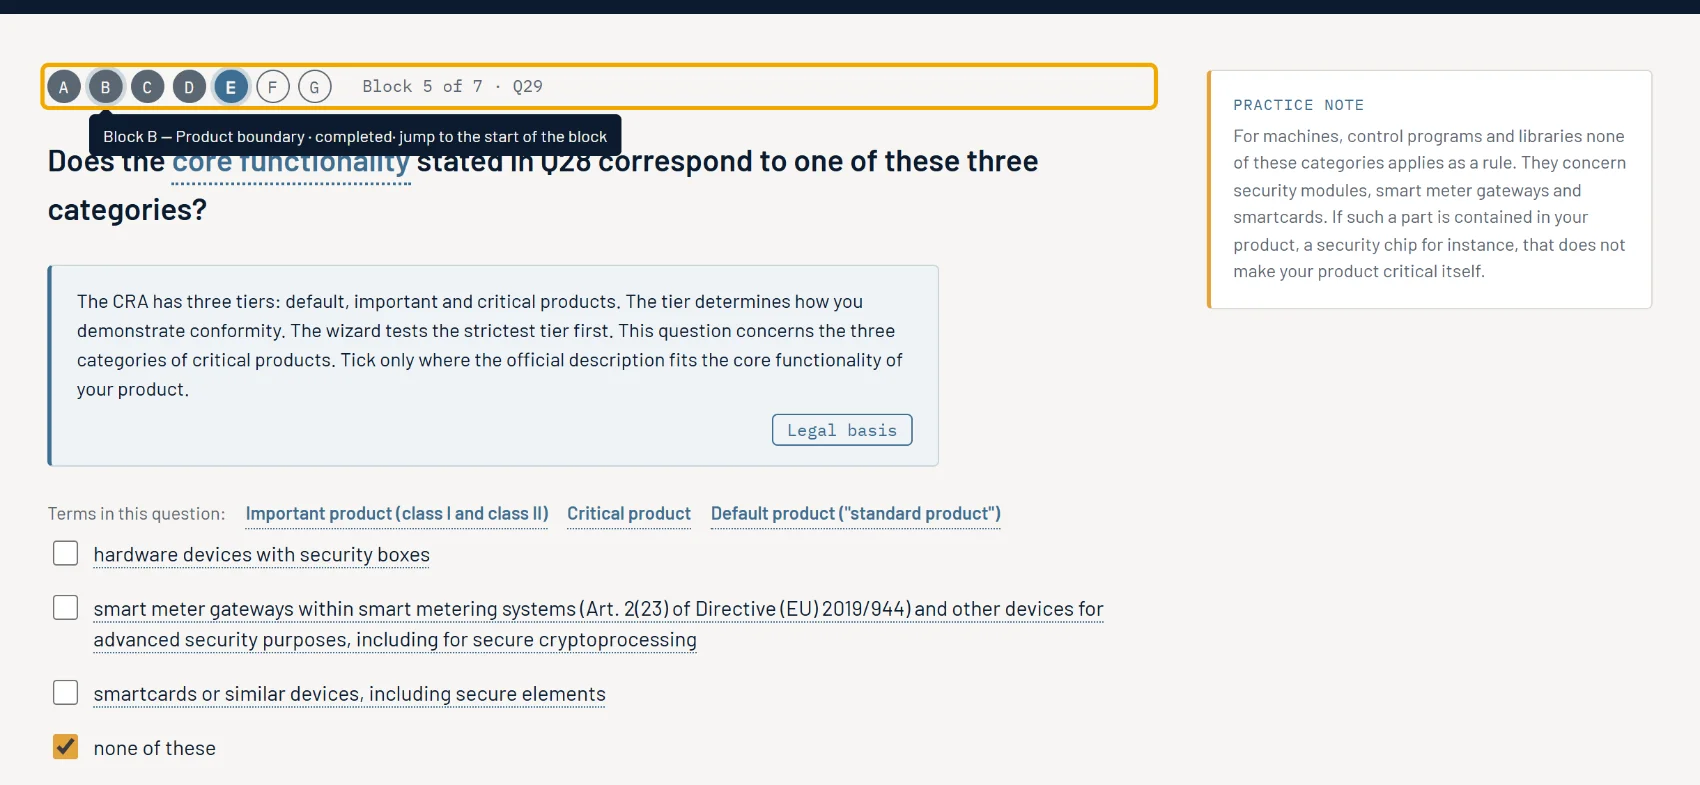
Layout of a question screen
At the top is the header bar with manufacturer, project and version, plus “Edit details” and “Save progress” (in the DoC Wizard also “To the overview”). Below it come the block bar, the question, its help (chapter 5) and the answer fields. On the right is the column with practice notes and terms. At the bottom are “Back”, “Save progress”, “Start over” and, on the right, “Next”.
Question types
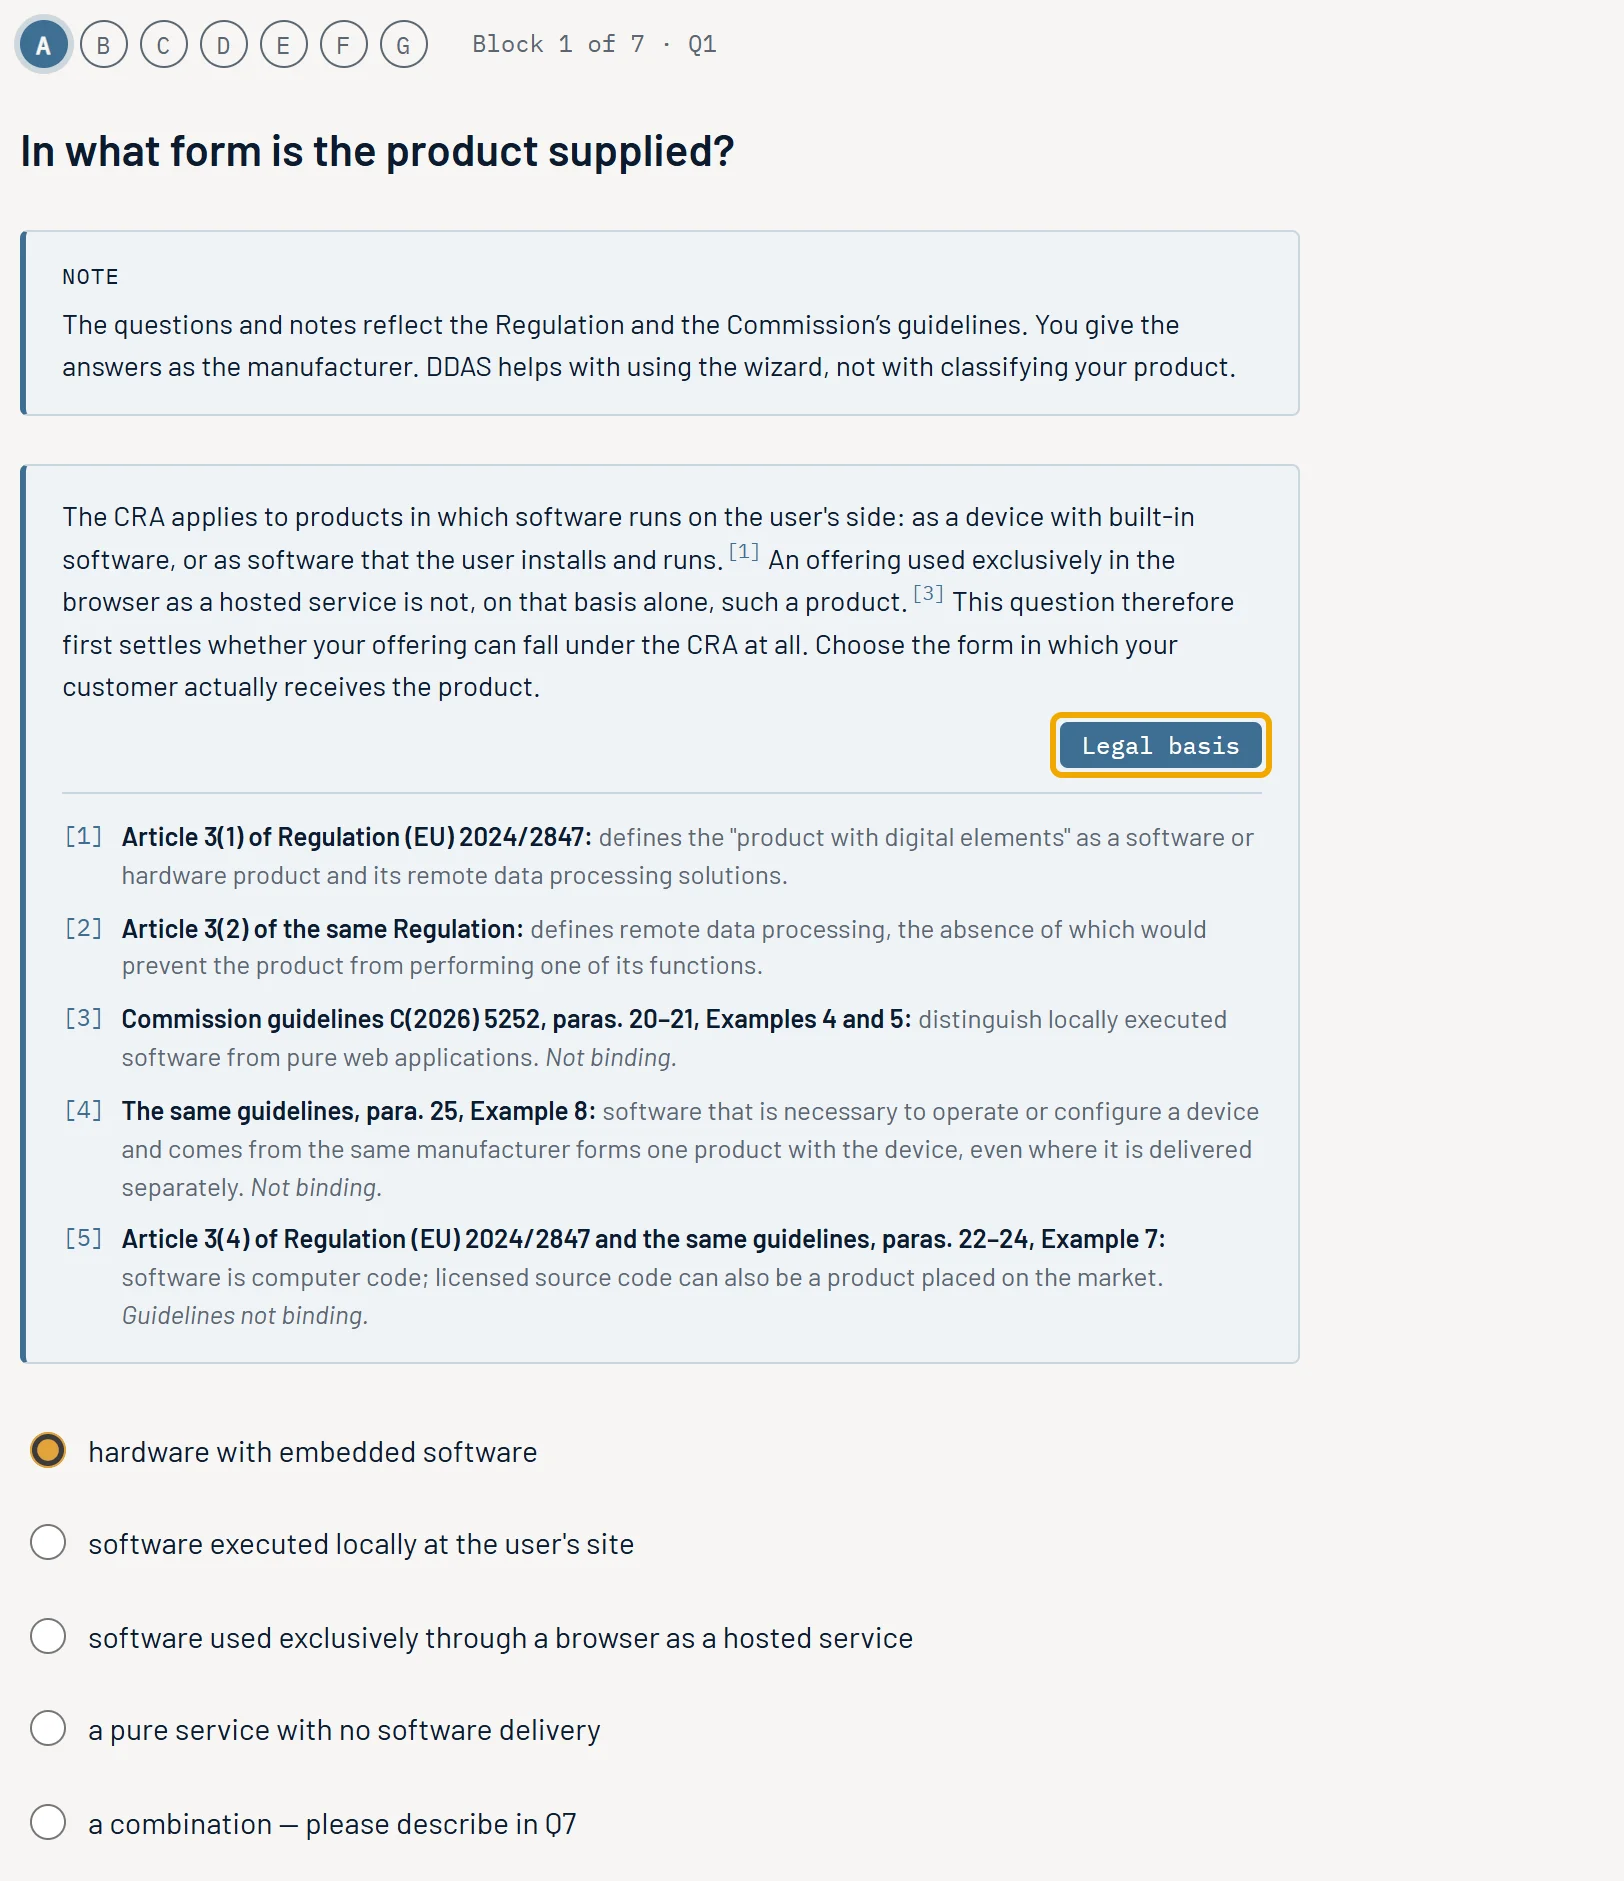
- Single answer: round option buttons, exactly one answer.
- Multiple answers: checkboxes, often in groups. Some answers exclude all others. Long lists offer “Select all”, “Clear selection” and the field “Addition (free text)”.
- Free text: a text field (“Enter your answer …”).
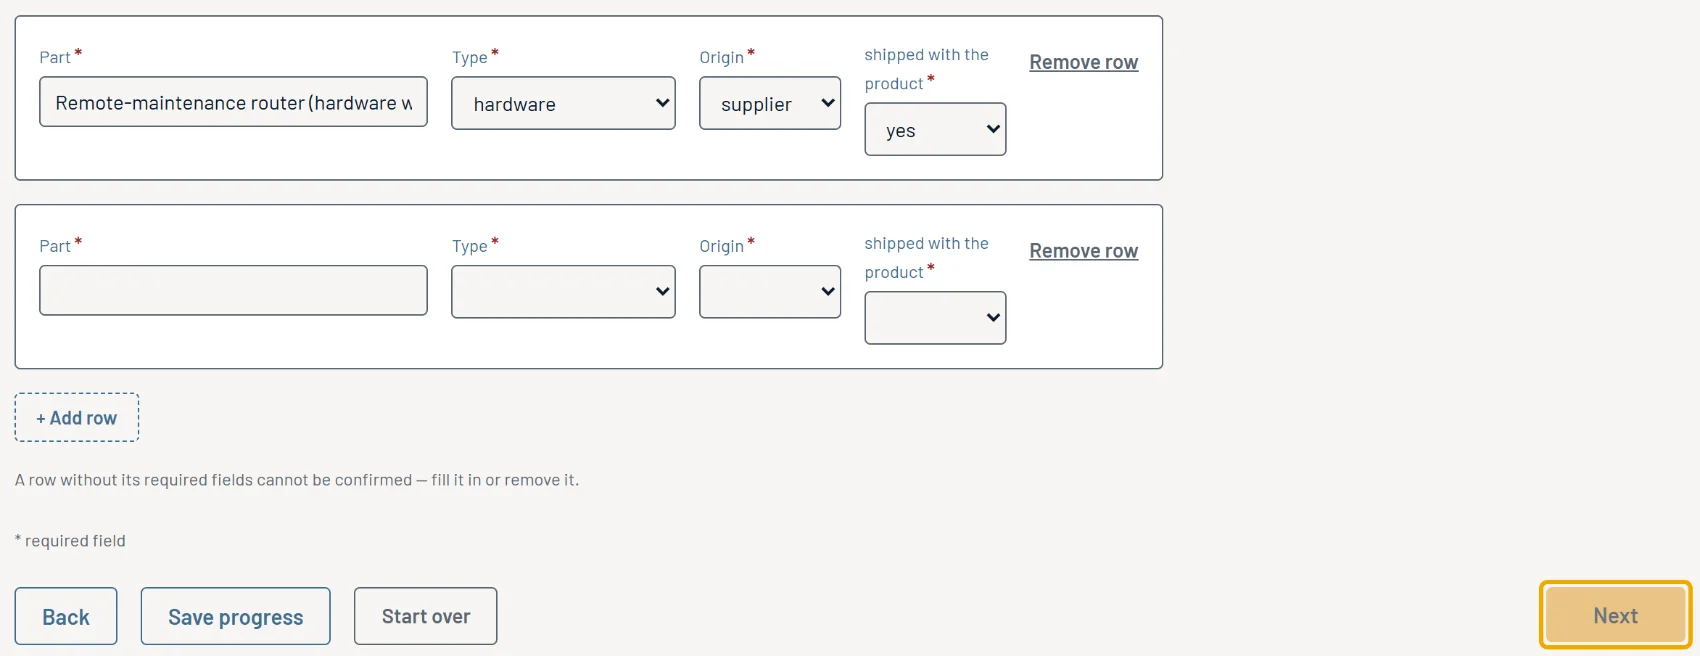
- Table: “+ Add row” adds rows, “Remove row” deletes them. Some tables come with suggested rows from your profile; you check, change or remove them.
- Form: several fields for one question.
- Additional fields: depending on the answer, further fields appear below it, for example for a justification.
Some questions come up several times, once per constituent part or per category. Above the question it then says what it refers to, for example “Component 2/3” with the name from your table.
Required fields and a disabled “Next”
Almost all questions are required. The few optional ones carry “(optional)” after the question text. Required additional fields and required columns are marked with “*”, with “* required field” below. “Next” stays disabled until the question is answered and all visible required fields are filled in. A table row you have added needs its required fields even if the table itself is optional; fill them in or remove the row. Internet addresses must start with https://. If a notice marked “Please note” asks for confirmation via a checkbox, you can only continue once it is ticked.
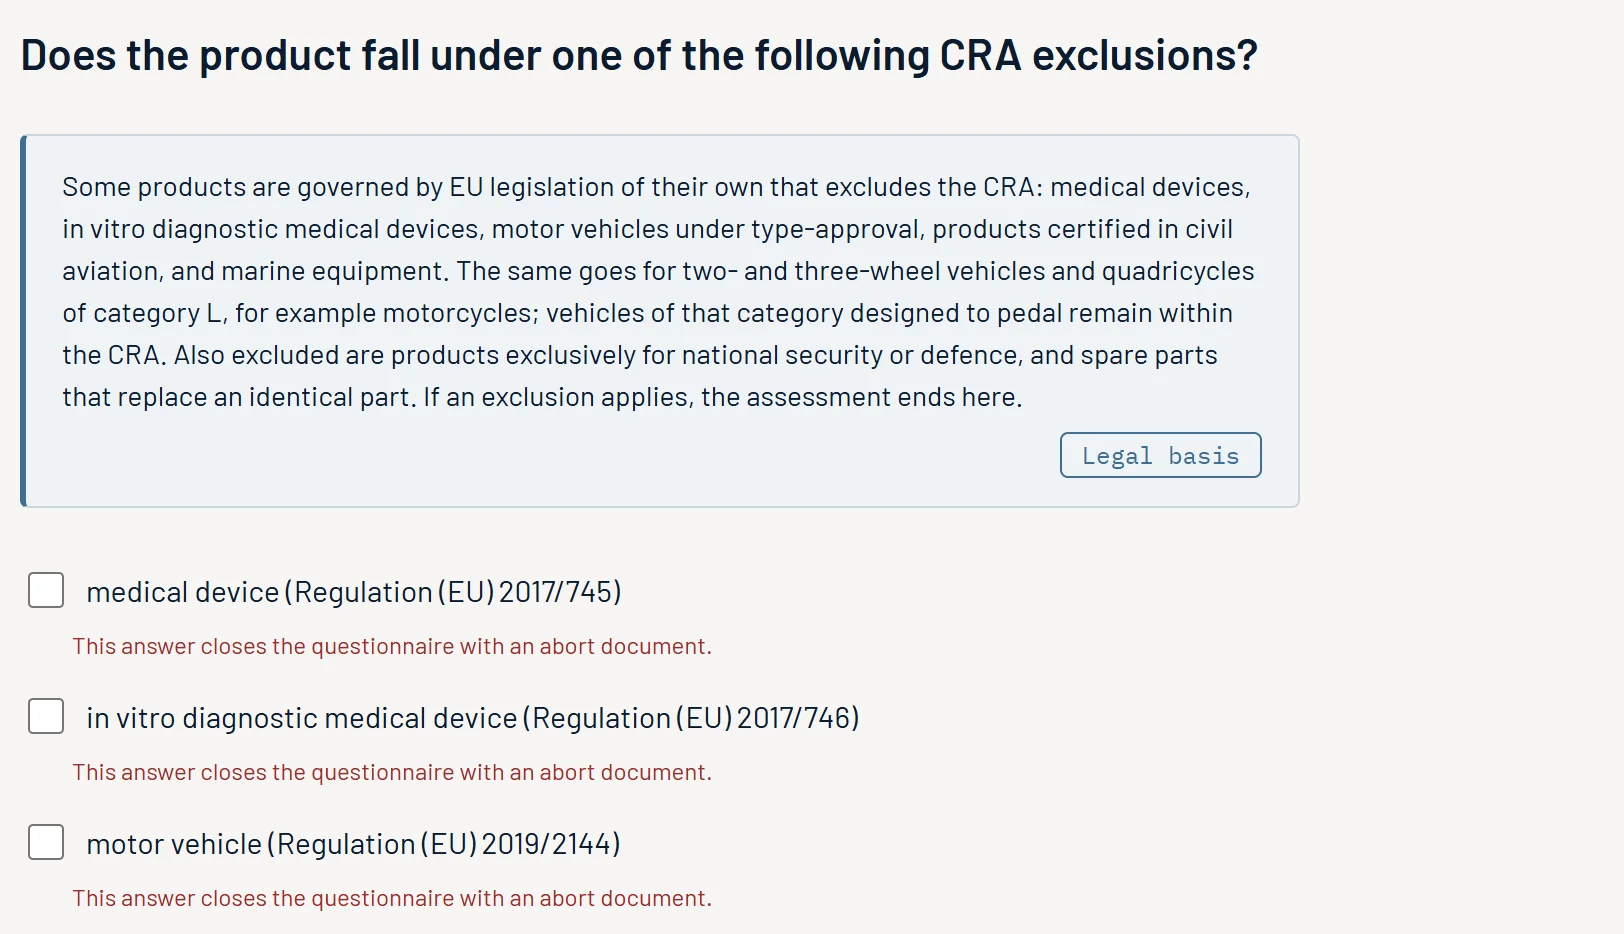
If red text below an answer says “This answer closes the questionnaire with an abort document.” (in the DoC Wizard: “This answer ends the run: …”), the questionnaire ends with this answer.
Block bar
The questions are grouped into blocks: A to G in the Classification Wizard, numbered in the DoC Wizard. To the right of the bar is your position, e.g. “Block 3 of 7 · Q12”. If you hover over a block, you see its title and status: “completed”, “currently in progress” or “not reached yet”. Clicking a block you have reached jumps to the first question of that block. You cannot jump forward to blocks not yet reached, because the following questions depend on your answers.
Going back
“Back” shows the previous question with your last answer. No answers are lost. On the first question, “Back” leads out of the questionnaire: in the Classification Wizard to profile selection or to the header details, in the DoC Wizard to the overview. Save your progress first. “Start over” asks: “Unsaved answers will be lost — really start over?” “Yes, start over” starts the questionnaire empty; in the DoC Wizard it leads back to loading the documents.
5. Help on every question
Every question comes with its own help. The texts reflect Regulation (EU) 2024/2847 and the guidelines of the European Commission. On the first question there is a “Note” about this: you give the answers as the manufacturer; DDAS helps with using the wizard, not with classifying your product.
Content
Below the question is the explanation. If it is longer, you first see the first paragraph; “show more” expands the rest, “show less” collapses it again.
Legal basis
The “Legal basis” button shows the question's sources as a numbered list. While it is open, the text and the practice notes also show reference numbers such as [1]. The setting stays as you move through the questions until you click the button again.
Practice note
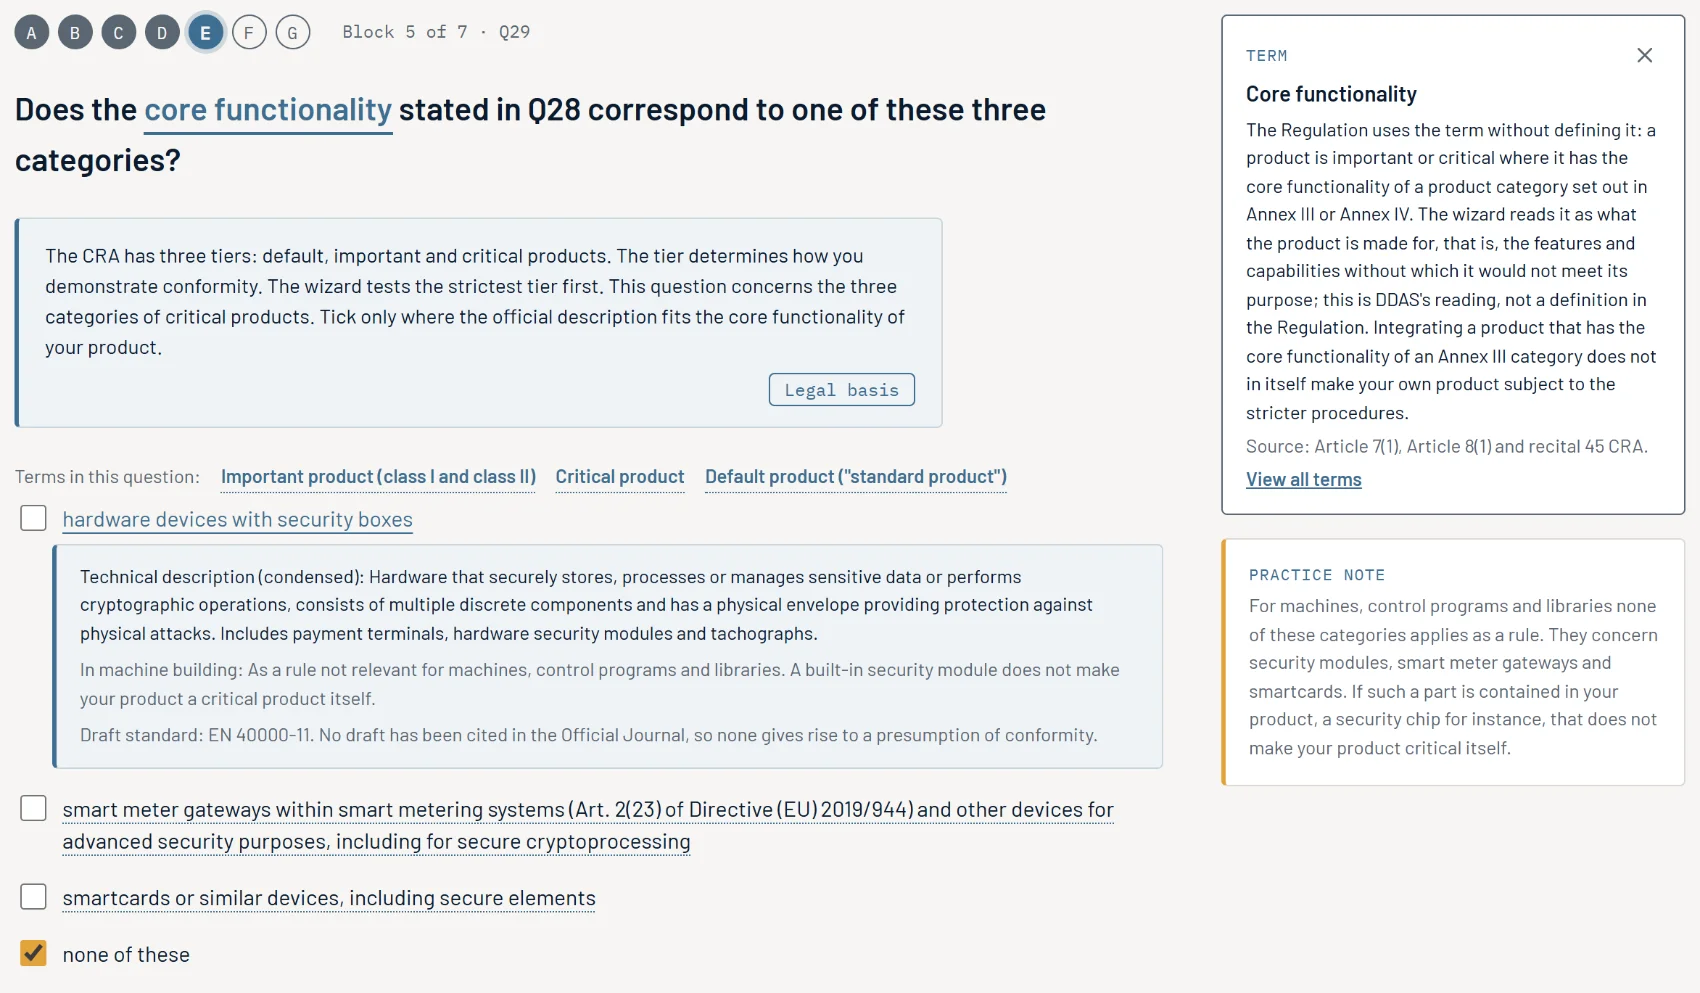
To the right of the question are cards headed “Practice note”. Two are shown at first; you expand the others with the button below them, e.g. “Show 2 more practice notes”.
Notes on answers
If the text of an answer has a dotted underline, there is a note on it. Clicking the text opens the note directly below the answer; the option button in front of it selects the answer. A second click closes the note.
Terms on the right
Words with a dotted underline in the question are terms. Clicking one opens a card “Term” on the right with an explanation and “Source”; the cross closes it. Further terms are listed under “Terms in this question:”. “View all terms” opens the glossary “Terms”; “Close” takes you back. On some questions, “View the categories of Annexes III and IV” opens the list “Categories of important and critical products”.
Confirming DDAS suggestions
The wizard does not answer any question for you. It makes suggestions that you confirm or change:
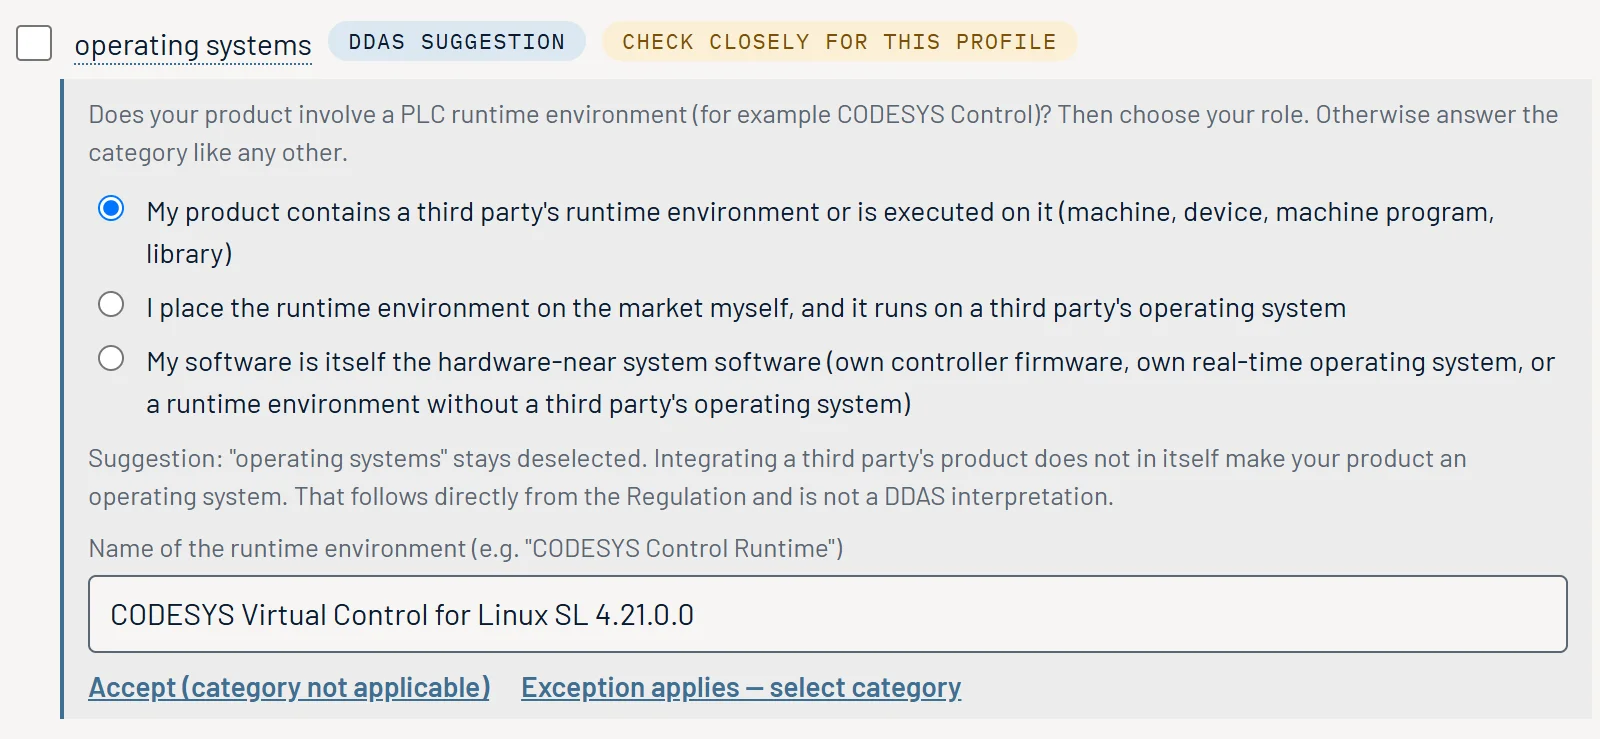
- Answers labelled “DDAS suggestion” carry a standard position. “Accept standard position (not applicable)” confirms it, after which “Accepted.” is shown; “Exception applies — select category” lets you select the answer. If the suggestion requires details, you can only confirm it after filling them in.
- “check closely for this profile” and “suggested by the wizard, please examine” mark answers you should look at particularly carefully. Nothing is selected by them.
- In the DoC Wizard, labels show where a pre-filled value comes from: “from the Classification Paper” with the question in the paper, or “DDAS suggestion”. If you change the value, the label shows the original value (“changed — in the paper: …”). For fixed text modules, “This text appears in the declaration:” is shown with the wording.
6. Saving and loading progress
The wizard does not save anything on its own, neither on your computer nor at DDAS. If you close the browser window, unsaved answers are lost. The browser therefore asks before closing or reloading whether you really want to leave the page. Still, save regularly, especially before breaks.
Saving
“Save progress” is in the header bar, at the bottom next to “Back” and on the completion page; in the DoC Wizard also on the overview and in the header bar of the overview and of the findings assessment. The browser downloads a JSON file. Its name starts with your file prefix and ends in _Progress_<date>.json (German run: _Zwischenstand_<date>.json); the progress file of the DoC Wizard also carries _DoC. The file contains your header details, the profile, the language, all answers and your own texts; in the DoC Wizard also the assessments of the findings. Keep it with your other project documents.
Loading in the Classification Wizard
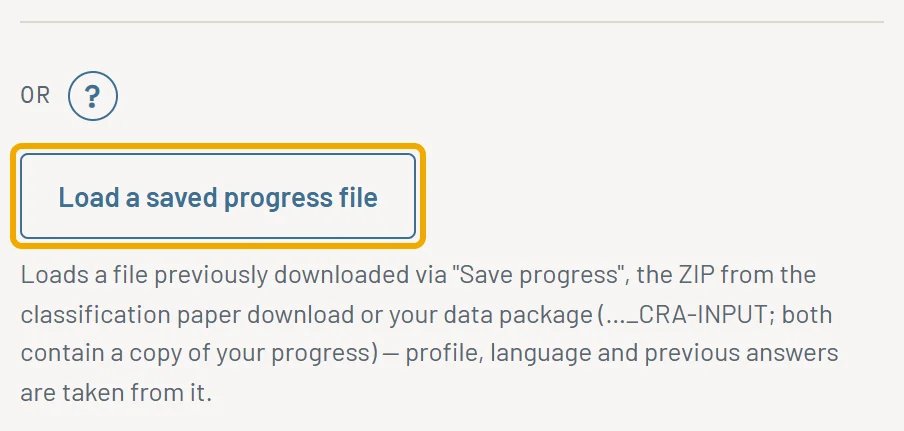
Enter the access code, choose route A and, on the screen “Access confirmed”, click “Load a saved progress file” under “or”. The wizard accepts:
- the file from “Save progress”,
- the ZIP from “Download classification paper (ZIP)”, which contains a copy of the progress file,
- the data package
…_CRA-INPUT_…zipfrom route A.
Profile, language and answers come from the file. The wizard opens where you saved; for a completed paper that is the completion page. Route B has no progress file: simply enter the few details again.
Loading in the DoC Wizard
On the screen for loading the documents, “Upload Classification Paper ZIP” also accepts a progress file of the declaration of conformity (JSON or ZIP) and resumes the run. Load the handover package again as well; the findings themselves are not stored in the progress file.
Different catalogue version
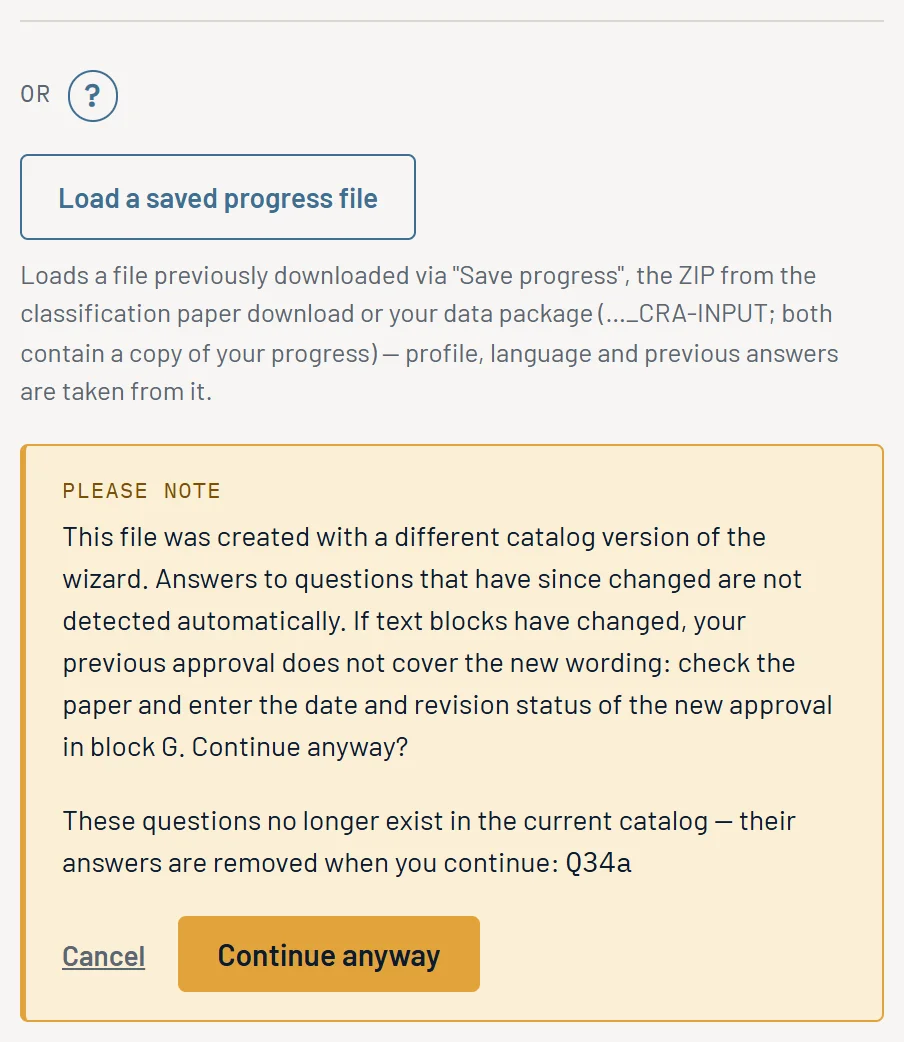
If the file comes from an older version of the wizard, the wizard asks: “This file was created with a different catalog version of the wizard. …” It lists answers to questions that no longer exist and removes them when you continue. Your own texts are kept; check them afterwards under “Review and replace sections”. “Continue anyway” continues, “Cancel” does not.
7. Reviewing the result and downloading the paper
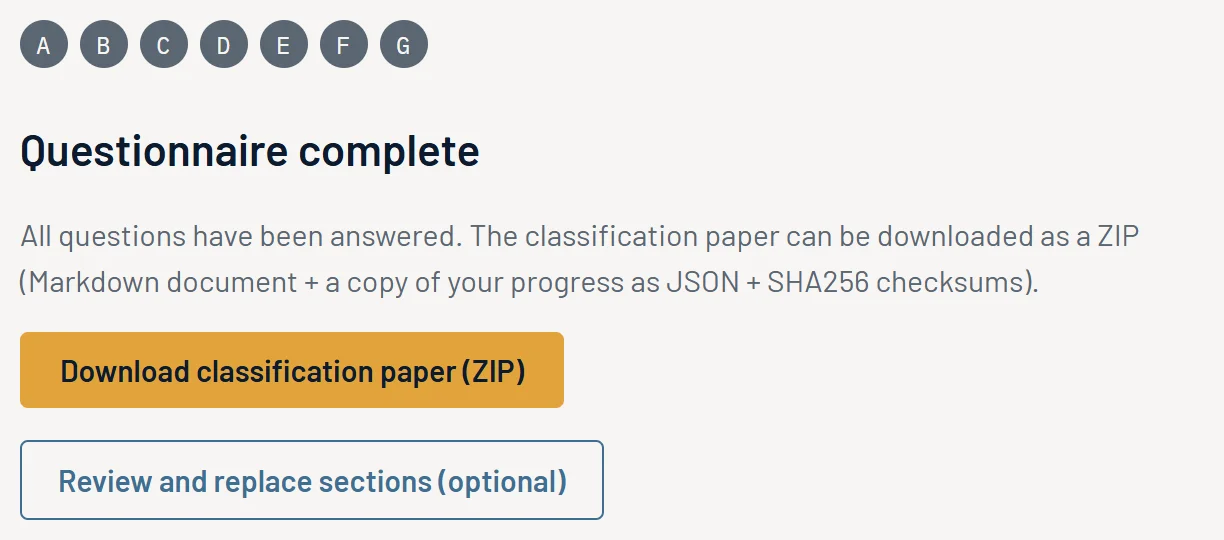
After the last question, “Questionnaire complete” appears. If the questionnaire ends with an abort answer, it says “Run aborted”: according to your answers, the preconditions for a Classification Paper are not met. In both cases, “Back” or the block bar takes you back to your answers.
What a finished paper looks like and which decisions it contains is shown by the sample package of a fictitious machine builder with a guide.
Reviewing and replacing sections
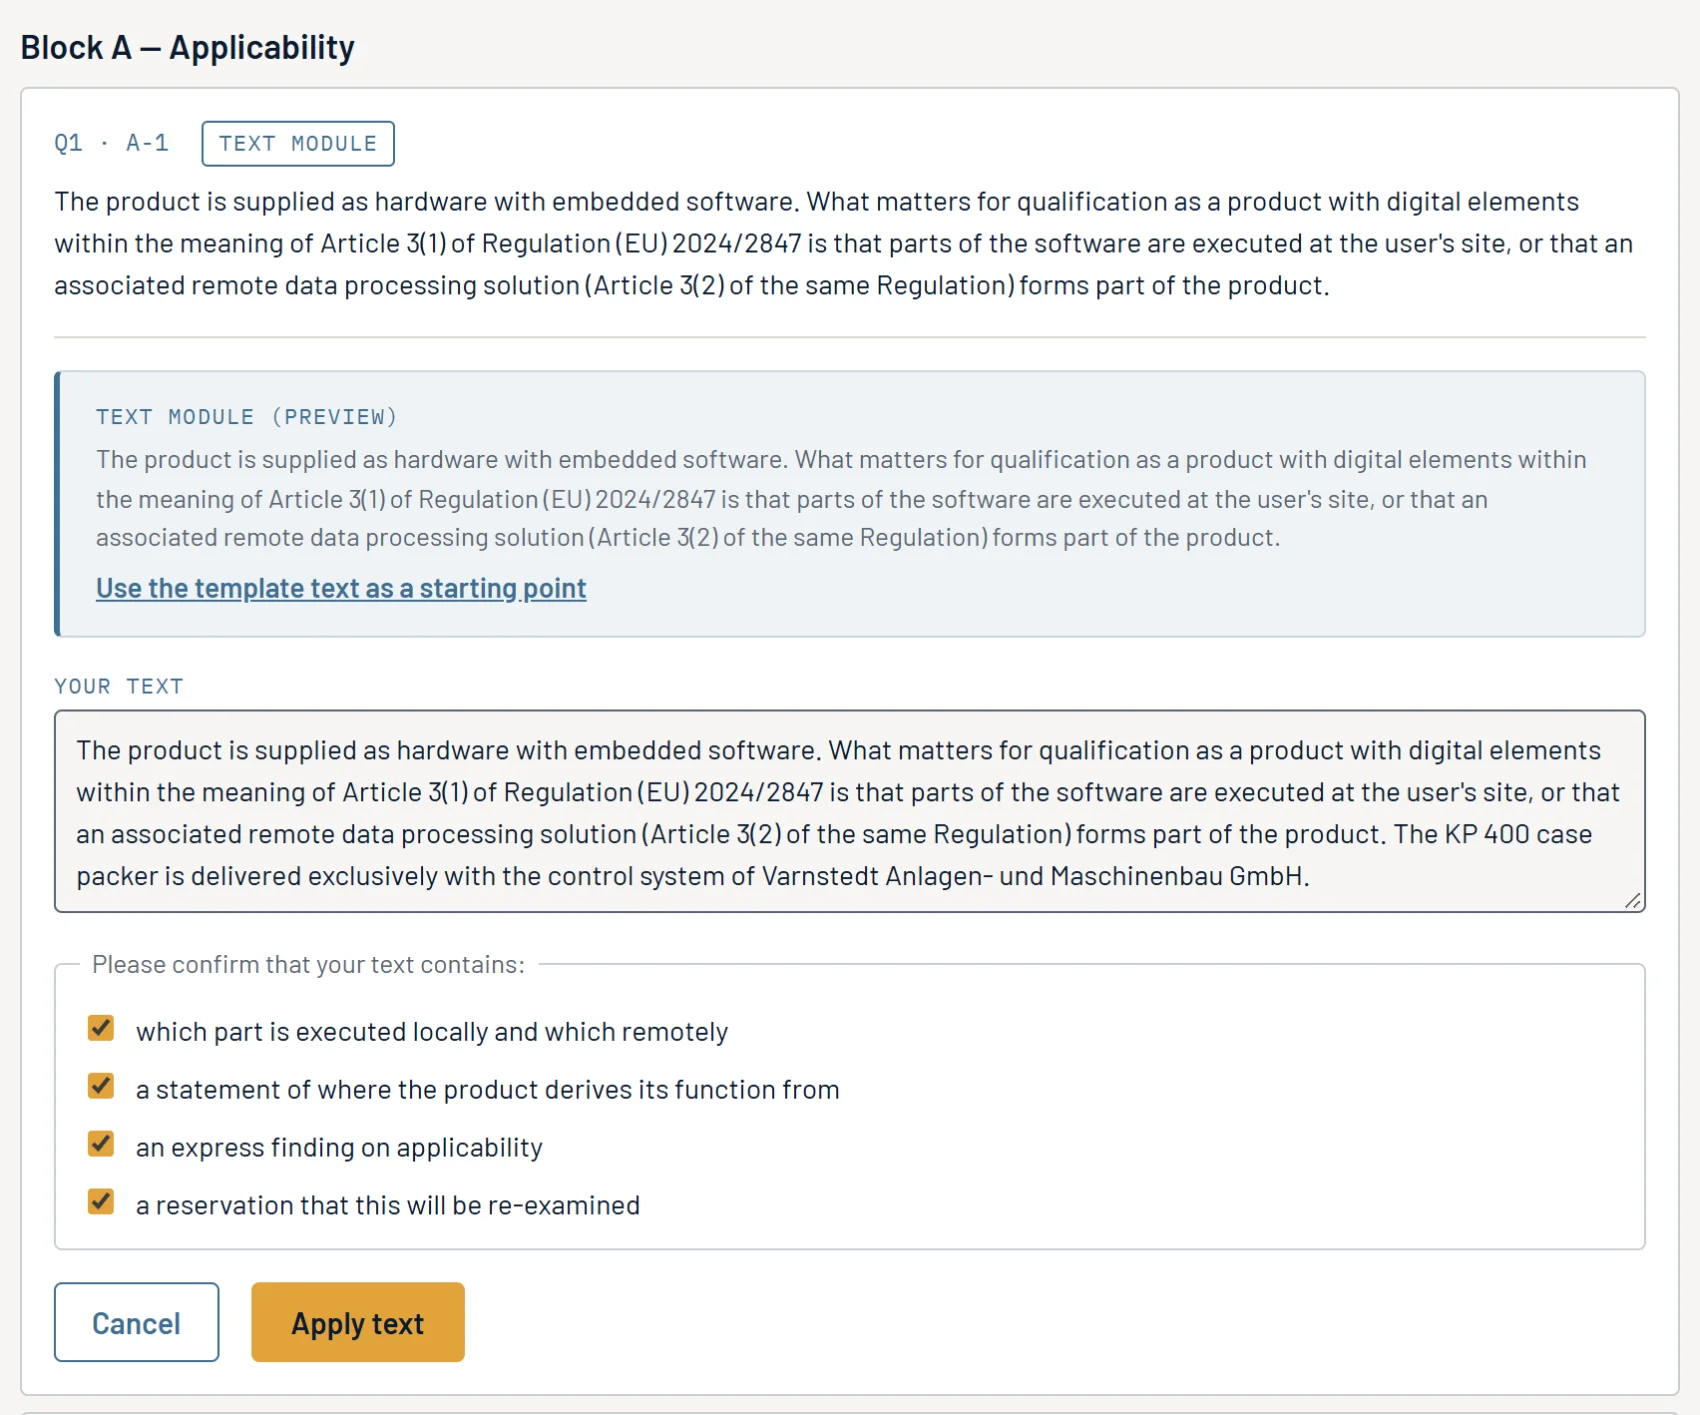
“Review and replace sections (optional)” opens the step “Review sections”. There you see all sections of the document grouped by block, each marked as “Text module”, “Provided by manufacturer” or “not replaceable”. With “Show:” you filter by “all”, “replaceable” or “replaced”.
To replace a section with your own text:
- Click “Provide your own text” at the section.
- If needed, use “Use the template text as a starting point” to copy the text module into the field “Your text”.
- Under “Please confirm that your text contains:”, confirm each required element.
- Click “Apply text”.
“Edit” lets you change your text later; with “Revert to template” the text module applies again. “Back to the completion page” closes the step.
Provenance: your own text stays identifiable
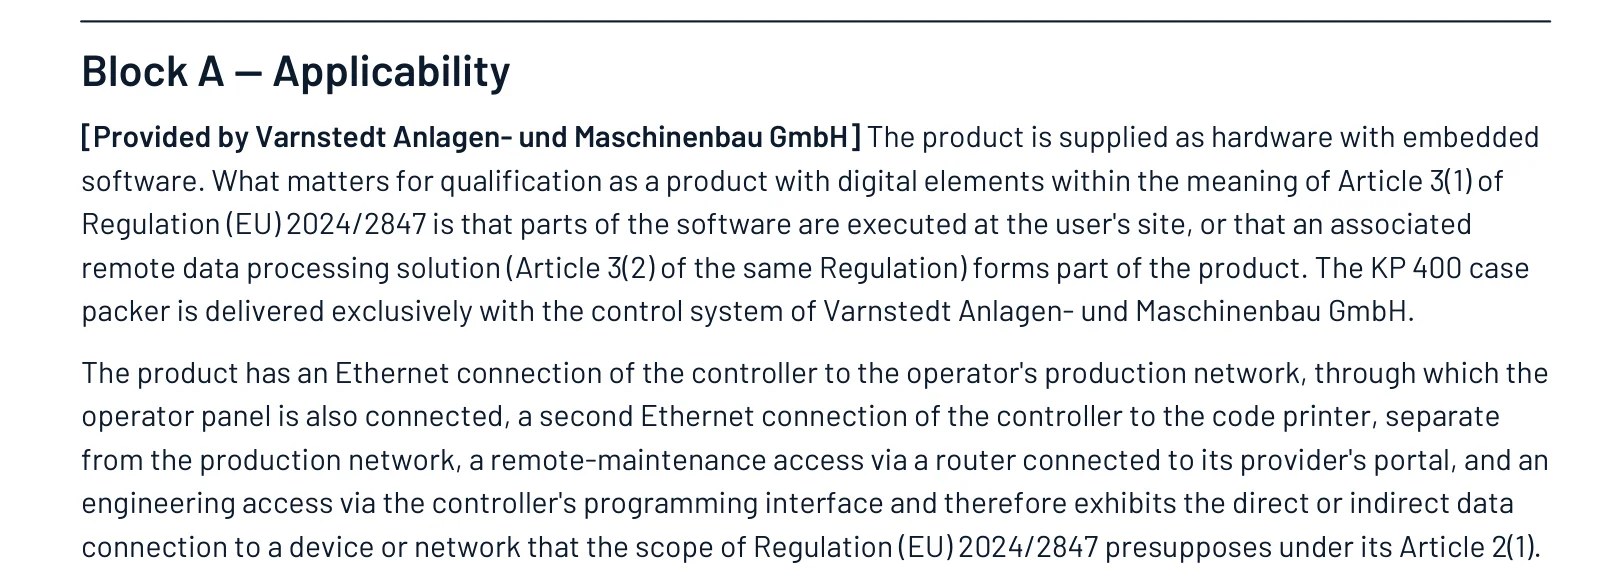
In the Classification Paper, each replaced section is preceded by “[Provided by <manufacturer>]”; all others remain text modules of the wizard. In the DoC Wizard, your text appears in the declaration without a marker; the cover sheet states for each point what you provided. The wizard checks texts you provide only for the confirmed required elements and for form, not for substantive or legal correctness. If the text module changes later, for example because of a different answer, the section warns: “The wizard's text module for this section has changed since you entered your text …”
Downloading the paper
“Download classification paper (ZIP)” asks: “Have you finished reviewing your answers and do you want to download the document now?” “Yes, download” gives you …_ClassificationPaper.zip: the paper as a Markdown file, a copy of your progress file, checksums and, if loaded, your logo. DDAS produces the PDF of the paper; it comes in the handover package. If the run was aborted, the button is called “Download abort document (ZIP)”.
The download is for your records. The wizard puts the paper in its current state into the data package itself anyway (chapter 8). Keep the ZIP: with it you pick up again for the next version or a correction (chapter 10).
8. Data package for DDAS
The data package is created in the section “Prepare the handover to DDAS”. On route A it is below “Questionnaire complete”, on route B after “Continue to the PLC project”. After an abort there is no data package from the questionnaire.
Packing the PLC project ZIP
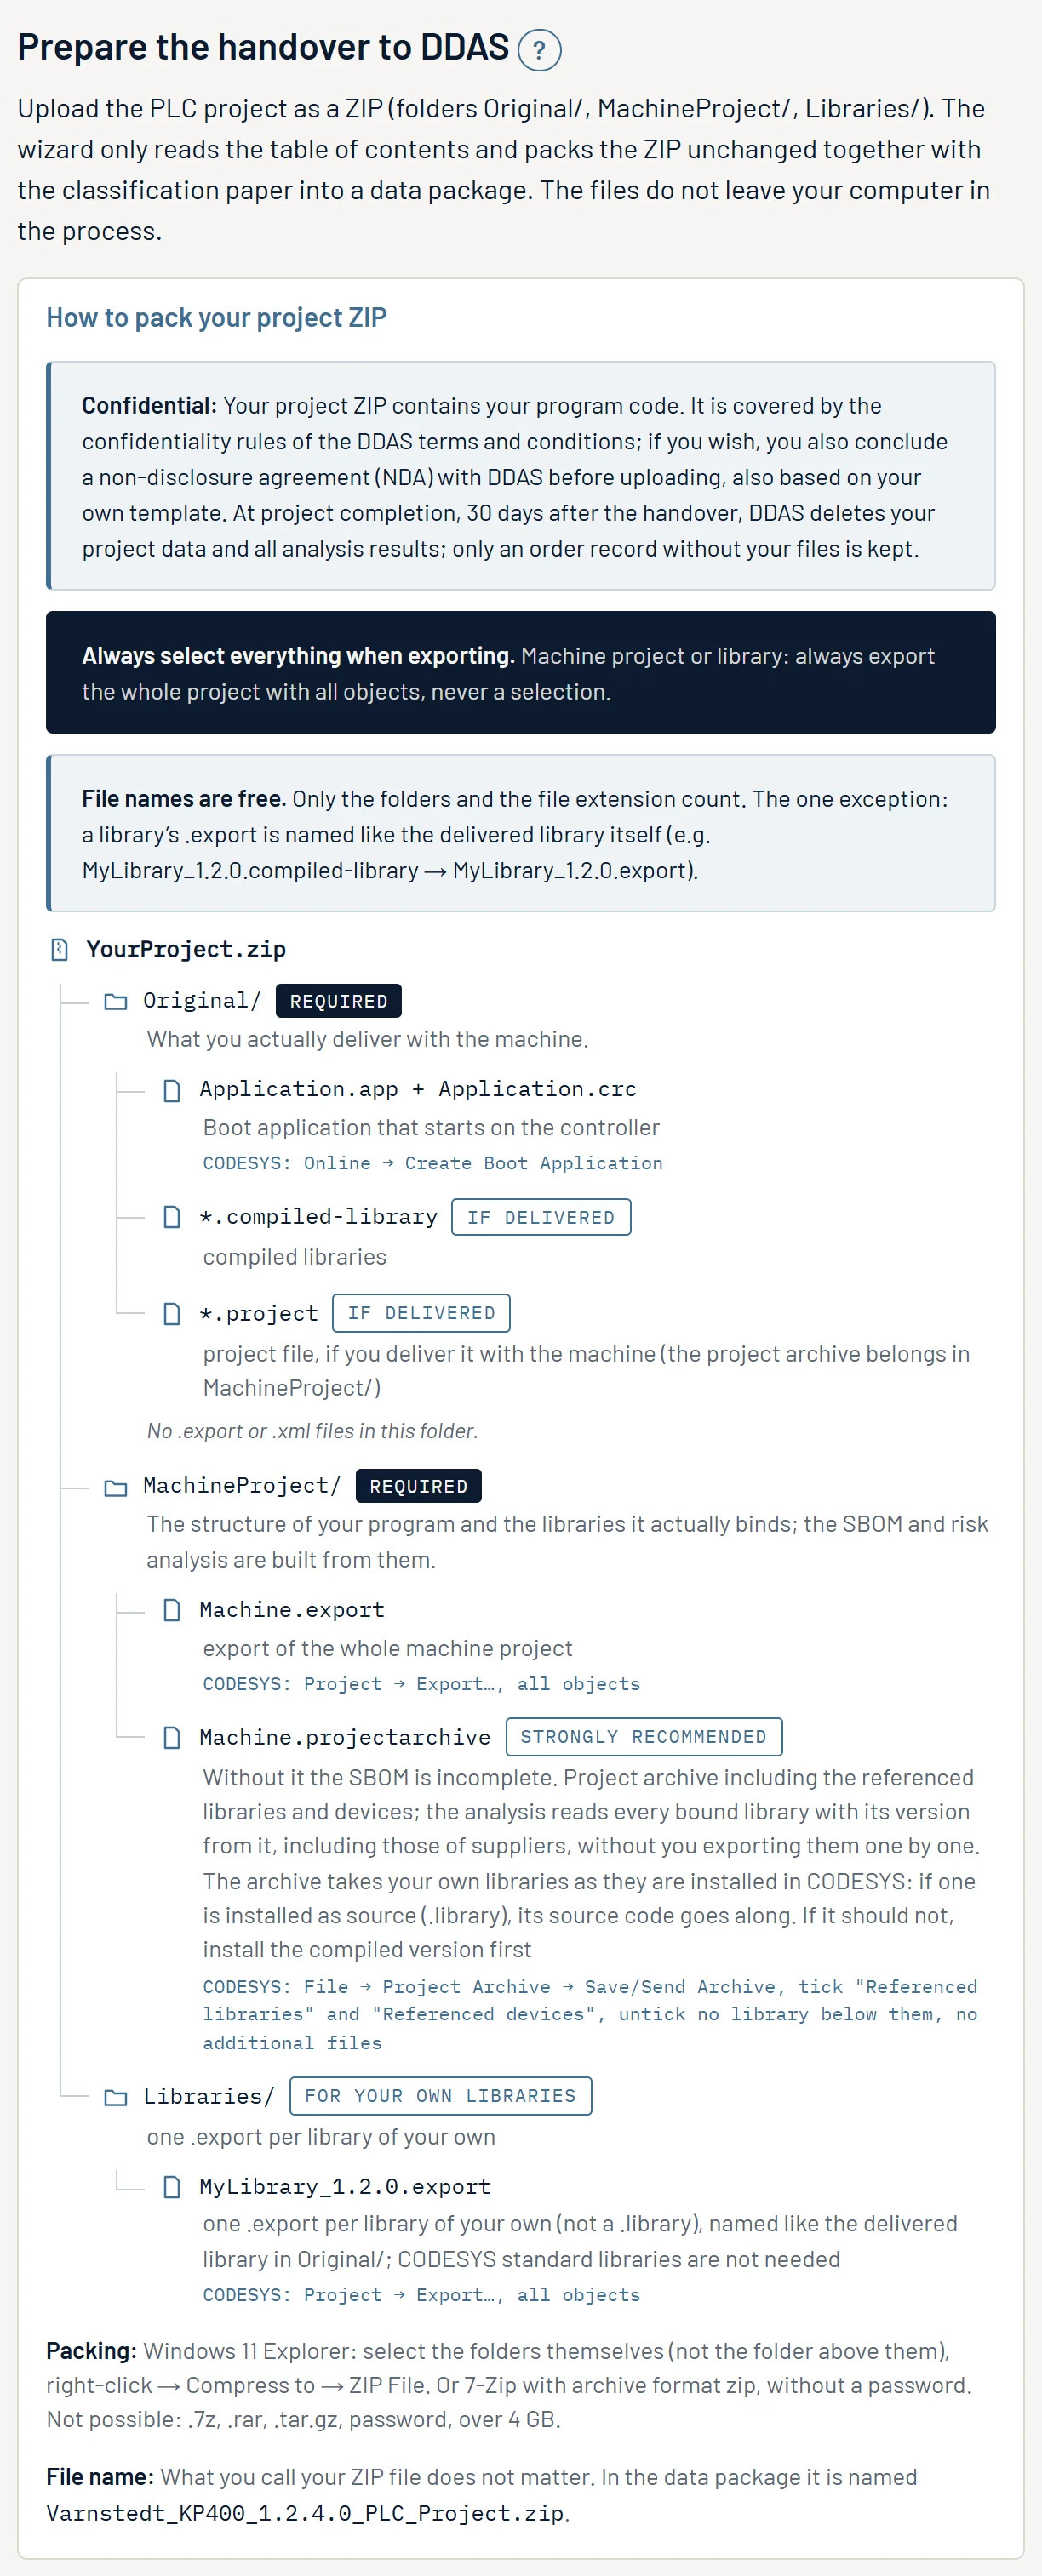
“How to pack your project ZIP” expands the guide for your profile. For a machine program, three folders go into the ZIP file:
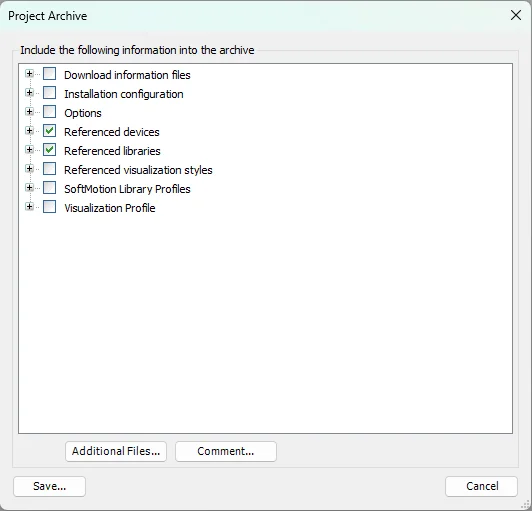
Original/(required): the boot applicationApplication.appwithApplication.crc(“CODESYS: Online → Create Boot Application”), plus delivered*.compiled-libraryand*.projectfiles if you deliver them with the machine. No.exportor.xmlfiles in this folder.MachineProject/(required): the export of the whole machine project as.export(“CODESYS: Project → Export…, all objects”) and the project archive as.projectarchive(“CODESYS: File → Project Archive → Save/Send Archive”). In the archive, tick “Referenced libraries” and “Referenced devices”, do not untick any library below them and do not add any additional files. The archive takes your own libraries as they are installed in CODESYS; if one is installed as source, its source code goes with it. The project archive is strongly recommended: without it the SBOM is incomplete; the wizard points this out but does not block the data package. It is used only for the analysis; it does not appear in the handover package under the delivered software. Whether you also give it to your customers is up to you.Libraries/(for your own libraries): one.exportper library of your own, not a.library, named like the delivered library. CODESYS standard libraries are not needed.
A library package (only if booked) has its own tree with Package/, Libraries/ and, only with an application example, Original/; the guide shows it if you have chosen this profile.
Rules: when exporting, always choose the whole project with all objects. File names are free; only the folder and the extension count. Only a library's .export is named like the library. Under Windows 11, pack the folders themselves (not the folder above them): select them, right-click → Compress to → ZIP File. Not possible: .7z, .rar, .tar.gz, a password, and more than 4 GB. The wizard names the ZIP file in the data package itself.
Without source code
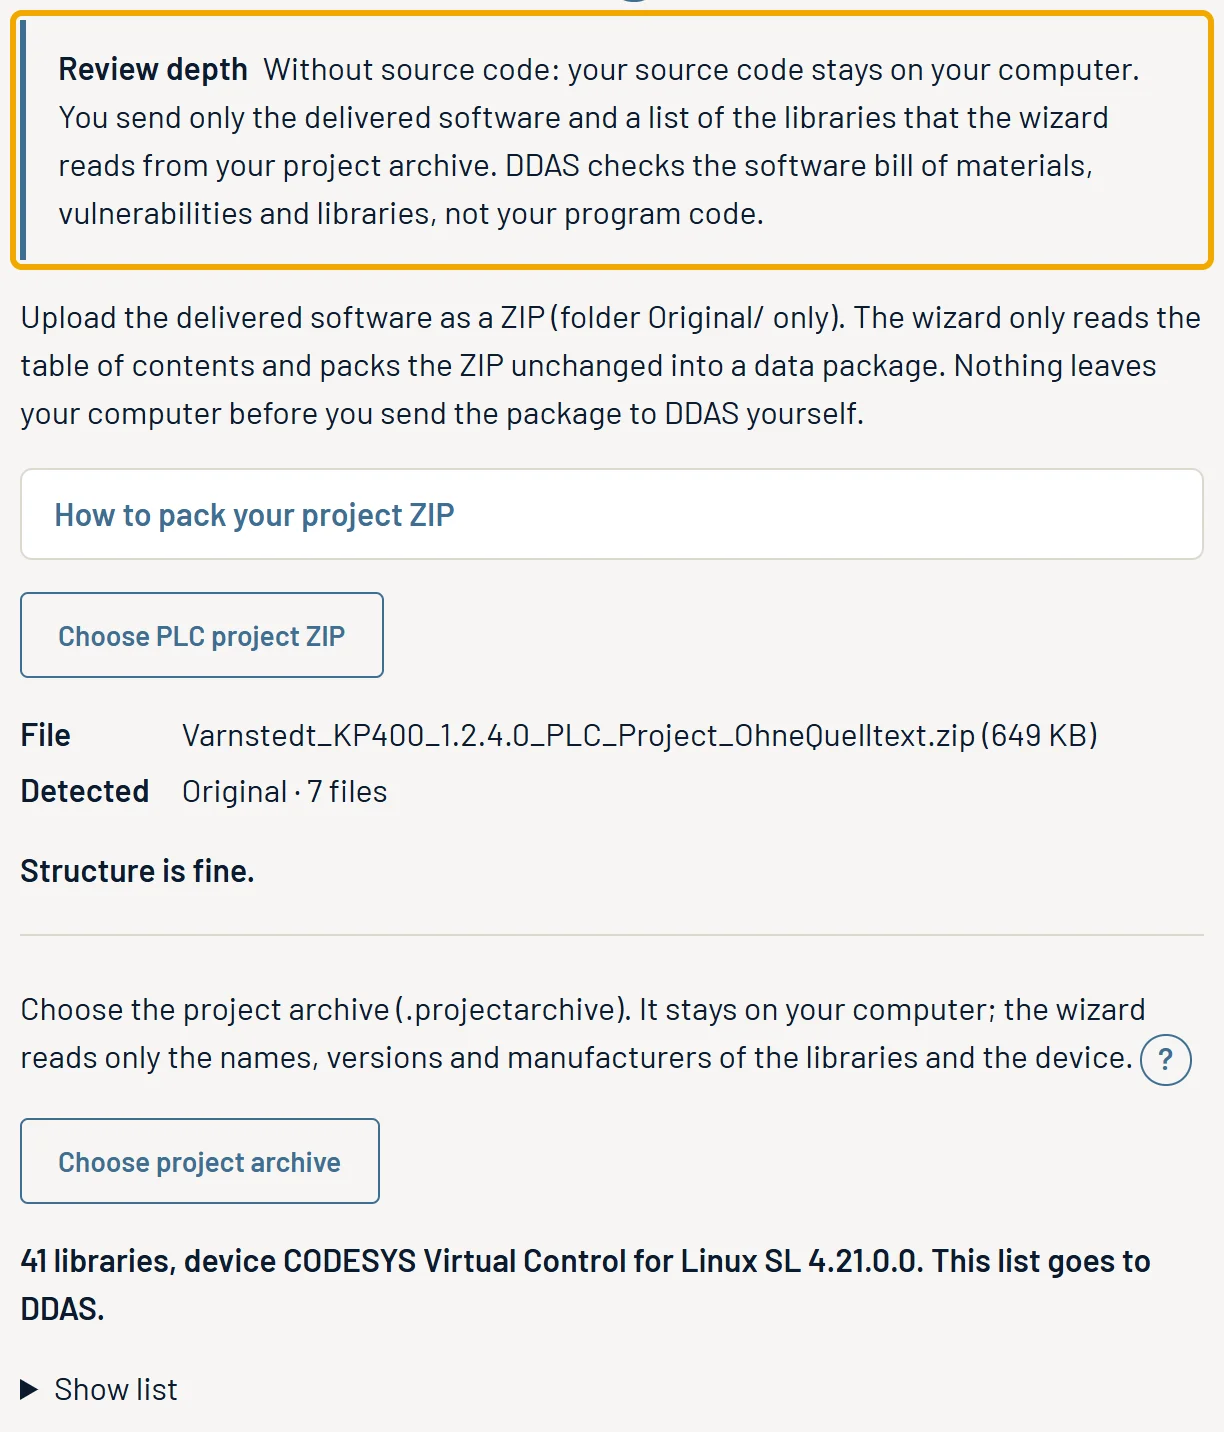
Above the section you see the review depth you ordered. “Full review” is the route above. If you ordered “Without source code”, your source code stays on your computer:
- The ZIP file contains only the folder
Original/with the boot application (.appand.crc) and the delivered*.compiled-library. The wizard rejects other folders and files containing source code (.project,.projectarchive,.library,.export,.xml). - Save the project archive as described above and choose it separately with “Choose project archive”. On your computer the wizard reads only the names, versions and manufacturers of the libraries and the device and shows “{n} libraries, device …”. Only this list goes into the data package, not the archive.
- The wizard checks that the archive and the boot application match. If they come from different project states, no package is created; save the archive again from the same state.
With this, DDAS checks the software bill of materials, vulnerabilities and libraries, not your program code. The cover sheet, the risk analyses and the check report state the review depth; the rules on the program code appear there as “not checked”.
Check in the browser
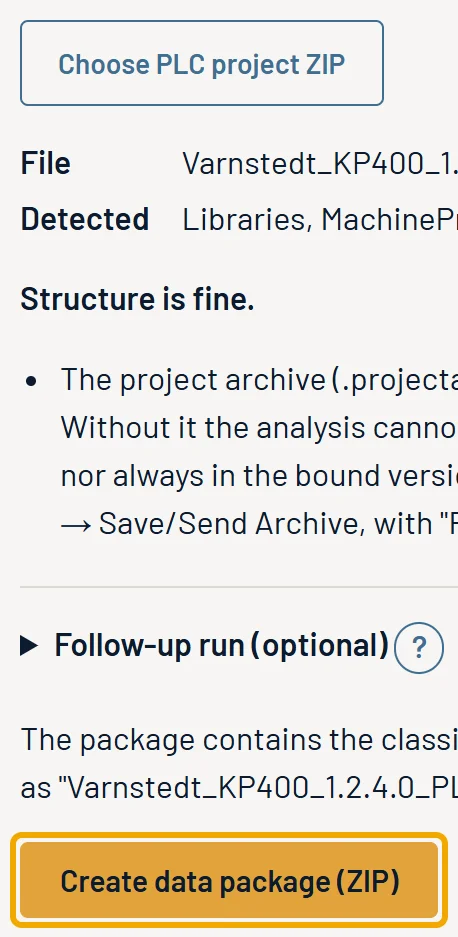
Click “Choose PLC project ZIP”. The wizard only reads the table of contents; the files do not leave your computer. Under “File” and “Detected” you see the name, size, detected folders and number of files. “Structure is fine.” means: no errors. Errors are listed below and block the package; notices do not block it (chapter 12). A single enclosing folder is skipped.
Creating the package
For a new version, first expand “Follow-up run (optional)” (chapter 10). Then click “Create data package (ZIP)”. The browser downloads …_CRA-INPUT_EN.zip; it contains your PLC project, on route A the Classification Paper in its current state, on route B your details, and the manifest with a checksum per file.
Sending the checksum or using e-mail
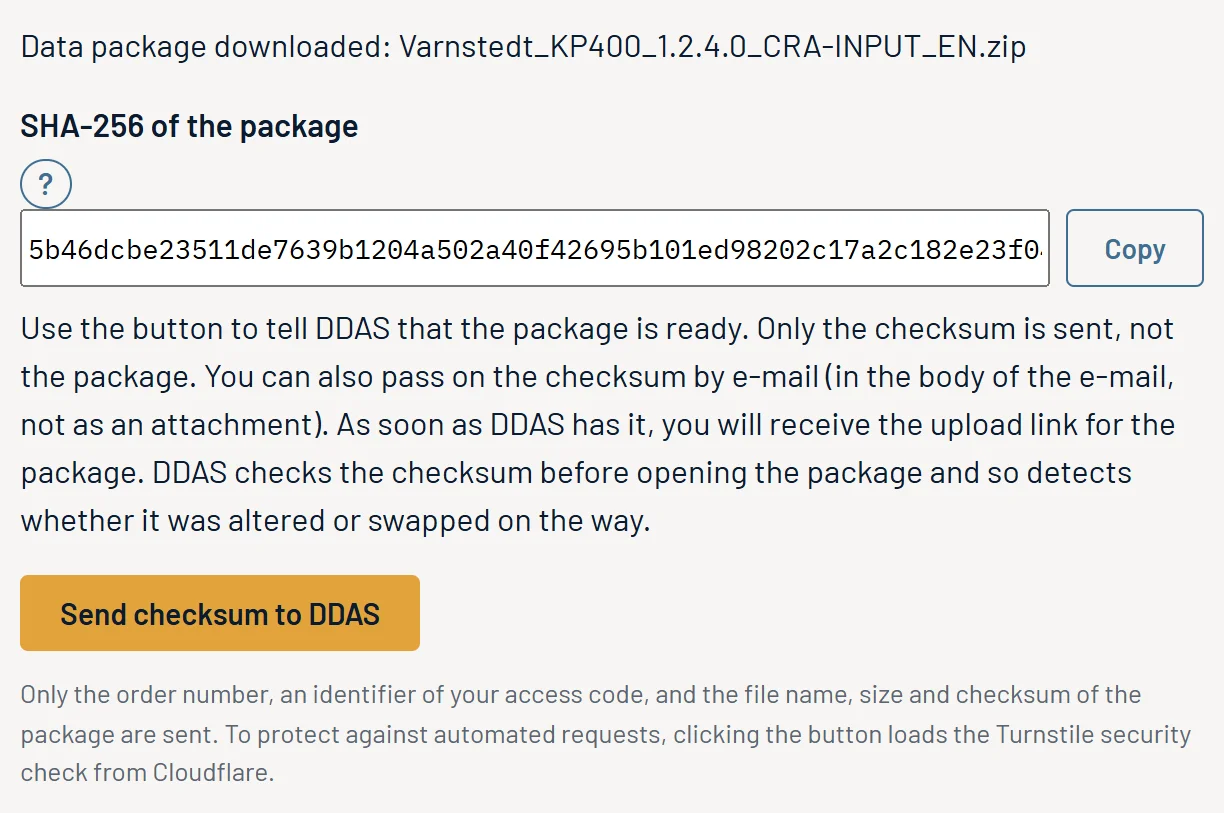
After creation, the checksum appears under “SHA-256 of the package”; “Copy” puts it on the clipboard. DDAS checks it before opening the package and so detects whether the package was altered or swapped on the way.
Then tell DDAS that the package is ready. Do not send the package itself by e-mail.
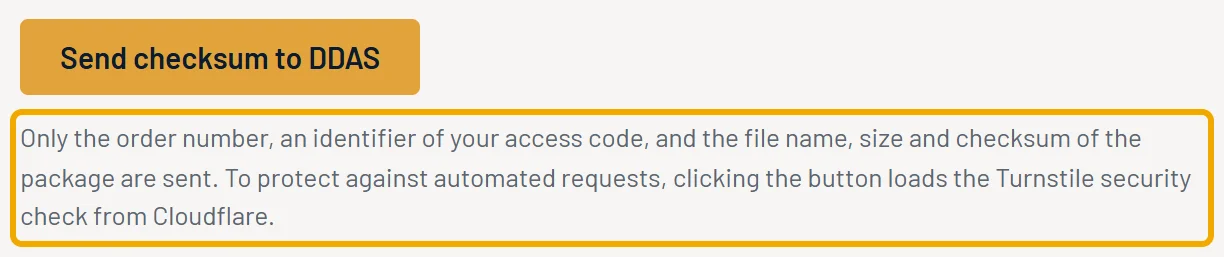
- If the button “Send checksum to DDAS” appears, use it to report that the package is ready. Only the order number, an identifier of your access code, the file name, size and checksum are sent, not the package.
- Otherwise, or if the report fails: send DDAS an e-mail “Package ready” with the checksum in the body of the e-mail, not as an attachment.
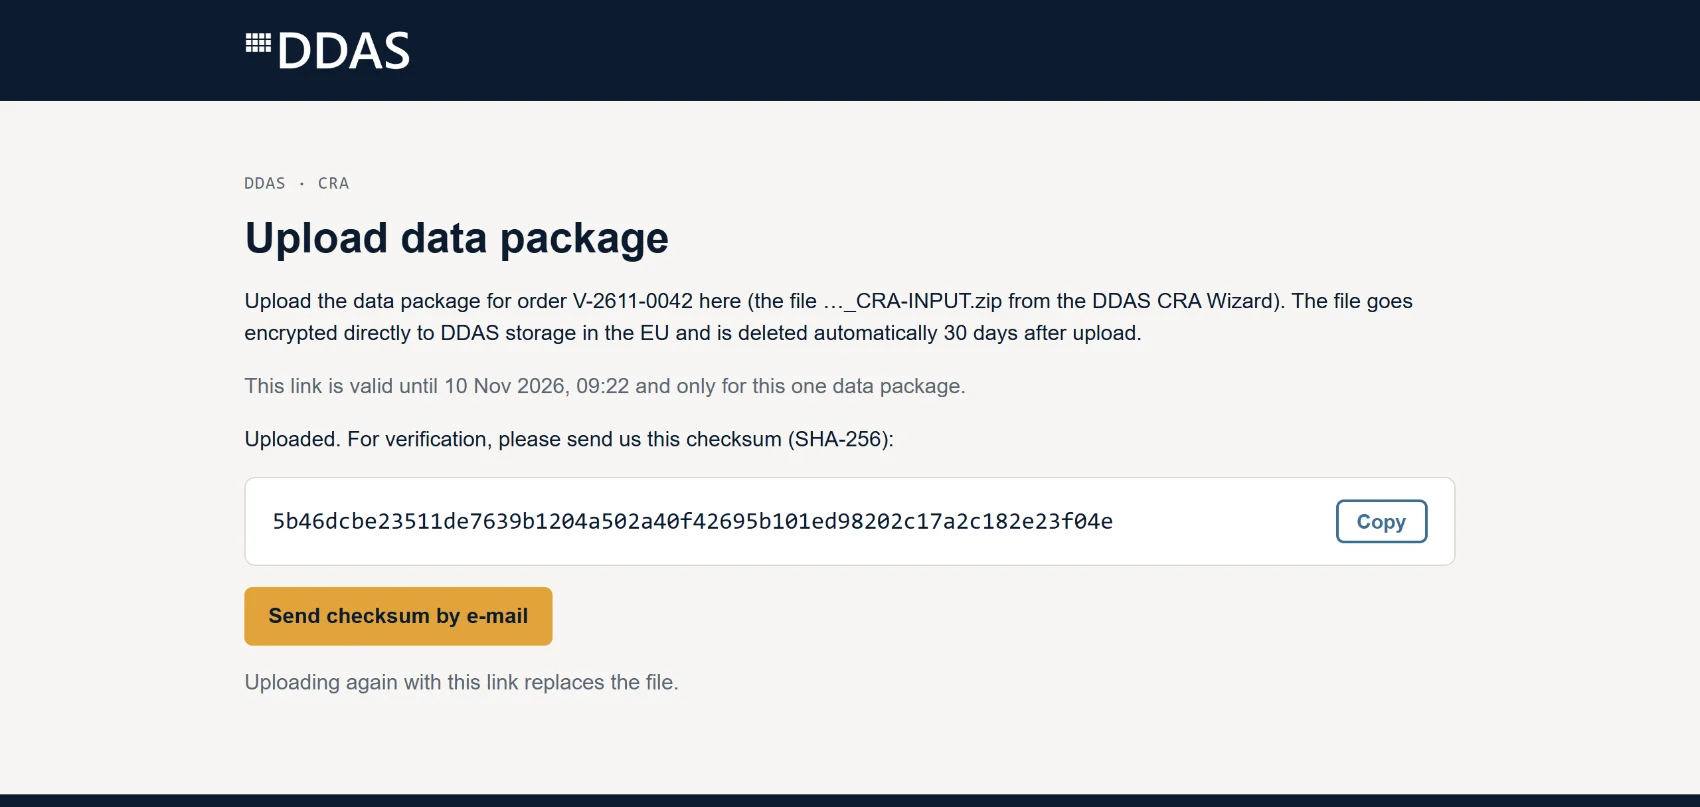
In response, DDAS sends an upload link to the contact person for the project data whom you named in your order. It is valid for 7 days; if it has expired, you receive a new one on request. On the upload page you select the data package; your browser calculates the checksum and uploads the package directly to our storage in the EU. DDAS compares the checksum with the one you reported before opening the package.
9. Handover package from DDAS
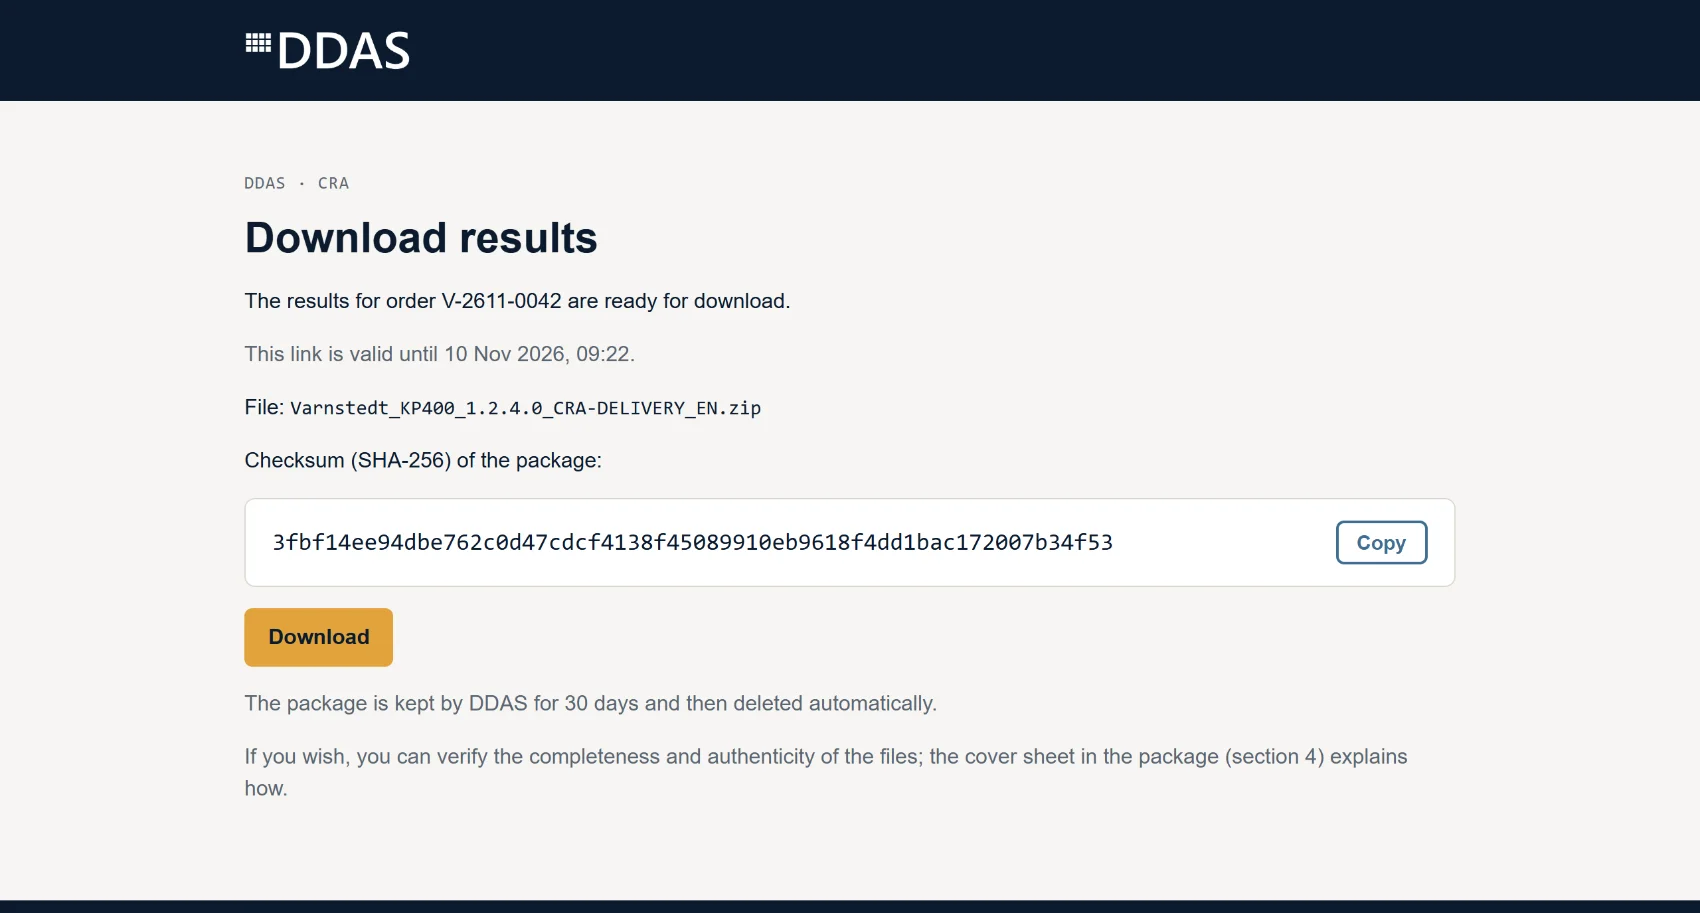
After the check and the analysis, you receive the handover package …_CRA-DELIVERY_EN.zip from DDAS. It is the only delivery from DDAS. The contact person for the project data receives an e-mail with a link to the download page. It is valid for 7 days. The page shows the order, the file, the validity and the checksum of the package (“Copy”); “Download” downloads it. Download the package within 30 days of the handover; after that, DDAS deletes all project data (section “Retention”).
Contents
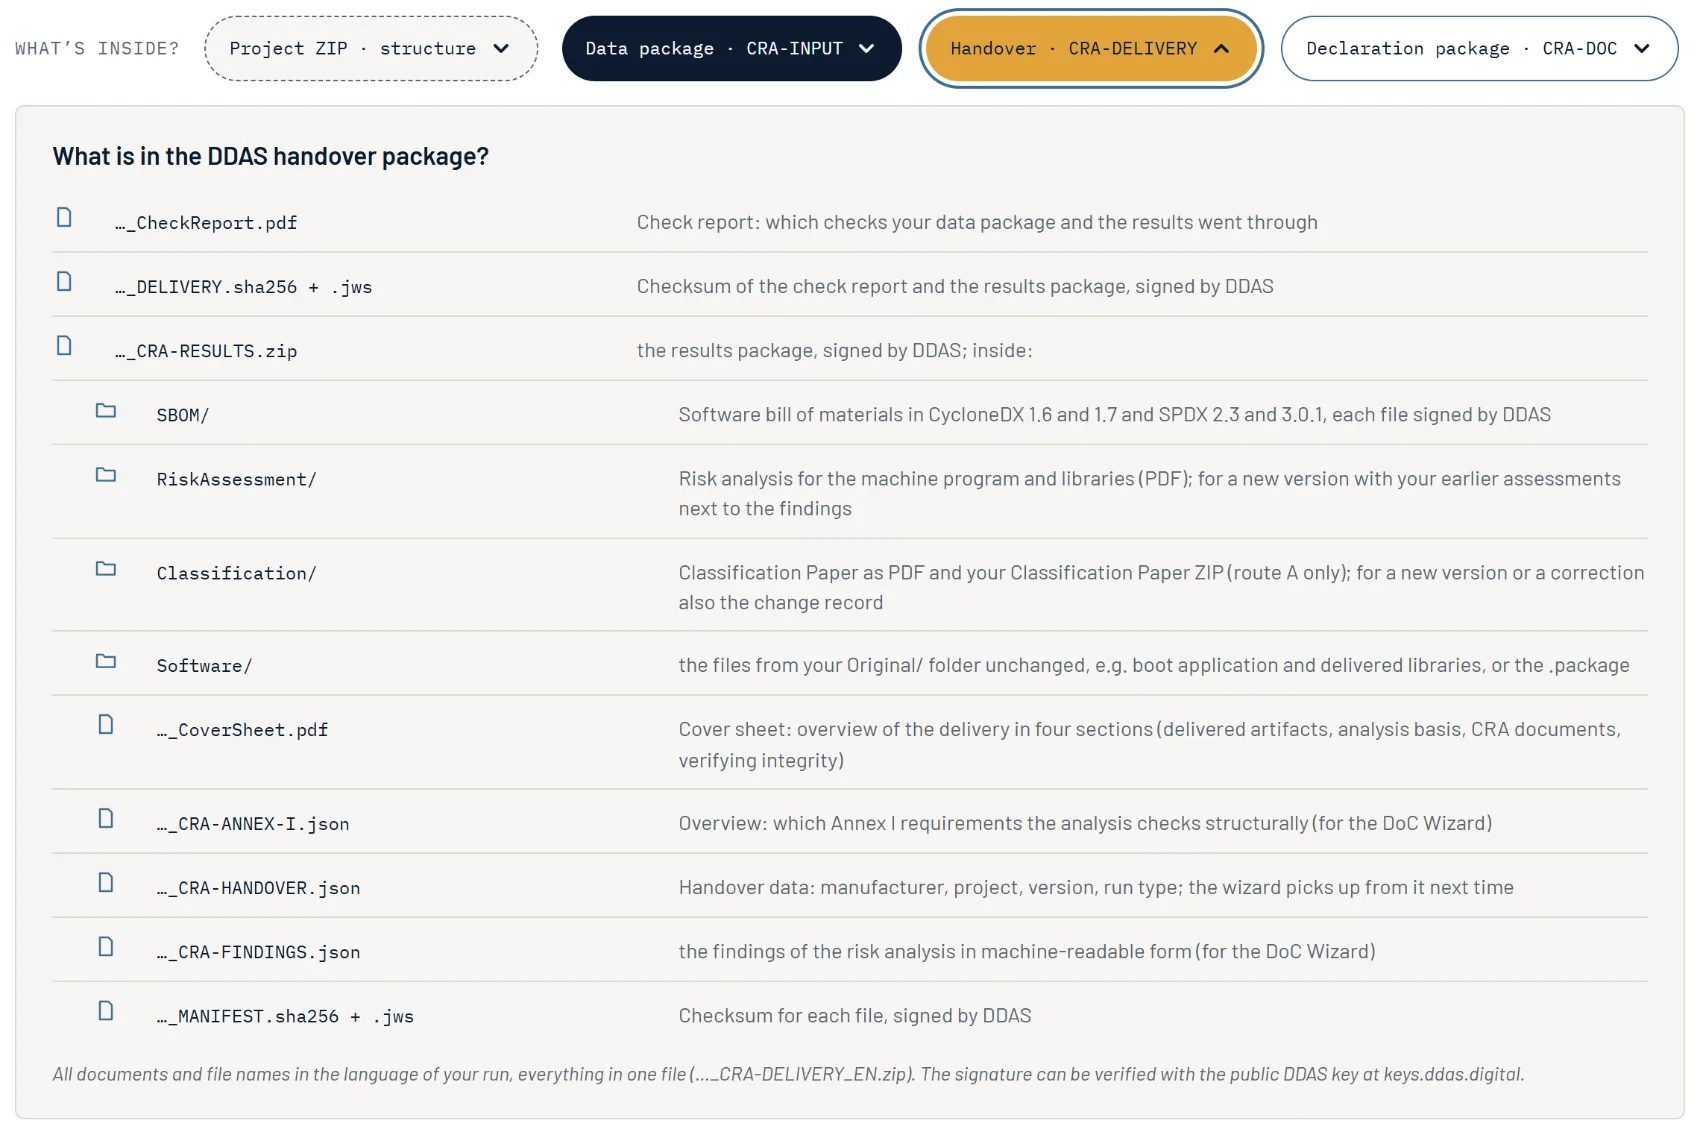
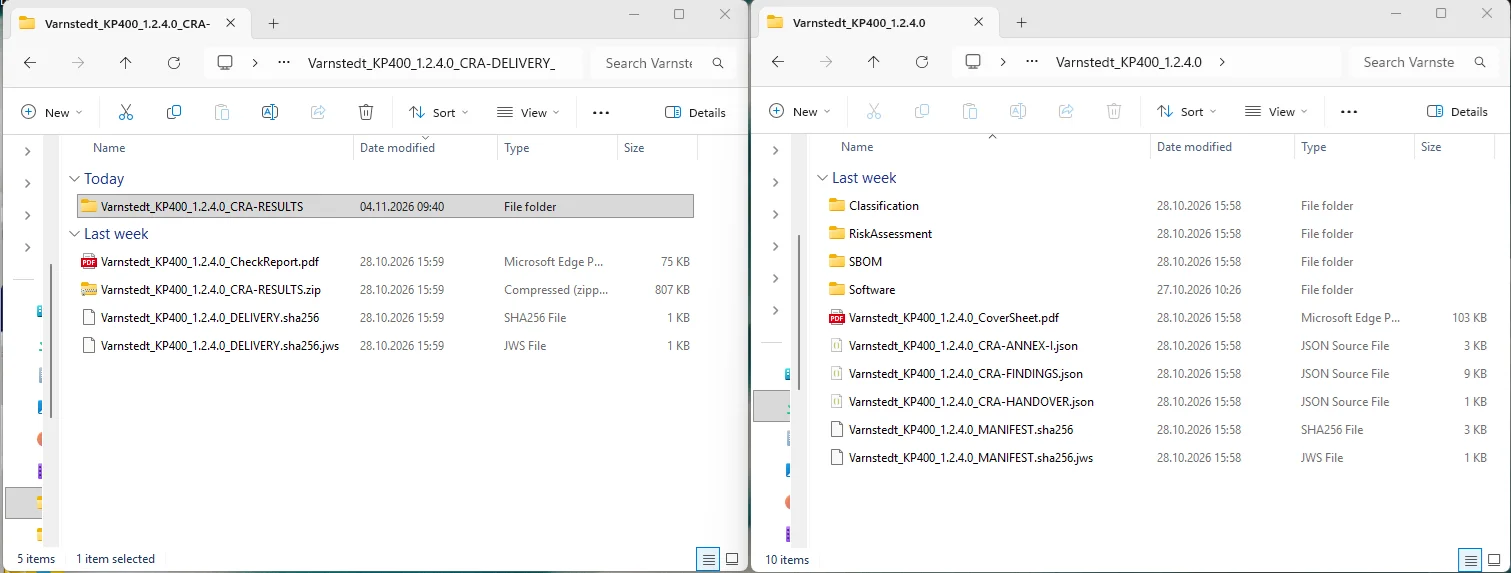
…_CheckReport.pdf: which checks your data package and the results went through,…_DELIVERY.sha256with.jws: checksum of the check report and the results package, signed by DDAS,…_CRA-RESULTS.zip, the results package, signed by DDAS. Inside:SBOM/: software bill of materials in CycloneDX 1.6 and 1.7 and SPDX 2.3 and 3.0.1, each file signed,RiskAssessment/: risk analysis for the machine program and the libraries (PDF),Classification/: Classification Paper as PDF and your Classification Paper ZIP (route A only); for a new version or a correction also the change record,Software/: the files from yourOriginal/folder unchanged, e.g. boot application and delivered libraries, or the.package,…_CoverSheet.pdf: the cover sheet of the delivery (not the cover sheet of your declaration, chapter 11), an overview in four sections: 1. Delivered artifacts, 2. Analysis basis, 3. CRA documents, 4. Verifying integrity,…_CRA-ANNEX-I.json,…_CRA-HANDOVER.json,…_CRA-FINDINGS.json: data for the DoC Wizard,…_MANIFEST.sha256with.jws: checksum for each file, signed by DDAS.
All documents and file names are in the language of your run.
Verifying the signature
The easiest way to check the package is in the CRA DoC Wizard: upload it there (chapter 11). On your computer, the wizard checks the signature and the checksums and reports “Handover checked: it comes from DDAS unchanged.” It shows the “DDAS key (fingerprint)”, which you can cross-check at keys.ddas.digital. Without the wizard, you check with the public DDAS key at keys.ddas.digital; the steps are in the cover sheet of the delivery, section 4 “Verifying integrity”.
Retention
The handover package is part of your technical documentation. The CRA requires you to keep the technical documentation and the declaration of conformity for at least 10 years after placing on the market or for the support period, whichever is longer; a separate set for each product version. DDAS keeps no copy: at project completion, 30 days after the handover, DDAS deletes your project data and all analysis results. Keep the package unchanged. For the next run you upload it again (chapter 10).
10. Next version: follow-up run and correction run
If your software changes, the process runs again from step 2. What you have already worked out comes along.
Which run when
- Follow-up run: The software has changed; you state a new version.
- Correction run: Same version, software unchanged; you have only corrected your Classification Paper. Upload the same PLC project again. DDAS recognises that the software is unchanged; the change record shows the changes to the paper. A correction run is free of charge within 30 days of the handover; after that it costs the same as a follow-up run.
DDAS determines the run type itself on receipt. If you have booked the option, you also take route A in the follow-up run: you load your progress file, enter the new version and the new approval, and adjust only what has changed. You need the new paper for the declaration of the new version. With the basic package, you take route B. For a correction run you need route A, because you change the paper.
What to bring
- the earlier handover package
…_CRA-DELIVERY_EN.zip, - your statement on the findings: the file
…_FindingStatements.jsonor the declaration package itself, - on route A, your progress file or your Classification Paper ZIP of the earlier version. If you only have the handover package, unpack it and then the results package
…_CRA-RESULTS.zipinside it; the paper ZIP is in itsClassification/folder. The wizard does not load the handover package itself or the results package.
In the Classification Wizard
- Enter the code, choose route A, click “Load a saved progress file” and choose the file of the earlier version (chapter 6).
- For a follow-up run, enter the new version via “Edit details”.
- Use the block bar to open the blocks that change and adjust the answers. In block G, enter the date and revision status of the new approval.
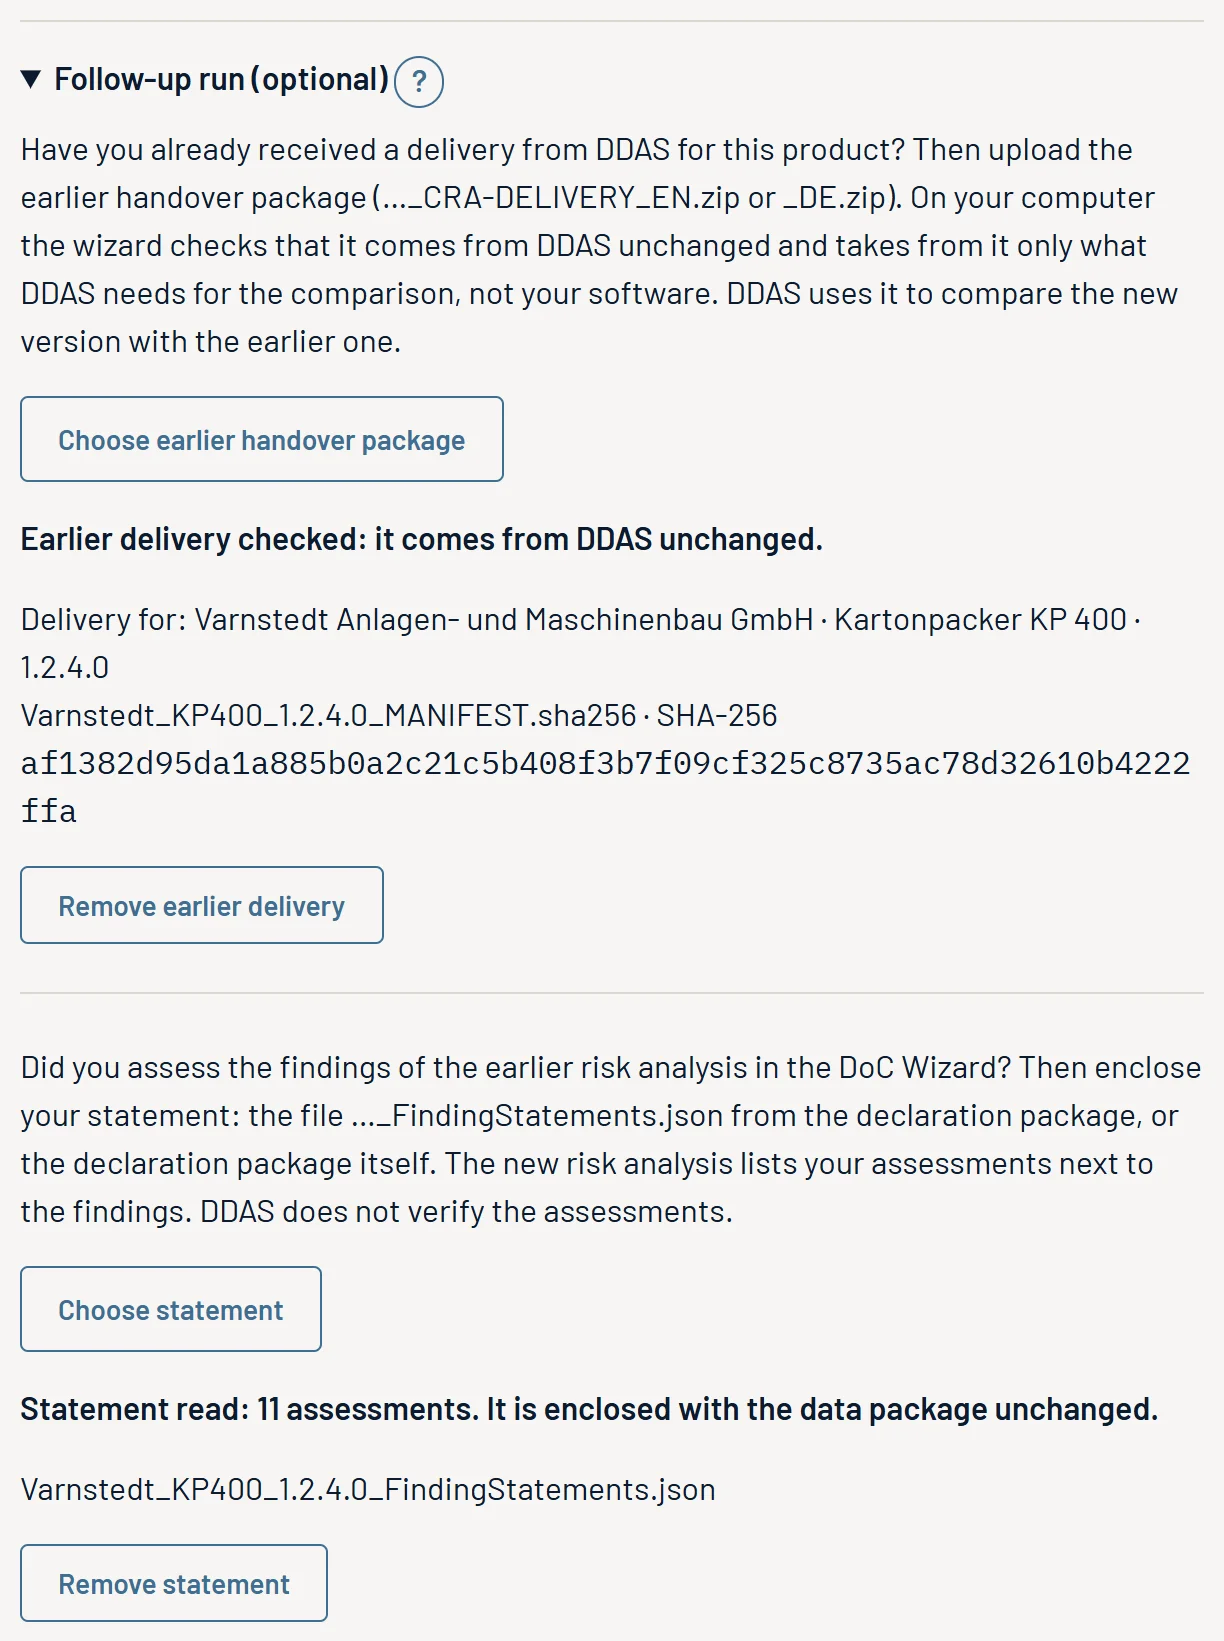
- On the completion page, in the data package section, expand “Follow-up run (optional)” and load the earlier handover package with “Choose earlier handover package”. The wizard checks it on your computer and reports “Earlier delivery checked: it comes from DDAS unchanged.” It takes over only what DDAS needs for the comparison, not your software; in the data package it is in the folder
Vorgaenger/. - Enclose your statement with “Choose statement” (e.g. “Statement read: 10 assessments. …”).
- “Create data package (ZIP)” as in chapter 8.
If the earlier delivery names a different product or the same version, the wizard points this out; it does not block.
What comes back
In the new handover package, the change record (…_ChangeRecord.pdf) is under Classification/: what has changed in the software, the answers and the findings. The new risk analysis lists your earlier assessments next to the findings.
In the DoC Wizard
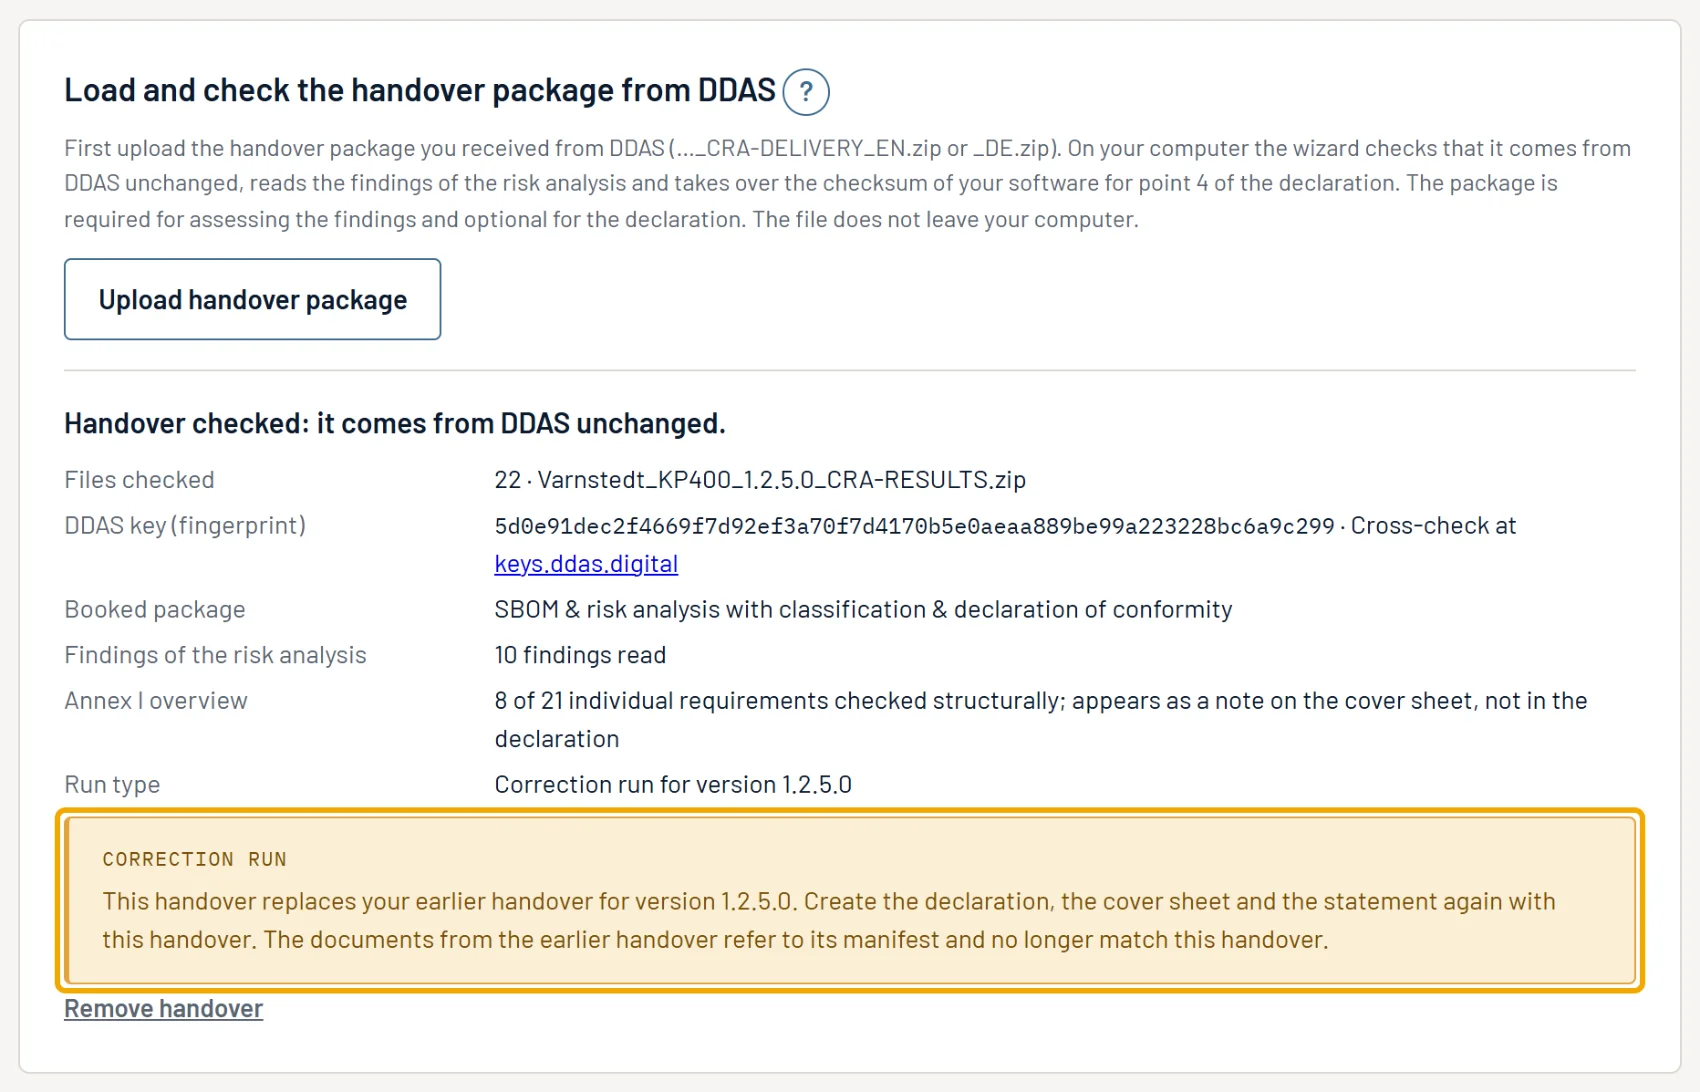
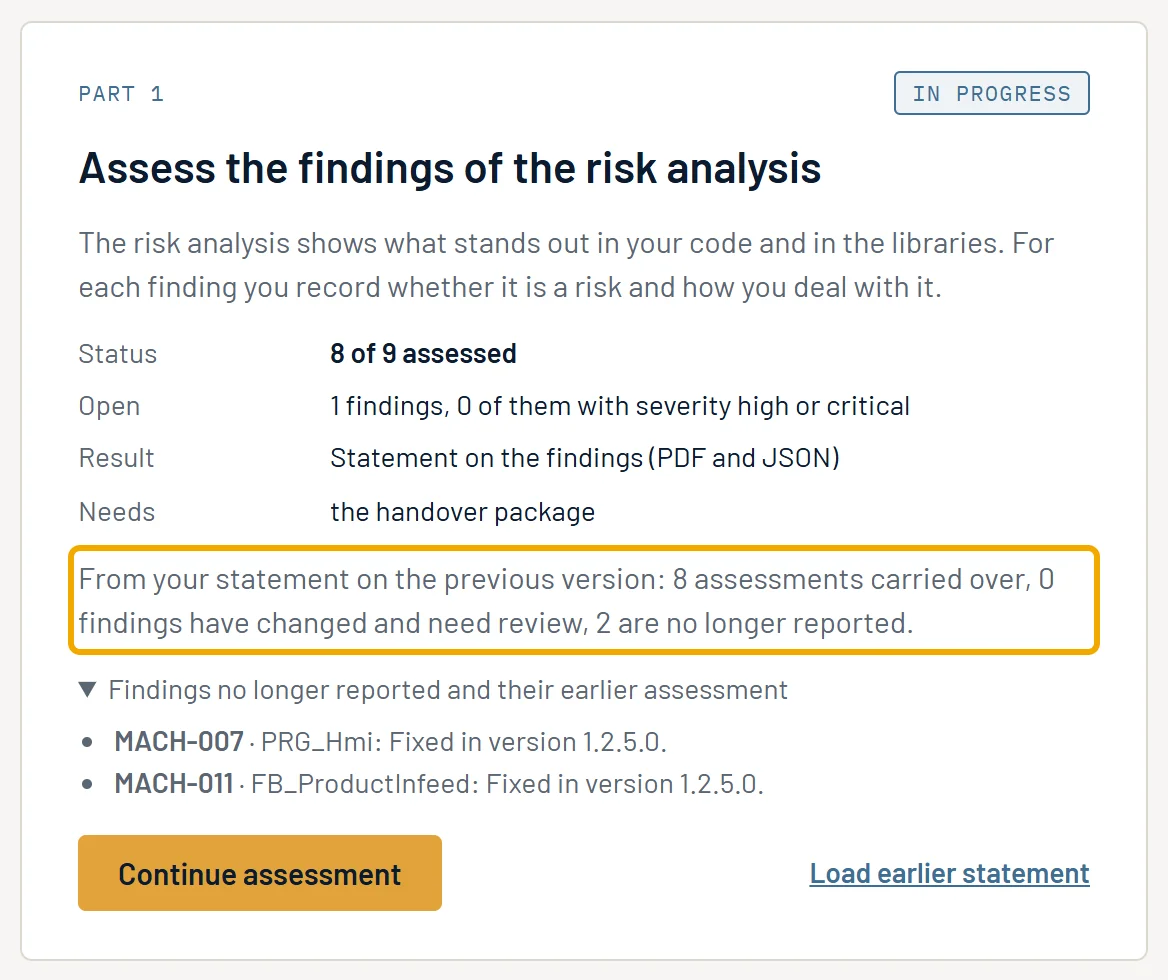
Load the new handover package. Under “Run type”, the list of the checked handover shows “First run”, “Follow-up run (previously version …)” or “Correction run for version …”. Unchanged findings stay assessed; part 1 of the overview states how many assessments were carried over, how many findings need review and how many are no longer reported. Changed findings are shown in the list as “review”; the earlier assessment is shown in the fields as a suggestion and applies only once you apply it. You can keep using your earlier DoC progress file; the wizard then asks whether it should assign the assessments (“Assign assessments” or “Discard assessments”).
Create the declaration, the cover sheet and the statement again with the new handover. For a correction run the wizard says: “This handover replaces your earlier handover for version 1.2.5.0. … The documents from the earlier handover refer to its manifest and no longer match this handover.”
11. CRA DoC Wizard
Loading documents and verifying the signature
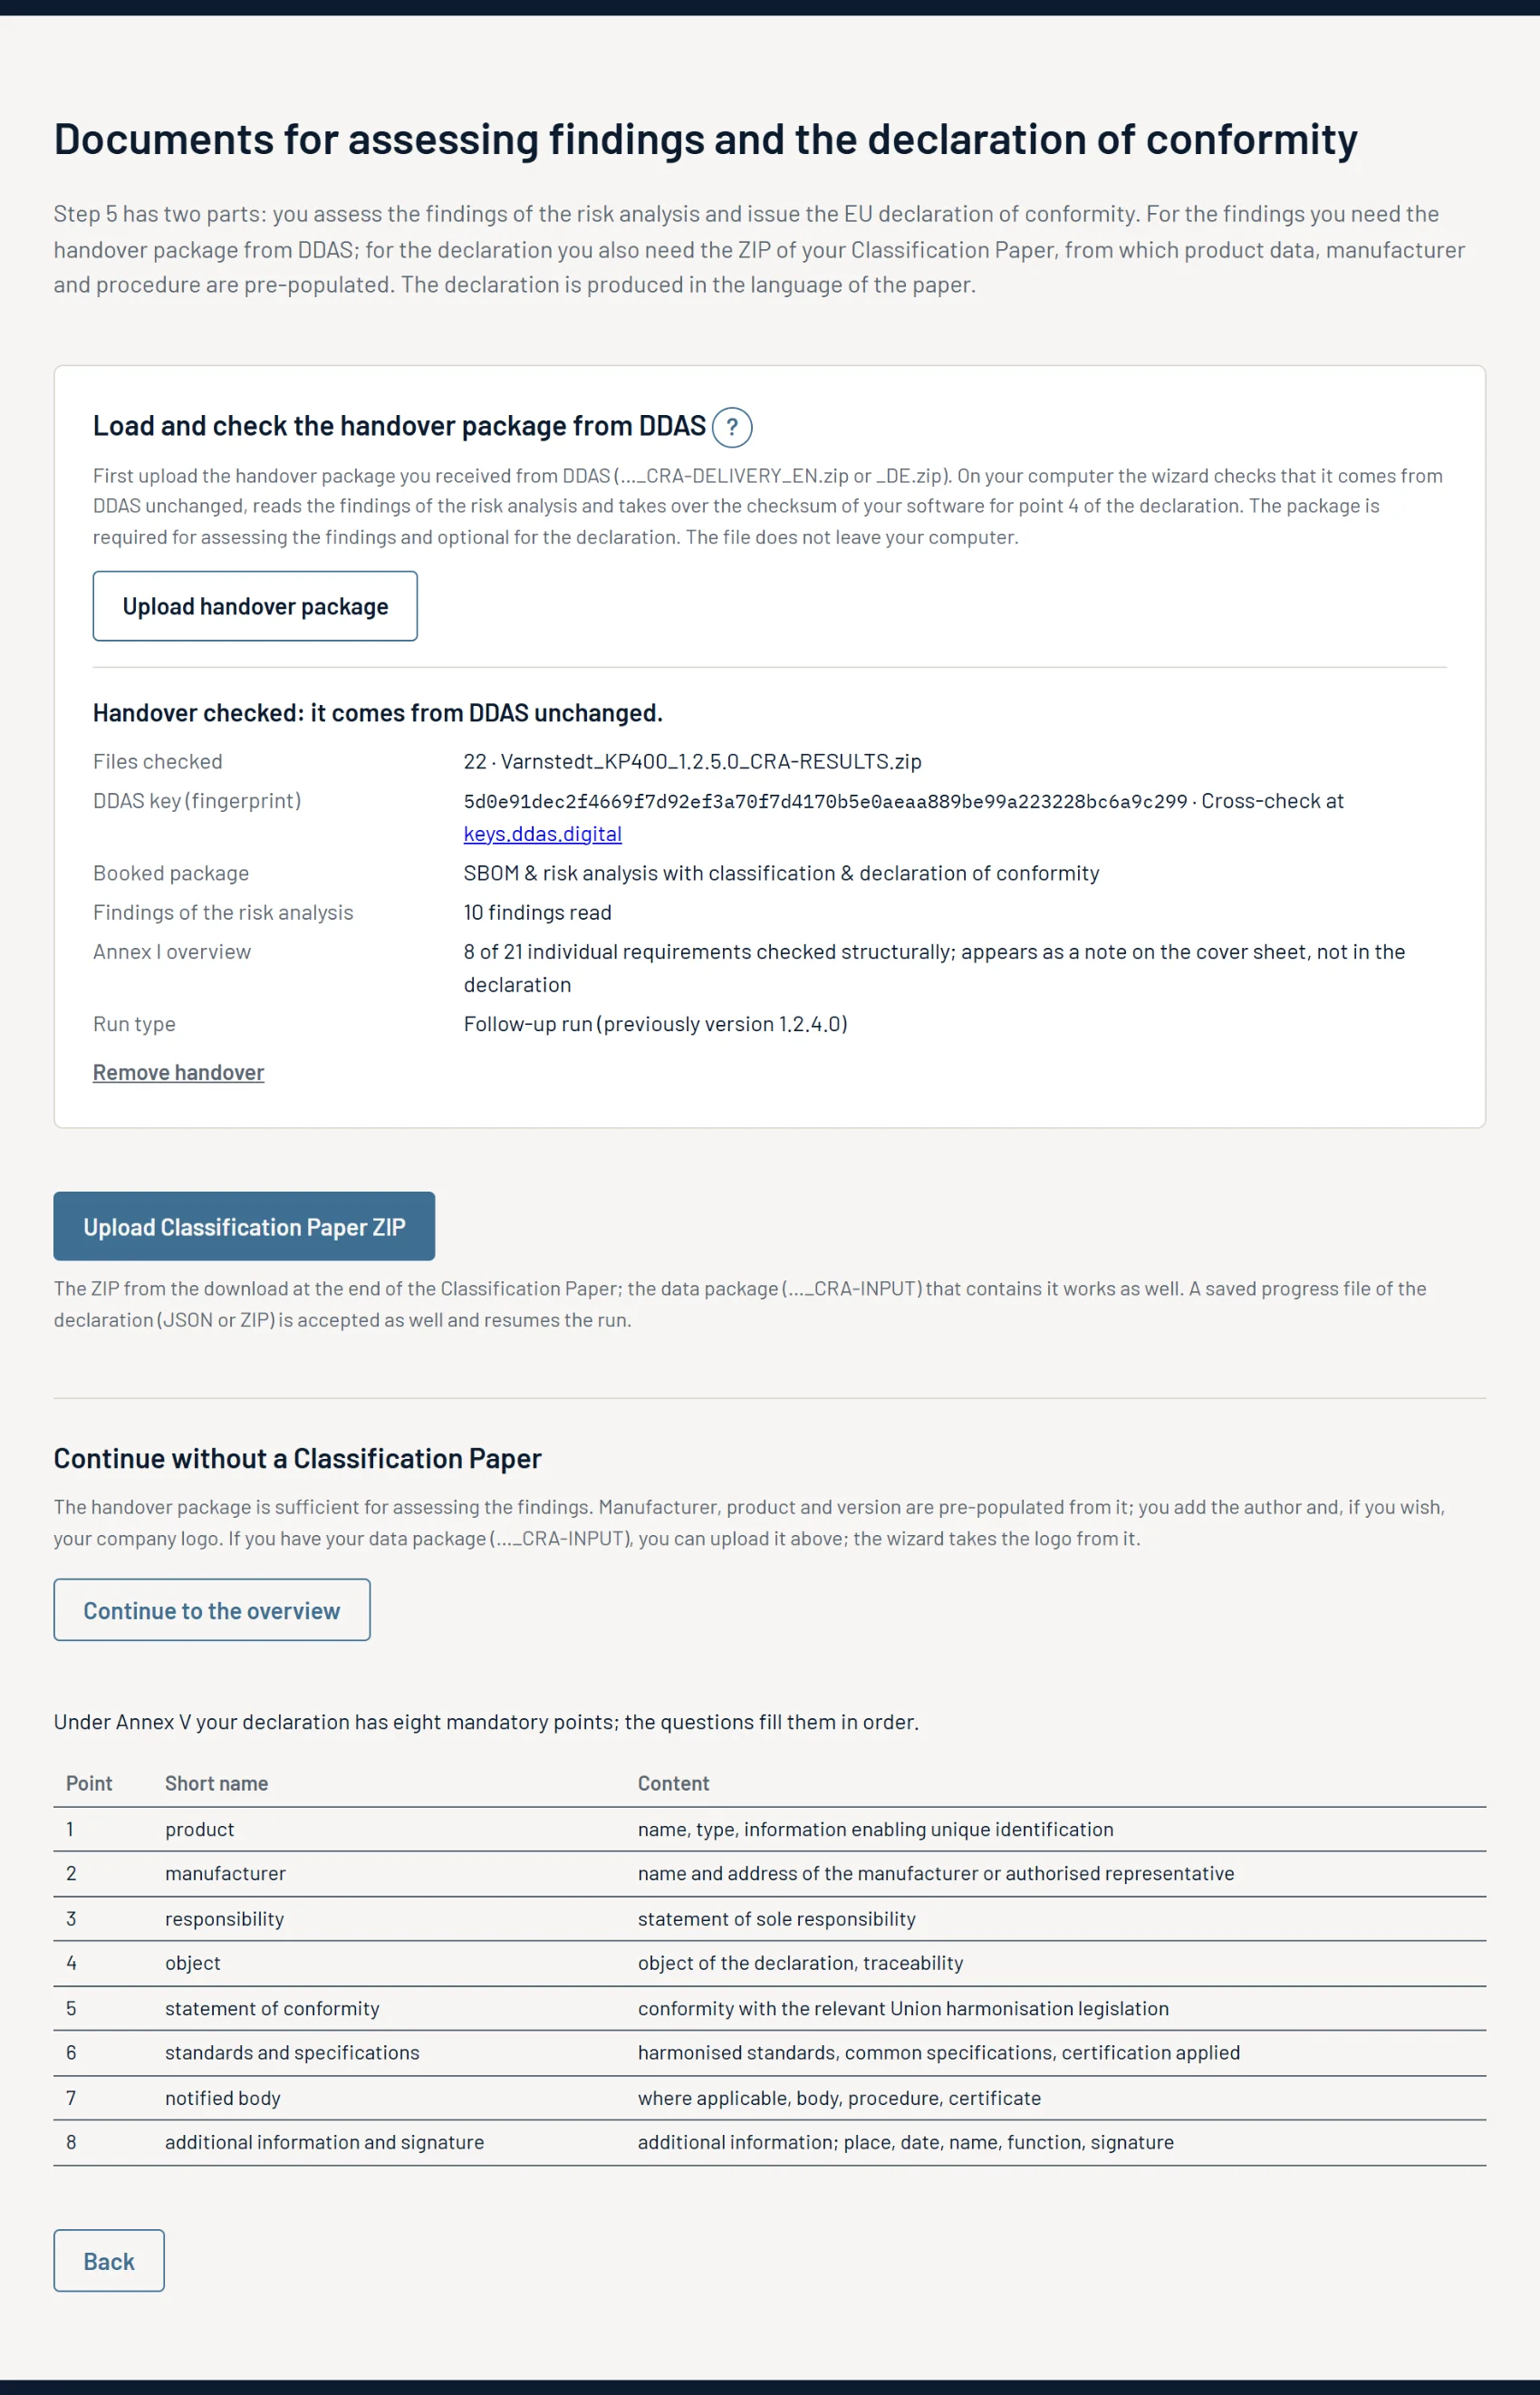
After the access code, “Documents for assessing findings and the declaration of conformity” appears.
- Under “Load and check the handover package from DDAS”, click “Upload handover package”. On your computer, the wizard checks that it comes from DDAS unchanged, reads the findings and takes over the checksum of your software for point 4 of the declaration. The file does not leave your computer. The result shows “Files checked”, “DDAS key (fingerprint)”, “Booked package”, “Findings of the risk analysis” and, where applicable, “Run type”.
- For the declaration, load your paper ZIP with “Upload Classification Paper ZIP”. The data package
…_CRA-INPUTworks as well. Product data, manufacturer and procedure are pre-filled from it. If the handover and the paper do not belong together, the wizard asks. - Without a paper: with a checked handover, “Continue to the overview” leads to the dialog “Details for the declaration”; manufacturer, product and version are pre-filled, and you add “Prepared by” and, if you wish, the logo. Without any documents at all there is “Enter details by hand”; then nothing is pre-filled.
The table at the bottom shows the eight mandatory points of the declaration under Annex V. “Leave wizard” leads back to “Access confirmed” and ends the run; save first. If you have loaded a handover package, the wizard asks first. If you came from the overview, “Back to the overview” takes you back.
Overview: part 1 and part 2
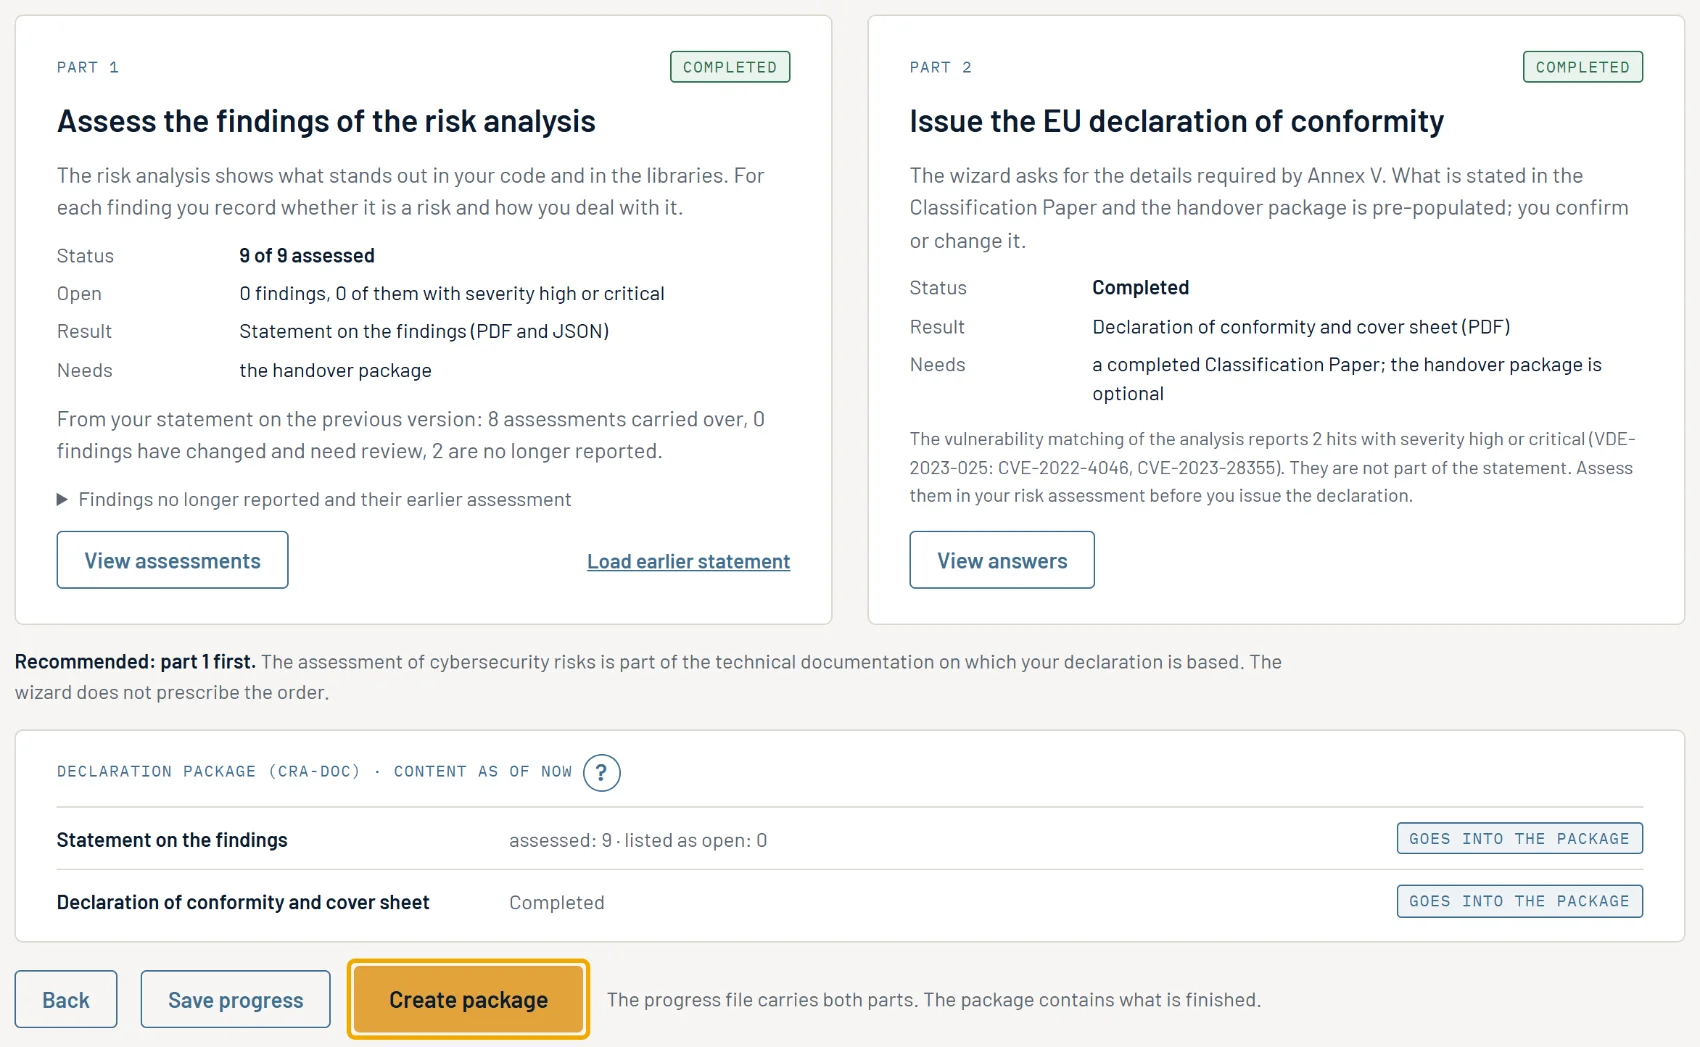
The overview “Assess findings and declaration of conformity” shows under “Loaded” what has been checked, and “Change documents”. Next to it are two cards with “Status”, “Result” and “Needs”:
- Part 1, “Assess the findings of the risk analysis”: “Start assessment”, “Continue assessment” or “View assessments”; plus “Load earlier statement”.
- Part 2, “Issue the EU declaration of conformity”: “Start declaration”, “Continue declaration” or “View answers”. Without the option it says “not booked”.
You choose the order yourself. Part 1 first is recommended. From each part, “To the overview” takes you back; the wizard does not jump on its own.
Assessing findings
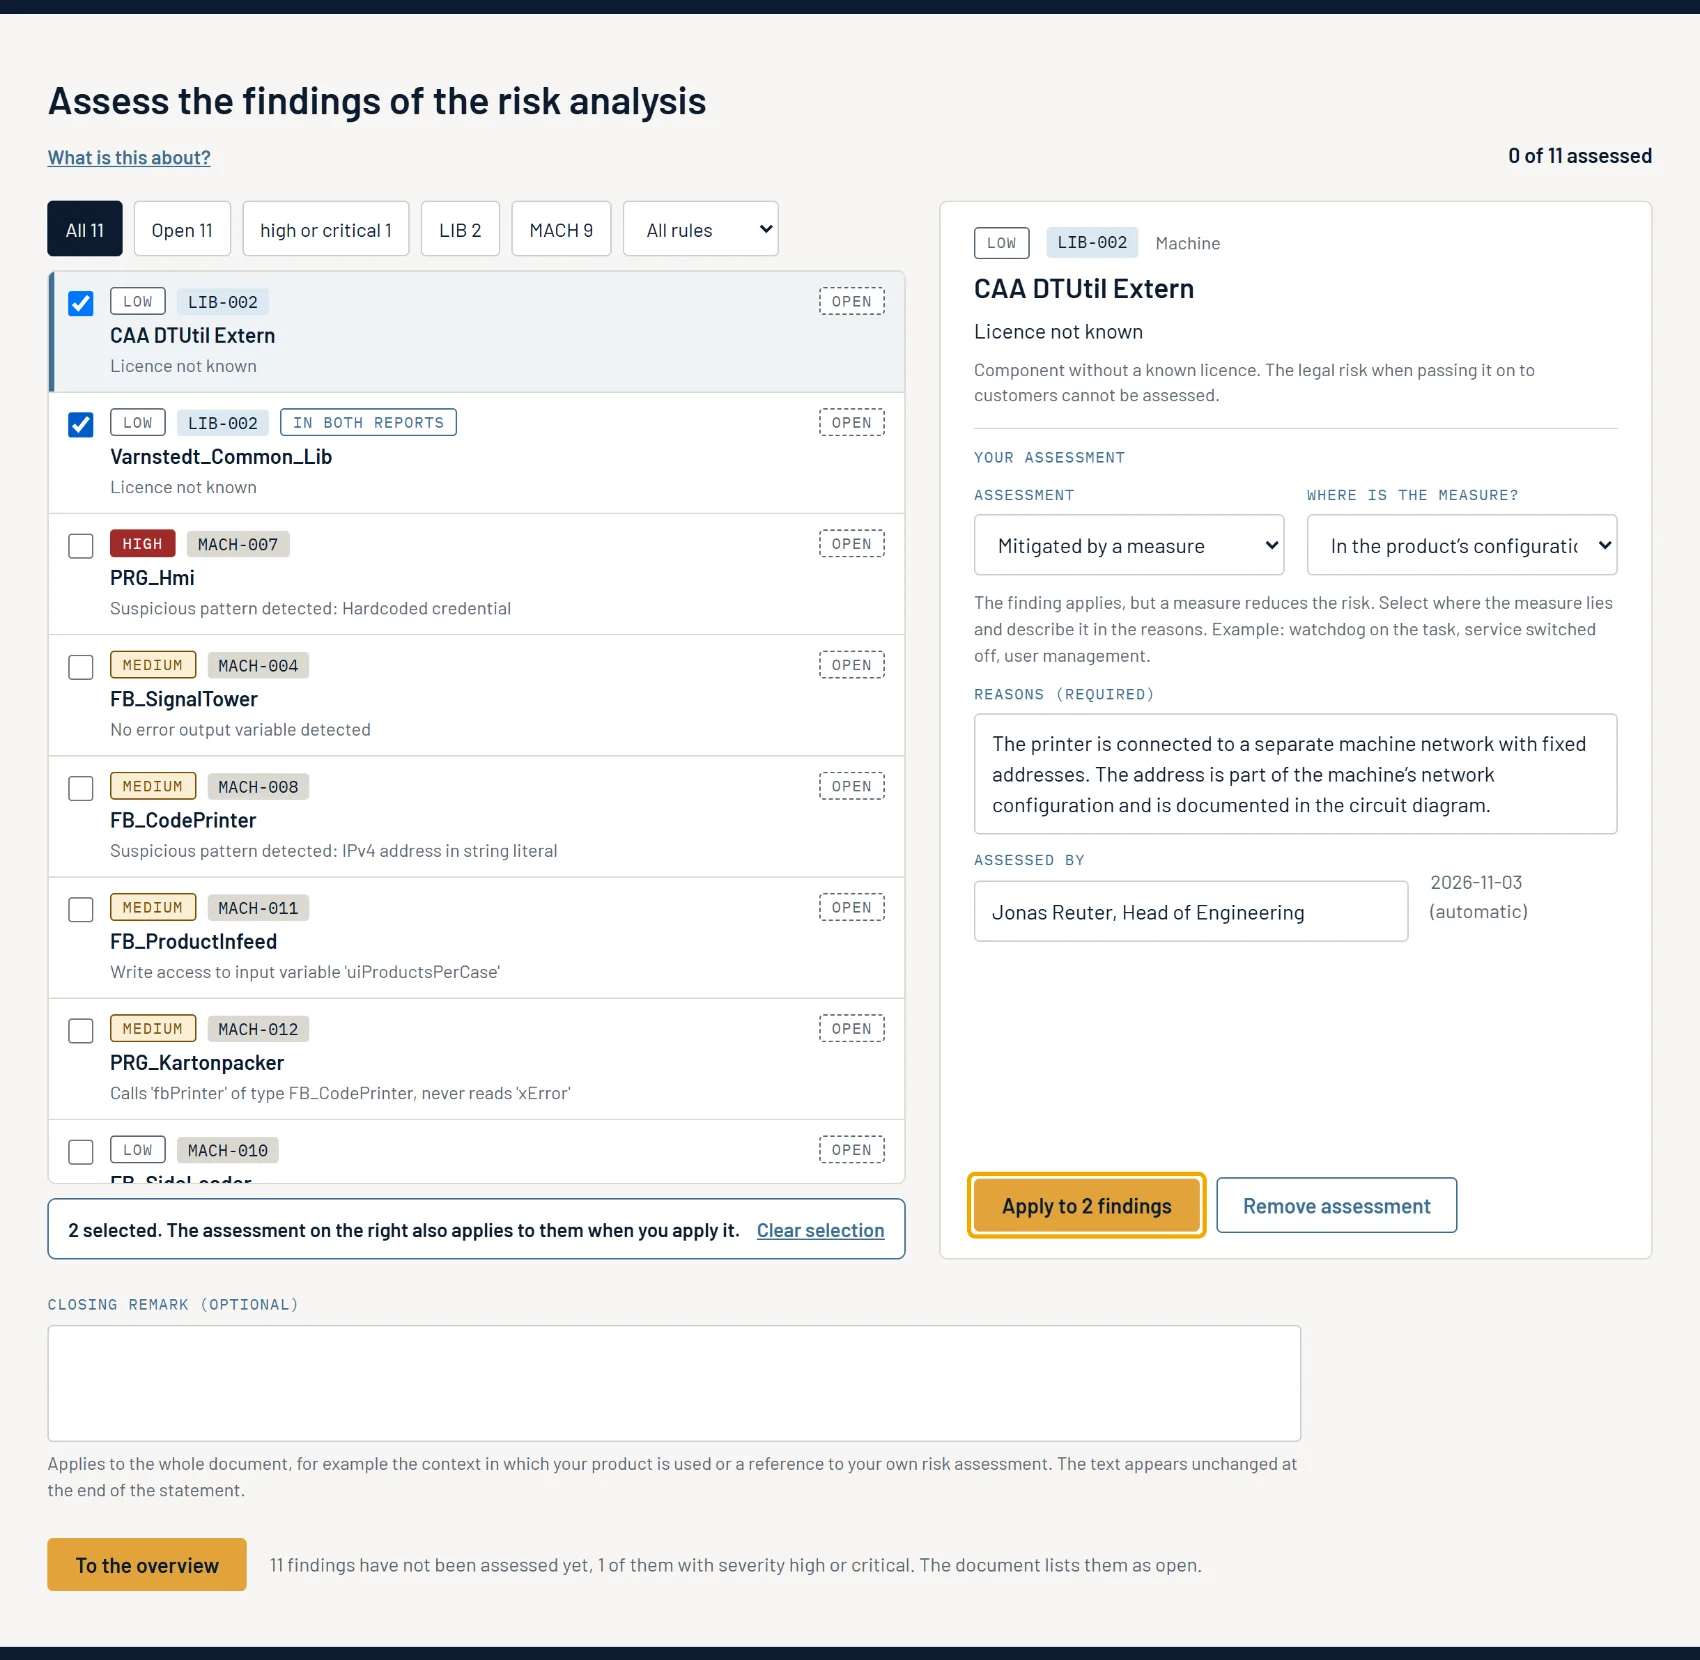
On the left is the list of findings with severity, rule and status. Filters: “All”, “Open”, “high or critical”, the rule families and “All rules”. Click a finding; on the right it is shown in detail with the form “Your assessment”: select an “Assessment”, a second field depending on the selection, “Reasons (required)” and “Assessed by” (name, function). The wizard sets the date. “Apply” saves the assessment in the run, “Remove assessment” deletes it.
You assess identical situations together: tick the findings in the list; the button is then called “Apply to 2 findings”. Or choose “Take over the assessment of another finding” as a suggestion. “What is this about?” opens the content, practice notes and legal basis for this step. At the bottom is the field “Closing remark (optional)” for the whole document. You do not have to assess all findings; whatever remains open is shown as open in the document.
Questions on the declaration
Under Annex V your declaration has eight mandatory items; the questions fill them in order.
| Point | Short name | Content |
|---|---|---|
| 1 | product | name, type, information enabling unique identification |
| 2 | manufacturer | name and address of the manufacturer or authorised representative |
| 3 | responsibility | statement of sole responsibility |
| 4 | object | object of the declaration, traceability |
| 5 | statement of conformity | conformity with the relevant Union harmonisation legislation |
| 6 | standards and specifications | harmonised standards, common specifications, certification applied |
| 7 | notified body | where applicable, body, procedure, certificate |
| 8 | additional information and signature | additional information; place, date, name, function, signature |
You work through part 2 like the questionnaire in chapters 4 and 5. Pre-filled values show their origin (chapter 5). The last question shows which sections differ from the text module and offers “Review and replace sections (optional)”. If you change text after that, confirm the overview again. After the last question, “Questionnaire complete” appears with “To the overview”. An abort states the reason; part 1 is not affected.
If the risk analysis reports vulnerability matches with severity “high” or “critical”, the wizard points this out before the declaration. Assess these matches in your risk assessment before you sign the declaration.
Declaration package
Under “Declaration package (CRA-DOC) · content as of now”, the overview shows for each part “goes into the package” or “still missing”. “Create package” is available as soon as a finding is assessed or the declaration is completed. The browser downloads …_CRA-DOC_EN.zip, after which “Package created: …” is shown. It contains: the declaration of conformity as PDF with a signature line, the cover sheet of the declaration with your next tasks, the statement on the findings as PDF and JSON, your progress file and the checksums. The package is created on your computer and does not go to DDAS.
Signing
Only the signed declaration is legally binding. Sign the PDF by hand and scan it, or sign it with a qualified electronic signature. The cover sheet lists the further tasks, such as CE marking, publication and further languages.
12. Common messages
The messages are quoted verbatim. The wizard fills in the placeholders in curly brackets.
Access code
| Message | Cause | Remedy |
|---|---|---|
| “This code was not found. Please check your entry or contact DDAS.” | code incomplete, copied incorrectly, or blocked | copy the code again in full from the license confirmation; otherwise [email protected] |
| “This access code expired on {datum}. Please request a new one from DDAS: [email protected]. Files you have already downloaded remain usable.” | expiry date of the code passed | request a new code; keep using progress files and packages |
| “The access code could not be checked right now. Please try again shortly.” | connection to the server disrupted | try again later |
Loading progress and paper
| Message | Cause | Remedy |
|---|---|---|
| “This file could not be read as a saved progress file. Please check your selection.” | not a progress file, no matching ZIP | choose the file from “Save progress” or the Classification Paper ZIP |
| “This file is a progress file of the declaration of conformity. Load it in the CRA DoC Wizard; a progress file of the Classification Paper is expected here.” | DoC progress file loaded in the Classification Wizard | “Leave wizard”, then “Open the DoC Wizard” under “Access confirmed” |
| “The checksum of the progress file inside the ZIP does not match its manifest — the ZIP was modified after download. …” | ZIP modified or repacked afterwards | use the unmodified ZIP or the .json |
| “This progress file belongs to the "Library package" profile. Your access code does not include that profile. …” | code without the library package booked | ask DDAS: [email protected] |
| “This file was created with a different catalog version of the wizard. …” | file from an older version of the wizard | chapter 6, “Different catalogue version” |
| “The file could not be read. Expected is the ZIP of a Classification Paper or a saved progress file of the declaration.” (DoC Wizard) | wrong file | choose the paper ZIP, the data package or a DoC progress file |
Logo
| Message | Cause | Remedy |
|---|---|---|
| “The file is neither PNG nor JPEG. SVG and other formats are not accepted.” | wrong format | export as PNG or JPEG |
| “The file is larger than 1 MB.” | file too large | save it smaller |
| “The image is only {w} px wide. A clean print needs at least 600 px.” | resolution too low | use a larger version |
PLC project ZIP
| Message | Cause | Remedy |
|---|---|---|
| “The file could not be read as a ZIP: …” with the reason (not a ZIP archive, larger than 4 GB, incomplete) | not a ZIP file, too large or damaged | repack as a normal ZIP, chapter 8 |
| “Unknown top-level entries: {names}. Only the folders Original/, Package/, Libraries/ and MachineProject/ are allowed.” | further files or folders at the top level | pack only the permitted folders |
| “The boot application (.app) in the Original/ folder is missing.” | boot application missing | create it in CODESYS and put it in Original/ |
| “The machine project export (.export) in the MachineProject/ folder is missing.” | export missing | Project → Export…, all objects |
| “The project archive (.projectarchive) in the MachineProject/ folder is missing. …” (notice, does not block) | project archive missing | create the archive as in chapter 8 and repack |
| “With “Without source code” the PLC project may contain only the folder Original/. …” | review depth “Without source code”, ZIP with other folders | pack only Original/ (chapter 8, “Without source code”) |
| “With “Without source code” the ZIP may not contain files with source code: {files}. …” | .project, .projectarchive, .library, .export or .xml in the ZIP | remove these files and repack |
| “The file is not a readable project archive or contains no libraries. …” | wrong file or archive without libraries | save the archive again with “Referenced libraries” and “Referenced devices” |
| “The project archive and the delivered software do not match: {list}. …” | archive from a different project state than the boot application | save the archive again from the same state |
| “The Libraries/ folder contains a .library file ({names}). …” | library as source instead of an export | export it in CODESYS as .export |
| “Encrypted entry: {name}” | ZIP with a password | repack without a password |
| “The ZIP contains no files.” | empty ZIP | pack folders with content |
| “For the "Library package" profile a .package file in the Package/ folder is missing.” | package missing | put the .package in Package/ |
| “The ZIP contains a .package file, but the chosen profile is a machine program. …” (notice) | profile does not match the content | check the profile |
Follow-up run and checksum
| Message | Cause | Remedy |
|---|---|---|
| “The handover package could not be confirmed as an unchanged delivery from DDAS: … You can continue without it.” with the reason | file modified, not a handover from DDAS, or wrong file | load the unmodified …_CRA-DELIVERY_…zip; otherwise ask DDAS |
| “The file is not a statement from the DoC Wizard. You can continue without it.” | wrong file | choose …_FindingStatements.json or the declaration package |
| “DDAS did not accept the report.”, “The security check failed.”, “No further reports are possible for this order today.”, “Reporting is not possible at the moment.”, each with “Please send the checksum to DDAS by e-mail.” | completion report failed | send the checksum by e-mail |
Handover package in the DoC Wizard
Each of these messages is followed by: “Please request the handover from DDAS again. You can also continue without it; the cover sheet then carries no evidence of the check.”
| Message | Cause | Remedy |
|---|---|---|
| “The file is not a readable ZIP.” | wrong or damaged file | load the handover package again |
| “The signature does not match the manifest: the delivery was changed or does not come from DDAS.” | package modified | use the unmodified delivery or request it again |
| “A file of the delivery is missing or was changed (checksum does not match the manifest).” | package unpacked and repacked, file missing | use the original ZIP |
| “The signature was made with a key this wizard does not know. …” | outdated version of the wizard or unknown key | reload the page; otherwise ask DDAS |
| “The handover does not state the booked package. …” | handover from an older version | request a new handover |
| “The handover belongs to "{h}", your Classification Paper to "{p}". …” | paper and handover belong to different products or versions | load the right files or “Continue anyway” |
| “The Classification Paper states version {p}, the analysed software carries version {f}. …” | versions differ | check the version in the declaration |
Overview and findings
| Message | Cause | Remedy |
|---|---|---|
| “Upload the handover package from DDAS to assess the findings.” | no handover package loaded | “Upload handover package” |
| “This handover package contains no list of findings. …” | handover from an older version | request a new handover |
| “The declaration of conformity belongs to the option “Classification & declaration of conformity”. It is not booked for this handover package. …” | basic package booked | book the option in addition: [email protected] |
| “The package is available once a finding is assessed or the declaration is completed.” | nothing finished yet | complete one part |
| “Please give reasons for the assessment.”, “Please state name and function.” | required field of the assessment empty | fill in the field, then “Apply” |
Questionnaire and your own texts
| Message | Cause | Remedy | |
|---|---|---|---|
| “The question could not be loaded. Please try again shortly.” | connection disrupted | save progress, try again later | |
| “A row without its required fields cannot be confirmed — fill it in or remove it.” | table row incomplete | fill it in or “Remove row” | |
| “The address must start with https://.” | address without https:// | enter the full address | |
| “The text contains an unresolved placeholder ("{{…}}").” | placeholders from the template text left in place | replace them with your details | |
| “The text must not start with #, \ | , > or a list marker ("- ", "1. ").” | formatting character at the start | start the text with a word |
13. Data protection and confidentiality in brief
- In the browser: Both wizards work on your computer. Answers, the checks of the PLC ZIP and of the handover package, the paper, the data package and the declaration package are all created in the browser. The wizard stores nothing in the browser; only what you download yourself is saved.
- Goes to DDAS: the data package, which you send yourself, and the checksum. With “Send checksum to DDAS”, only the order number, an identifier of your access code, and the file name, size and checksum of the package are sent; when you click, a security check against automated access is also loaded; details are given in our privacy policy.
- Does not go to DDAS: the declaration package with the declaration, the cover sheet and the statement.
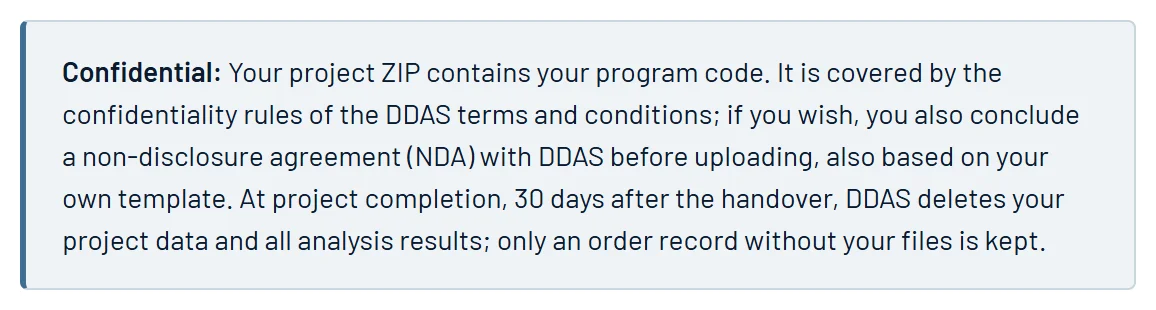
- Confidentiality: Your project data is covered by the confidentiality rules of the DDAS terms and conditions. If you wish, you also conclude a non-disclosure agreement (NDA) with DDAS before uploading. You can also propose your own template for it; DDAS reviews it case by case.
- Deletion period: At project completion, 30 days after the handover, DDAS deletes your project data and all analysis results; only an order record without your files remains. So keep the handover package and the declaration package yourself.
14. Found an error or have a suggestion?
If something in this manual or in the help at a question is not correct, or if you have a suggestion how we can make something clearer, please write to [email protected]. Please include:
- the wizard, its version and the CRA package (shown at the bottom in the footer, e.g. “v0.9.0 · CRA Package 2026.1”),
- the place: the chapter of this manual or the question where you noticed it,
- what is wrong or what you suggest.
We review every message and update the manual and the help accordingly.
15. Versions and release notes
Current state: CRA Package 2026.1
The two wizards and the tool with which DDAS analyses your data package together form the CRA package. It carries a package number by year. It is shown at the bottom in the footer and in the “Tool” line of every document you receive from us or from the wizards. The versions of the individual tools continue to count alongside it.
How to read the package number:
- 2026.1, 2026.2 …: a new release in which results may change, for example through new or changed check rules, text modules or questions. In a new year the count starts again at 1.
- 2026.1.1, 2026.1.2 …: corrections that change neither the classification nor the findings.
- “not compatible”: if a release carries this note, older saved states, data packages or handover packages no longer fit it.
A new vulnerability database is not a release; the check always uses the current state.
CRA Package 2026.1 (November 2026)
Versions: CRA Classification Wizard and CRA DoC Wizard 0.9.0 · CRA-AnalyseTool 0.7.0 · Catalogues: Classification Paper 2026-11-04.1, EU declaration of conformity 2026-11-04.1, statement 2026-11-05.1
First release of the CRA Compliance Service. It comprises:
- the CRA Classification Wizard with the Classification Paper and the data package for DDAS,
- the analysis by DDAS with SBOM (CycloneDX and SPDX, signed), risk assessments, check report and cover sheet in the handover package; as an exception for projects whose source code must not leave the company, the review depth “Without source code”,
- the CRA DoC Wizard with the statement on the findings, the EU declaration of conformity and its cover sheet, optionally as a dossier with existing declarations or with a simplified declaration,
- follow-up run and correction run with change record.
For wizard 0.17.3 · CRA Package 2026.1. Questions about using the wizards, errors or suggestions for this manual: Helpdesk